Table of Contents
Advertisement
Advertisement
Table of Contents

Subscribe to Our Youtube Channel
Related Manuals for Nexx X-COM2


Summary of Contents for Nexx X-COM2
- Page 1 Motorcycle Bluetooth ® Communication System User’s Guide www.nexx-helmets.com...
-
Page 2: Table Of Contents
13 INTERCOM PAIRING .................... 28 5.5 Pairing with the Sena SR10, Bluetooth Two-way Radio Adapter .........16 13.1 Pairing with Other X-COM2 Headsets for Intercom Conversation ........28 PAIRING WITH SELECTIVE PROFILE: A2DP STEREO OR HANDSFREE ..18 13.2 Pairing with Other Sena Headset Models for Intercom Conversation .........29 6.1 A2DP Stereo Music Only .......................18... - Page 3 X-COM2 17 UNIVERSAL INTERCOM ..................35 24 RESET TO FACTORY DEFAULT SETTINGS ............46 17.1 Universal Intercom Pairing ....................35 25 FAULT RESET ....................... 46 17.2 Two-way Universal Intercom ....................35 17.3 Three-way Universal Intercom ....................36 26 FIRMWARE UPGRADE ..................47 17.4 Four-way Universal Intercom ....................37 27 OPERATION QUICK REFERENCE ..............
-
Page 4: Safety Precautions
X-COM2 • When relevant, follow all regulations regarding the use of the camera. Safety Precautions (1) Do not use your camera in an aircraft, unless permitted. (2) Turn off the camera when you are near medical equipment. Your camera can cause interference with medical devices in hospital or healthcare facilities. - Page 5 X-COM2 Battery CAUTION Your product has a built-in battery. Be careful to heed all safety information in this guide. • If the product emits an unusual smell, feels hot, or appears abnormal in any other way Failure to carefully observe the safety precautions can cause battery heat generation, while using or charging, stop using it immediately.
- Page 6 X-COM2 Product Storage and Management • Do not store the camera in proximity to magnetic fields. Doing so may result in camera malfunction. Take the following precautions to avoid personal injury or damage to your product while • Be careful to protect the lens by avoiding rough handling or physical shock. storing and maintaining the product.
-
Page 7: Introduction
• Audio Multitasking™ Thank you for choosing the NEXX X-COM2, Motorcycle Bluetooth • Multi-way intercom up to 8 connections Communication System. With the X-COM2, you can call handsfree on your Bluetooth mobile phone, listen to stereo music or voice instructions • Group Intercom™... -
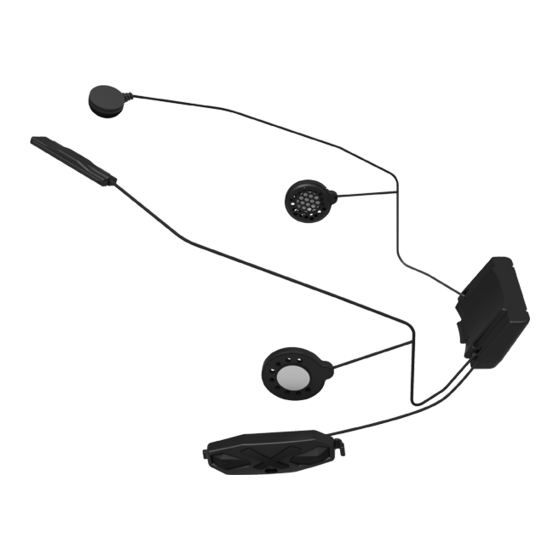
Page 8: Package Contents
X-COM2 2 PACKAGE CONTENTS 3 INSTALLING THE X-COM2 ON YOUR HELMET • Headset Main Unit To securely install the X-COM2 on the helmet, please follow this procedure. 1. Lift the face cover completely. 2. Remove the inner parts from the helmet. • Hook and Loop Fasteners for Speakers (2) • Hook and Loop Fastener for Wired Microphone 3. - Page 9 X-COM2 7. Remove the cover that protects the cavity for the main unit. Battery 8. Place the main unit in the prepared cavity. 5. Place Headset Connection in a position where it can be connected to the main unit. Place the antenna on the front of the helmet as shown.
-
Page 10: Getting Started
X-COM2 4.2 Powering On and Off 4 GETTING STARTED When powering on the headset, press the Center Button and the (+) Button at the same time for 1 second. When powering off the headset, tap the Center Button and the (+) Button at the same time until the red 4.1 Product Details... -
Page 11: Low Battery Warning
• The X-COM2 is compatible with 5 V input USB-charged devices only. 4 flashes = High, 70~100% • Any 3rd party USB charger can be used with Nexx products if the 3 flashes = Medium, 30~70% charger is approved by either the FCC, CE, IC or other locally approved agencies that Nexx accepts. -
Page 12: Volume Adjustment
Simply pair your phone with your X-COM2 headset, run the Smartphone Bluetooth MP3 music. So you can always maintain the preferred App and you can configure its settings directly from your smartphone. -
Page 13: Pairing The X-Com2 With Bluetooth Devices
5. The mobile phone confirms that pairing has been completed and within range. You will hear high-toned double beeps and a voice the X-COM2 is ready to use. You will hear a voice prompt from the prompt when the headset connects to the paired device automatically: X-COM2 saying “Your headset is paired”. -
Page 14: Second Mobile Phone Pairing
PIN. procedure in section 5.1, “Mobile Phone Pairing” . 5. The mobile phone confirms that pairing has completed and the X-COM2 is ready to use. You will hear a voice prompt from the Note: X-COM2 saying “Your headset is paired”. -
Page 15: Bluetooth Gps Navigation Pairing
A2DP You will hear the voice prompt, “GPS pairing”. 3. Search for Bluetooth devices on the GPS navigation screen. Select the X-COM2 in the list of the devices detected on the GPS. 4. Enter 0000 for the PIN. GPS Pairing 5. -
Page 16: Pairing With The Sena Sr10, Bluetooth Two-Way Radio Adapter
Bluetooth, you can pair the mobile phone to the 5.5 Pairing with the Sena SR10, Bluetooth Two-way GPS to use your mobile phone. When you do this, the X-COM2 thinks Radio Adapter the GPS is a mobile phone so you can no longer pair your mobile phone to the X-COM2 directly. - Page 17 4. When the pairing is completed, you will hear a voice prompt saying “Your headset is paired”. 5. If the pairing process is not completed within three minutes, the X-COM2 will return to stand-by mode. The incoming audio from the two-way radio via SR10 is heard in the Two-way Radio...
-
Page 18: Pairing With Selective Profile: A2Dp Stereo Or Handsfree
HFP for phone calls. 6.2 HFP for Phone Call Only If you have previously paired a mobile phone to the X-COM2, you must clear the previous paring list on both devices; the mobile phone and 1. Turn on the headset and press the Center Button for 12 seconds X-COM2. -
Page 19: Mobile Phone Call Making And Answering
X-COM2 Note: 7 MOBILE PHONE CALL MAKING AND 1. If you are using second mobile phone connection and you have an ANSWERING incoming call from the second phone during the call of the first phone, then you may still receive the call from second phone. In this case, the call from the first phone is on waiting mode. -
Page 20: Vox Phone (Default: Enable)
Center Button. If any button is not pressed within 15 the Smartphone App. If this feature is enabled, you can answer seconds, the X-COM2 will exit the voice speed dial menu and go incoming calls by simply saying a word loudly enough, unless you are back to stand-by mode. -
Page 21: Stereo Music
8.1 By Bluetooth Wireless Stereo 2. To track forward or track back, press and hold the (+) Button or The Bluetooth audio device must be paired with the X-COM2 by the (-) Button for 1 second. following the “Bluetooth Stereo Device Pairing” procedures described 3. -
Page 22: Smart Volume Control (Default: Disable)
Manager or the Smartphone App. Enabling Smart Volume Control automatically changes the level of the speaker volume based on the If you pair a Bluetooth GPS to the X-COM2 as described in section 5.4, level of the environment noise. You can enable it by setting the “Bluetooth GPS Navigation Pairing”... -
Page 23: Sena Sr10, Two-Way Radio Adapter
10 SENA SR10, TWO-WAY RADIO ADAPTER As described in section 5.5 , you can use a two-way radio and the Smart Phone X-COM2 Bluetooth intercom simultaneously by using the Sena SR10, a Two-way Radio Bluetooth Two-way Radio Adapter, along with the X-COM2. Incoming... -
Page 24: Fm Radio
1. You can save FM stations to presets before using FM radio. Connect the “Seek” is the function that searches for station to station frequencies. X-COM2 to your PC and open the Device Manager. It allows you to save To use the “Seek” function, please follow the procedure below: up to 10 FM station frequency presets on the X-COM2 settings menu. -
Page 25: Scan And Save
X-COM2 11.4 Scan and Save 11.5 Temporary Preset "Scan" is the function that automatically searches station frequencies, With the temporary preset function, you may temporarily preset starting from the current frequency and up. To use the scan function, stations automatically without changing the existing preset stations. -
Page 26: Rds Af Setting (Default: Disable)
Smartphone App. RDS AF allows a receiver to re-tune to the second frequency location when the first signal becomes too weak. The voice command of the X-COM2 allows you to operate certain With RDS AF enabled on the receiver, a radio station with more than operations by simply using your voice. -
Page 27: Voice Command Setting (Default: Enable)
X-COM2 Mode Status Function Voice Command Mode Status Function Voice Command “Intercom Next track (music) / next Start/End each intercom “Next” [one, two, … , nine]” preset (FM radio) End all intercoms Music / FM Radio Previous track (music) / “End intercom”... -
Page 28: Intercom Pairing
Conversation The X-COM2 can be paired with up to nine other headsets for Bluetooth intercom conversation. 1. Turn on the two X-COM2 headsets (A and B) that you would like Pairing A & B to pair with each other. 2. Press and hold the Center Button of two Bluetooth systems for 8 4. -
Page 29: Pairing With Other Sena Headset Models For Intercom Conversation
Intercom Conversation second to end any intercom, or use the voice command, “End The X-COM2 can be paired with all other Sena headset models such intercom”. Or, you can single tap to end intercom with the first as the SMH10 and the SMH5 for an intercom conversation. Please intercom friend and double tap to end intercom with the second follow the same procedure as above to pair with these headset models. -
Page 30: Multi-Way Intercom
14.2 Multi-way Intercom may start an intercom call with you (A). 14.2.1 Start Three-way Intercom You (A) can have a three-way intercom with two other X-COM2 friends (B & C) by establishing two intercom connections at the same time. First Friend... - Page 31 For example, by single tapping the Center Button, you can just terminate the intercom connection with the first intercom friend 4. Now you (A) and two X-COM2 intercom friends (B & C) are having (B). However, you still have the intercom connection with your a three-way intercom.
- Page 32 (D) can be added to either (B)-the head, or (C)-the tail. If You can have multi-way intercom with up to seven other X-COM2 users (D) were added to (C), then (D) becomes the new tail of the chain. If by creating an intercom chain.
- Page 33 X-COM2 14.2.4 End Multi-way Intercom You can completely get out of the multi-way intercom or just disconnect a part of the chain. 1. Press the Center Button for 5 seconds until you hear double beeps to terminate multi-way intercom. It terminates the intercom connections between you (A), and all participants in the chain.
-
Page 34: Three-Way Conference Phone Call With Intercom Participant
3. Check your friends and press ‘Save to My X-COM2’ on the screen. by tapping the Center Button. To end the mobile phone call first and maintain the intercom conversation, press the Center Button for 2 4. -
Page 35: Universal Intercom
Center Button to begin an intercom conversation with Sena Bluetooth headset, the previous pairing list will be removed. the first intercom friend, double tap with the second intercom friend, 1. Turn on the X-COM2 and a non-Sena Bluetooth headset that you and triple tap with the third intercom friend. want to pair with. -
Page 36: Three-Way Universal Intercom
X-COM2 17.3 Three-way Universal Intercom 3. The other X-COM2 (C) may join the intercom by making an intercom call to you (A). You may make a three-way Universal Intercom connection with two X-COM2s and one non-Sena Bluetooth headset. 1. You (A) need to be paired with a non-Sena Bluetooth headset (B) and another X-COM2 headset (C) for the three-way intercom. -
Page 37: Four-Way Universal Intercom
X-COM2 17.4 Four-way Universal Intercom 2. The other X-COM2 (C) may join the intercom by making an intercom call to you (A). You may make a four-way Universal Intercom connection with a couple of different configurations, 1) three X-COM2s and one non-Sena Bluetooth headset or 2) two X-COM2s and two non-Sena Bluetooth headsets. -
Page 38: Additional Intercom Settings
X-COM2 4. Now two X-COM2 headsets (A & C) and two non-Sena Bluetooth 18 ADDITIONAL INTERCOM SETTINGS headsets (B & D) are connected with the four-way Universal Intercom. 18.1 Audio Multitasking™ (Default: Enable) You can enable or disable Audio Multitasking through the Device Manager or the Smartphone App. -
Page 39: Audio Overlay Volume Management (Default: Disable)
Note: You can enable or disable HD Intercom through the Device Manager If you use your X-COM2 with the Bluetooth Audio Pack for GoPro, you can or the Smartphone App. HD Intercom enhances the two-way intercom enable or disable this feature only during Normal Voice Recording. This audio from normal quality to HD quality. -
Page 40: Remote Control
X-COM2 19 REMOTE CONTROL 20 FUNCTION PRIORITY You can remotely control the X-COM2 via Bluetooth using the Remote The X-COM2 operates in the following order of priority: Control (sold separately). This eliminates the need to take off your (highest) Mobile phone hand for button operations. -
Page 41: Voice Prompt
X-COM2 21 VOICE PROMPT 22 SIDETONE Voice Prompt is enabled by default. You can disable voice prompts Sidetone is disabled by default. You can enable or disable Sidetone through the Device Manager or the Smartphone App, but the following through the Device Manager or the Smartphone App. Sidetone is the voice prompts are always on. -
Page 42: Configuration Setting
GPS pairing the Center Button, or disable the feature by tapping the Center Phone selective pairing Button. (-) Button 4. If any button is not pressed within 10 seconds, the X-COM2 will Media selective pairing exit the configuration and go back to stand-by. Delete all pairings 5. If you want to exit the configuration immediately, tap the (-) Button and you will hear a voice prompt, “Exit configuration”, and tap... -
Page 43: Phone Pairing
X-COM2 23.1 Phone Pairing 23.3 GPS Pairing Voice Prompt "Phone pairing" Voice Prompt “GPS pairing” Factory Default Factory Default To go into mobile phone pairing mode, tap the (+) Button or the (-) To go into GPS pairing mode, tap the (+) Button or the (-) Button until Button until you hear the voice prompt, “Phone pairing”. -
Page 44: Media Selective Pairing
Execute Tap the Center Button To delete all Bluetooth pairing information of the X-COM2, tap the (+) To enter into Universal Intercom Pairing mode, tap the (+) Button or the Button or the (-) Button until you hear a voice prompt, “Delete all (-) Button until you hear a voice prompt, “Universal intercom pairing”. -
Page 45: Factory Reset
Tap the Center Button GPS Pairing None None Phone Selective Pairing To restore factory default settings on the X-COM2, tap the (+) Button or the (-) Button until you hear a voice prompt, “Factory reset”, and None Media Selective Pairing tap the Center Button to confirm. The X-COM2 powers off with a voice... -
Page 46: Reset To Factory Default Settings
25 FAULT RESET 1. To restore the X-COM2 to factory default settings, press the Center When the X-COM2 is not working properly or is in faulty status for any reason, you may reset by pushing the pin-hole reset button located Button for 12 seconds until you hear high-toned double beeps. -
Page 47: Firmware Upgrade
X-COM2 26 FIRMWARE UPGRADE 27 OPERATION QUICK REFERENCE The X-COM2 supports firmware upgrade function. Please visit Type Operation Button Command Beep Bluetooth web site at oem.sena.com/nexx/ to check the latest Press the (+) Button and the Ascending software downloads. Power on... -
Page 48: Certification And Safety Approvals
X-COM2 CERTIFICATION AND SAFETY APPROVALS Type Operation Button Command Beep Press the Center Button for FCC Compliance Statement Play/Pause music 1 second This device complies with part 15 of the FCC rules. Operation is Press the (+) Button for Music... -
Page 49: Fcc Rf Exposure Statement
This device can be operated in at least one Member State without distance of 10 mm is 0.76 W/Kg. This transmitter must not be collocated infringing applicable requirements on the use of radio spectrum. or operating in conjunction with any other antenna or transmitter. Product: X-COM2 This product is compliance to FCC RF Exposure requirements and Model: SP65 refers website https://apps.fcc.gov/oetcf/eas/reports/... -
Page 50: Industry Canada Rf Exposure Statement
X-COM2 Bluetooth License (1) This device may not cause interference. The Bluetooth ® word mark and logos are owned by the Bluetooth SIG, (2) This device must accept any interference, including interference Inc. and any use of such marks by Sena is under license. Other that may cause undesired operation of the device. -
Page 51: Product Warranty And Disclaimer
Use of this product will constitute consent to warranty. Here, product warranty extends to the product only. NEXX this agreement, and forfeiture of rights to all claims. If you do not will not be liable for any loss, damage of human life, or loss of property... - Page 52 NEXX and Sena (collectively referred to In addition, usage of the product constitutes acceptance of all as “the company”) recommend that, before using the product terms and conditions regarding waiver of rights.
-
Page 53: Warranty Exclusions
LOSS ARISING OUT OF OR IN CONNECTION WITH THE SALE, that may have occurred while you use the product. Further, NEXX will INSTALLATION, MAINTENANCE, USE, PERFORMANCE, FAILURE, OR not be liable for any substantial damage not related to the condition, INTERRUPTION OF ITS PRODUCTS, EVEN IF NEXX OR ITS environment, or malfunction of the product. -
Page 54: Warranty Service
In addition to damages which may occur due to the use of the product, To obtain product warranty service, send the defective product, at NEXX will not be liable for damages of the product which occur due to your expense, to the manufacturer or the seller along with proof of the following events. - Page 55 1.0.0 www.nexx-helmets.com User’s Guide for Firmware v1.0...
Need help?
Do you have a question about the X-COM2 and is the answer not in the manual?
Questions and answers