
Related Manuals for Insignia NS-BC1ZSS9


Summary of Contents for Insignia NS-BC1ZSS9
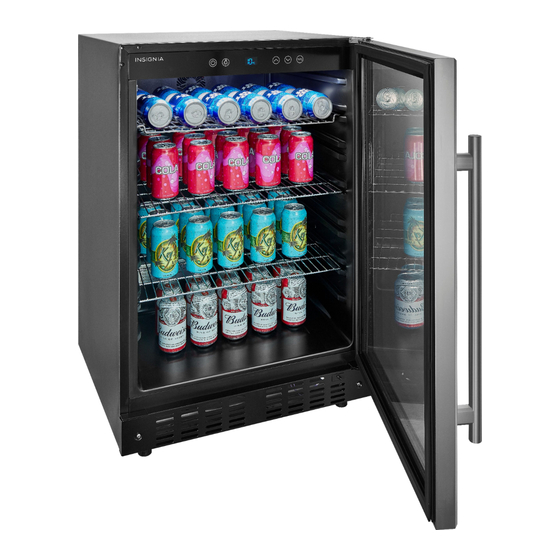
- Page 1 USER GUIDE 165-Can Beverage Cooler NS-BC1ZSS9 Before using your new product, please read these instructions to prevent any damage.
-
Page 2: Table Of Contents
Contents Introduction ............3 IMPORTANT SAFETY INSTRUCTIONS . -
Page 3: Introduction
165-Can Beverage Cooler Introduction Congratulations on your purchase of a high-quality Insignia product. Your NS-BC1ZSS9 represents the state of the art in beverage cooler design and is designed for reliable and trouble-free performance. IMPORTANT SAFETY INSTRUCTIONS CAUTION RISK OF ELECTRIC SHOCK... - Page 4 NS-BC1ZSS9 Unplug this appliance during lightning storms or when it will not be used for long periods of time. Make sure that the available AC power matches the voltage requirements of this appliance. Do not handle the plug with wet hands. This could result in an electric shock.
- Page 5 165-Can Beverage Cooler This appliance is not intended for use by persons (including children) with reduced physical, sensory, or mental capabilities, or lack of experience and knowledge, unless they have been given supervision or instruction concerning use of the appliance by a person responsible for their safety. Children should be supervised to ensure that they do not play with the appliance.
-
Page 6: Features
NS-BC1ZSS9 Features • 165-can capacity • Temperature range from 34° to 50°F (1° to 10°C) • Auto-defrosting fan to eliminate ice and condensation build-up • Touch controls and LED display • Interior light • Reversible door • Removable shelves Package contents •... -
Page 7: Control And Display Panel
165-Can Beverage Cooler Control and display panel Light Display Raise Temperature Standby Lower temperature Change temperature unit (°F/°C) BUTTON FUNCTION Hold for five seconds to set your cooler to “Standby” mode (the cooler stops cooling and light turns off ). Press to set whether the interior light stays on or off while the door is closed. -
Page 8: Leveling Your Cooler
NS-BC1ZSS9 • If the cooler is not properly ventilated, the compressor will use more power. Make sure that you leave space on all sides: • Top: .2 in. (.5 cm) • Sides: .2 in. (.5 cm) • Back: .8 in. (2.0 cm) 23.4 in. -
Page 9: Installing The Handle
165-Can Beverage Cooler Installing the handle Align the handle with the two bolts on the glass door. Handle Secure the handle with the 3 mm hex wrench (included), making sure that the screw holes on the handle are facing downward. Screw hole facing downward Hex wrench Reversing the door... - Page 10 NS-BC1ZSS9 Remove the upper hinge bolt (1) and lift the door off the cooler. To reverse the cooler’s hinges: A Remove the three screws (2) securing the upper hinge (3) and the three plastic caps (4) at the top left side of the cooler. Set the upper hinge aside and save it in case you need to reverse the door again.
- Page 11 165-Can Beverage Cooler B Install the upper hinge from the included accessories bag (3) to the opposite side, then insert the plastic caps (4) into the old screw holes. Note: The left upper hinge and right upper hinge are not the same. Make sure that you install the extra hinge that was included with your refrigerator.
- Page 12 NS-BC1ZSS9 D Remove the two screws (8) securing the door support (9), the three screws (10) securing the lower hinge (11), and the lower hinge shaft (12). E Reinstall the door support (9) and lower hinge (11) on the opposite sides, then place the lower hinge shaft (12) back into the lower hinge.
- Page 13 165-Can Beverage Cooler F Secure the air cover (7) to the refrigerator with the screws (5). To prepare the cooler door: A Remove the upper sleeve (2) from the top of the door. www.insigniaproducts.com...
- Page 14 NS-BC1ZSS9 B Remove the light switch block (4) and door stopper (5) from the bottom of the door by removing the corresponding screws (3) and sleeve (6). C Rotate the door 180°. D Insert the upper sleeve (2) into the top of the door.
- Page 15 165-Can Beverage Cooler E Secure the light switch block (4) and door stopper (5) to the bottom of the door with their corresponding screws (3) and sleeve (6). Note: Make sure that these parts are installed on the side WITHOUT the handle.
-
Page 16: Connecting To Power
NS-BC1ZSS9 Connecting to power • Plug the cooler into a dedicated, properly installed grounded wall outlet. This appliance should be operated on a separate electrical circuit from other operating appliances. CAUTION: This unit is not designed to be installed in an RV or used with an inverter. -
Page 17: Using Your Beverage Cooler
165-Can Beverage Cooler Using your beverage cooler Turning on your cooler • Plug your cooler in to turn it on for the first time. The display lights up for three seconds, the cooler beeps, then the compressor starts working. If in standby mode, press and hold (power) for five seconds to turn your cooler on. -
Page 18: Arranging Your Beverages
NS-BC1ZSS9 Arranging your beverages In order to maintain good air circulation in the cooler, do not let the beverages touch the back of the cooler. Due to the air circulation, the temperature in the upper area of the cooler will be higher than in the lower area of the cooler. -
Page 19: Maintaining Your Beverage Cooler
165-Can Beverage Cooler Maintaining your beverage cooler Your cooler is designed for year-round use with only minimal cleaning and maintenance. Before using your cooler for the first time, wipe the cabinet with a mild detergent and warm water, then wipe dry with a dry cloth. Do this periodically to keep your cooler looking new. -
Page 20: Moving Your Beverage Cooler
NS-BC1ZSS9 Moving your beverage cooler Note: Make sure that the cooler stays in the upright position while transporting. Turn off the cooler and unplug it from the wall outlet. Remove all beverages. Securely tape down all loose items inside your cooler. -
Page 21: Problems And Solutions
165-Can Beverage Cooler Problems and solutions PROBLEM SOLUTION The cooler does not • Make sure that the cooler is plugged in and that the plug is operate. pushed completely into the outlet. • Check the house fuse/circuit breaker box and replace the fuse or reset the circuit breaker. -
Page 22: One-Year Limited Warranty
Product is determined to be defective by an authorized Insignia repair center or store personnel, Insignia will (at its sole option): (1) repair the Product with new or rebuilt parts; or (2) replace the Product at no charge with new or rebuilt comparable products or parts. - Page 23 165-Can Beverage Cooler • Connection to an incorrect voltage or power supply • Attempted repair by any person not authorized by Insignia to service the Product • Products sold “as is” or “with all faults” • Consumables, including but not limited to batteries (i.e. AA, AAA, C, etc.) •...
- Page 24 1-877-467-4289 (U.S. and Canada) or 01-800-926-3000 (Mexico) INSIGNIA is a trademark of Best Buy and its affiliated companies. Distributed by Best Buy Purchasing, LLC 7601 Penn Ave South, Richfield, MN 55423 U.S.A. V1 ENGLISH ©2018 Best Buy. All rights reserved.
Need help?
Do you have a question about the NS-BC1ZSS9 and is the answer not in the manual?
Questions and answers