Table of Contents
Advertisement
U S E R ' S G U I D E
5770/5990/6100/6405 SERIES
Safety Instructions
3
4
Product View
5
Assembly
6-9 Operation
10-15 Maintenance and Care
16-17 Troubleshooting
18 Consumer Services
19 Replacement Parts
20 Warranty
ug203-1369_5770_507.indd 1
ug203-1369_5770_507.indd 1
5/31/07 1:15:21 PM
5/31/07 1:15:21 PM
Advertisement
Table of Contents

Related Manuals for Bissell 5770


Summary of Contents for Bissell 5770
-
Page 1: Replacement Parts
U S E R ’ S G U I D E 5770/5990/6100/6405 SERIES Safety Instructions Product View Assembly 6-9 Operation 10-15 Maintenance and Care 16-17 Troubleshooting 18 Consumer Services 19 Replacement Parts 20 Warranty ug203-1369_5770_507.indd 1 ug203-1369_5770_507.indd 1 5/31/07 1:15:21 PM... - Page 2 Consumer Services department, so, should you ever have a question, you’ll receive fast, considerate assistance. My great-grandfather invented the floor sweeper in 1876. Today, BISSELL is a global leader in the design, manufacture, and service of high quality homecare products like your Healthy Home Vacuum.
-
Page 3: Important Safety Instructions
■ Use only on dry, indoor surfaces. ■ Keep appliance on a level surface. ■ Do not carry the vacuum cleaner while it is running. ■ Brush may unexpectedly restart. Unplug from outlet when cleaning or servicing. SAVE THESE INSTRUCTIONS FOR... -
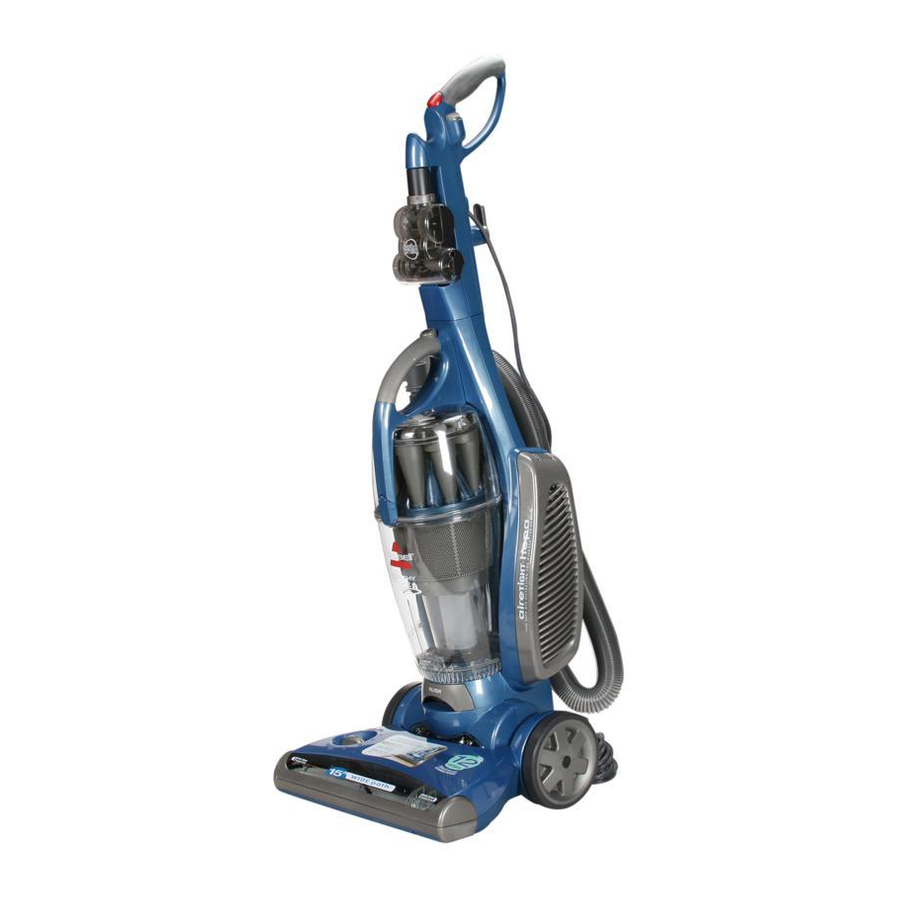
Page 4: Product View
roduct view Upper Handle TurboBrush ® Screen Dirt Container Headlight Height Adjustment Dial Furniture Protection Guard Brush w w w . b i s s e l l . c o m ug203-1369_5770_507.indd 4 ug203-1369_5770_507.indd 4 Power Switch Hose Release Button Carrying Handle Brush Switch Filter Door Latch... - Page 5 . b i s s e l l . c o m ug203-1369_5770_507.indd 5 ug203-1369_5770_507.indd 5 CAUTION: Do not plug in your vacuum cleaner until you are familiar with all instructions and operating procedures. 8 0 0 . 2 3 7 . 7 6 9 1...
-
Page 6: Operation
Handle positions Use your foot to pull the handle release pedal back to recline the vacuum cleaner. Height adjustment There are seven height settings available for various floor surfaces. Turn the dial on the foot of the cleaner to the desired setting. - Page 7 Acarosan ® Dust Mite Control Select models only BISSELL Acarosan dust mite control products kill dust mites, which aids in a complete cleaning program. Acarosan spray can be used on carpets, mattresses and upholstery, Acarosan powder is designed to be used on carpets and rugs.
-
Page 8: Crevice Tool
peration Using the tools Make sure the cleaner is in the upright position. Remove the hose wand from the wand base. This automatically diverts the suction to the hose. Unwind the hose from the cleaner. Note: To help prevent the machine from tipping, the hose should remain in the bottom hose clip. -
Page 9: Emptying The Dirt Container
. b i s s e l l . c o m ug203-1369_5770_507.indd 9 ug203-1369_5770_507.indd 9 CAUTION: Make sure vacuum cleaner has been switched off and unplugged before removing dirt container. 8 0 0 . 2 3 7 . 7 6 9 1... -
Page 10: Cleaning The Foam Filter
aintenance and care Cleaning the dirt container Additional steps can be taken to clean the dirt container as necessary. Ensure the dirt container has been emptied. Remove the lower portion by pressing the front and back latches on the upper portion as shown. -
Page 11: Maintenance And Care
Note: To have the benefits of the Airetight HEPA System, you must ™ use the BISSELL HEPA filter cartridge. To remove the HEPA filter cartridge, push down on the filter door latch and pull door away from the cleaner. Lift the tab at the top of the HEPA filter cartridge and pull cartridge away from the cleaner. -
Page 12: Clearing Clogs
Clearing clogs Low suction or poor pickup may be due to a clog in the vacuum cleaner. If you notice a change in the sound of the motor or a reduction in the spinning action in the dirt container, check for a clog. -
Page 13: Thermal Motor Protection
If the cleaner will not turn on or the thermal protector continues to activate, your cleaner may need servicing. Call BISSELL Consumer Services or visit the website. Note: The thermal protector controls the main vacuum motor only, not the brush motor. -
Page 14: Brush Maintenance
Do not attempt to disassemble the vacuum foot or to remove the brush roll. If you feel it needs to be checked or replaced, call BISSELL Consumer Services or visit the website to locate an authorized service center. -
Page 15: Changing The Light Bulb
aintenance and care Changing the light bulb Unplug cleaner from electrical outlet. Recline handle for easier access to light bulb and remove screw to lift off lens. Remove the bulb by grasping bulb and pull- ing straight out of the socket. Install the new bulb by pushing gently into the socket until the bulb snaps into place. -
Page 16: Troubleshooting
2. Vacuum is in upright position 3. Brush is jammed 4. Brush needs to be reset 5. Handle not fully attached Vacuum cleaner won’t pick up or low suction Possible causes 1. Incorrect height setting 2. Hose wand not properly positioned 3. -
Page 17: Please Do Not Return This Product To The Store
Thank you for selecting a BISSELL product. Please do not return this product to the store. For any questions or concerns, BISSELL is happy to be of service. Contact us directly at 1-800-237-7691. w w w . b i s s e l l . c o m ug203-1369_5770_507.indd 17... - Page 18 For information about repairs or replacement parts, or questions about your warranty, call: BISSELL Consumer Services Or visit the BISSELL website - www.bissell.com When contacting BISSELL, have model number of cleaner available. Please record your Model Number: ___________________ Please record your Purchase Date: ___________________ NOTE: Please keep your original sales receipt.
- Page 19 - BISSELL Healthy Home Vacuum™ You may purchase parts from your retailer, by calling BISSELL Consumer Services or by visiting our website. Below is a list of common replacement parts*. While not all of these parts may have come with your specific model, they are available for purchase if desired.
- Page 20 Subject to the *EXCEPTIONS AND EXCLUSIONS identified below, upon receipt of the product BISSELL Homecare, Inc. will repair or replace (with new or remanufactured components or products), at BISSELL’s option, free of charge from the date of purchase by the original purchaser, for five years any defective or malfunctioning part.
Need help?
Do you have a question about the 5770 and is the answer not in the manual?
Questions and answers