Table of Contents

Related Manuals for Bissell CleanView Proheat 53U6 series


Summary of Contents for Bissell CleanView Proheat 53U6 series
- Page 1 USER'S GUIDE 53U6, 34T2 SERIES 220-240V Thank You Safety Instructions Product View Assembly Operations 7-14 Maintenance and Care 14-15 Troubleshooting 16-17 Replacement Parts Accessories and Formulas Warranty Consumer Care...
- Page 2 Everything we know about floor care went into the design and construction of this complete, high-tech home cleaning system. Your BISSELL deep cleaner is well made, and we back it with a limited two-year warranty. We also stand behind it with a knowledgeable, dedicated Consumer Care department, so, should you ever have a problem, you’ll receive fast, considerate assistance.
-
Page 3: Important Safety Instructions
■ moistened by cleaning process Use only cleaning products formulated ■ by BISSELL for use in this appliance to Do not leave machine when it is plugged in ■ prevent internal component damage Do not service machine when it is plugged in ■... -
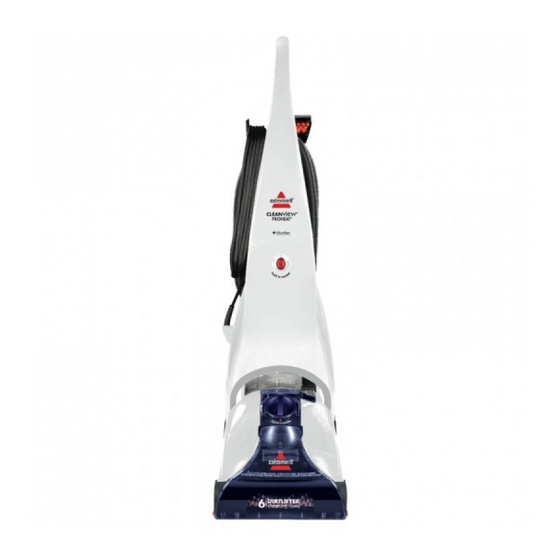
Page 4: Product View
roduct view Ergonomically Designed Handle Handle Assembly Heat Indicator Heater Switch: Light/Built-in Turn heat on or off Hot Water Heater as needed Lower Body Assembly Integrated Carry Handle ReadyTools Dial ™ Belt Access Door Removable Nozzle DirtLifter ™ Edge Sweep Brushes PowerBrush ™... -
Page 5: Cleaning Formula
Maneuver Wheels Cleaning formula: Keep plenty of genuine BISSELL 2X cleaning formula on hand so you can clean and protect whenever it fits your schedule. Always use genuine BISSELL deep cleaning formulas. Non-BISSELL cleaning formulas may harm the machine and will void the warranty. -
Page 6: Assembly
ssembly Your CleanView ® ProHeat ® deep cleaner comes WARNING: in four easy to assemble components: • Handle assembly Do not plug in your cleaner until • Upper hose rack you have completely assembled • Lower body assembly it per the instructions and are familiar with all instructions and • Lower hose rack operating procedures. -
Page 7: Special Features
Special features Your BISSELL CleanView ® ProHeat ® is a home cleaning system that uses a combination of heat, BISSELL cleaning formula, brush agitation and Heater suction to safely clean carpets. Switch Built-In-Heater BISSELL CleanView ® ProHeat ® models all fea-... -
Page 8: Measuring Cup
To help restore this important protection, only BISSELL offers cleaning formulas with Scotchgard protector. This offers extra protection against dirt and tough stains to keep your carpets looking good longer. -
Page 9: Before You Clean
Remove lid, turn over and locate built in measuring cup. 3. Fill with BISSELL 2X formula to the indi- cated fill line on the built in measuring cup and pour into mouth of the bladder. -
Page 10: Carpet Cleaning
3. While pressing the spray trigger, make one slow forward wet pass and another back. Let the built-in heater, BISSELL 2X deep cleaning formula and DirtLifter Heater Switch PowerBrush do the work for you. - Page 11 perations Empty the 2-in-1 water tank/ clean removable nozzle cont 5. When finished, replace nozzle by slightly raising front of machine to line up slots on the base with the hooks on nozzle. Attach at base first and then click nozzle into place. NOTE: If nozzle is not attached properly loss of suction will occur.
- Page 12 perations 7. Set the ReadyTools dial to the TOOLS setting. This will allow spray and suction from the hose. 8. Attach the cleaning tool of your choice to the end of the hose. 9. Clean by pressing the spray trigger to spray solution onto the area to be cleaned.
-
Page 13: Hard Floor Cleaning
NOTE: Prior to filling with formula and water be sure all carpet cleaning formula is thoroughly rinsed from the 2-in-1 water tank. 2. Fill BISSELL Hard Floor Solutions to the indicated fill line in the built in measuring cup and pour into mouth of bladder. 3. Fill the bladder with clean hand hot tap water and set aside. -
Page 14: Maintenance And Care
perations Hard Floor Cleaning continued 9. Repeat the motion without pressing the spray trigger using the hard floor tool to squeegee and suction up the dirty water. 10. When finished, remove hard floor tool, rinse and let dry before storing. Refer to the Maintenance and care section on page 15 for machine clean up and storage instructions.Machine care... -
Page 15: Machine Storage
aintenance and care Machine care continued 5a. Remove the white filter by grasping the post and pulling up and out of the unit. Rinse the filter under cold water. NOTE: Be careful not to drop the filter into the sink or disposal. 5b. Replace the white filter back into the filter area. -
Page 16: Troubleshooting
If it is broken or missing, please refer to Replacement Parts on page 18. A replacement belt may be ordered by calling BISSELL Consumer Services. Complete installation instructions will accompany the replacement belt. B. When replacing belt access door be sure to line up slots of belt access door with slots in machine, slide door into place and snap shut. - Page 17 6. Empty 2-in-1 water tank and refill, refer to the Operation section. 7. The lint screen may be clogged. 7. Clean out lint screen. Refer to page 12. Other maintenance or service not included in the manual should be performed by an authorized service representative. Thank you for selecting a BISSELL product. Please do not return this product to the store. w w w . b i s s e l l . c o m...
-
Page 18: Replacement Parts
56L9-E 473 mL 2X Hard Floor Solutions 0400-E 651 mL Tough Stain Precleaner Note: Additional BISSELL formula options may be available at your local retailer. w w w . b i s s e l l . c o m... -
Page 19: Limited Two Year Warranty
If you need additional instruction regarding this warranty or have questions regarding what it may cover, please contact BISSELL Consumer Care by telephone, or regular post as described below, or contact your local in country distributor. - Page 20 ISSELL Consumer Care If your BISSELL product should require service: Call BISSELL Consumer Care at the numbers below and we will give you the location of a BISSELL Authorized Service Center in your area. If you have questions about your warranty or need replacement parts please contact the numbers below.
Need help?
Do you have a question about the CleanView Proheat 53U6 series and is the answer not in the manual?
Questions and answers