Table of Contents
Advertisement
Quick Links
Pet Hair Eraser
B A G L E S S
U S E R ' S G U I D E
3920 SERIES 220-240V
3
Safety Instructions
4
Product View
5-6
Assembly
6-10
Operations
10-16
Maintenance and Care
17
Troubleshooting
18
Consumer Services
19
Replacement Parts
20
Warranty
ug110-4048_3920E_508.indd 1
ug110-4048_3920E_508.indd 1
™
V A C U U M
5/7/08 3:56:50 PM
5/7/08 3:56:50 PM
Advertisement
Table of Contents

Related Manuals for Bissell 3920 Series


Summary of Contents for Bissell 3920 Series
- Page 1 Pet Hair Eraser B A G L E S S U S E R ’ S G U I D E 3920 SERIES 220-240V Safety Instructions Product View Assembly 6-10 Operations 10-16 Maintenance and Care Troubleshooting Consumer Services Replacement Parts Warranty ug110-4048_3920E_508.indd 1...
- Page 2 Your BISSELL vacuum is well made, and we back it with a limited one year warranty. We also stand behind it with a knowledgeable, dedicated Consumer Services department, so, should you ever have a problem, you’ll...
-
Page 3: Important Safety Instructions
BS 1362) fuse is fitted in the carrier contained in the plug. (Spares may be obtained from your BISSELL supplier). If for any reason the plug is cut off, it must be disposed of, as it is an electric shock hazard should it be inserted into a 13 amp socket. -
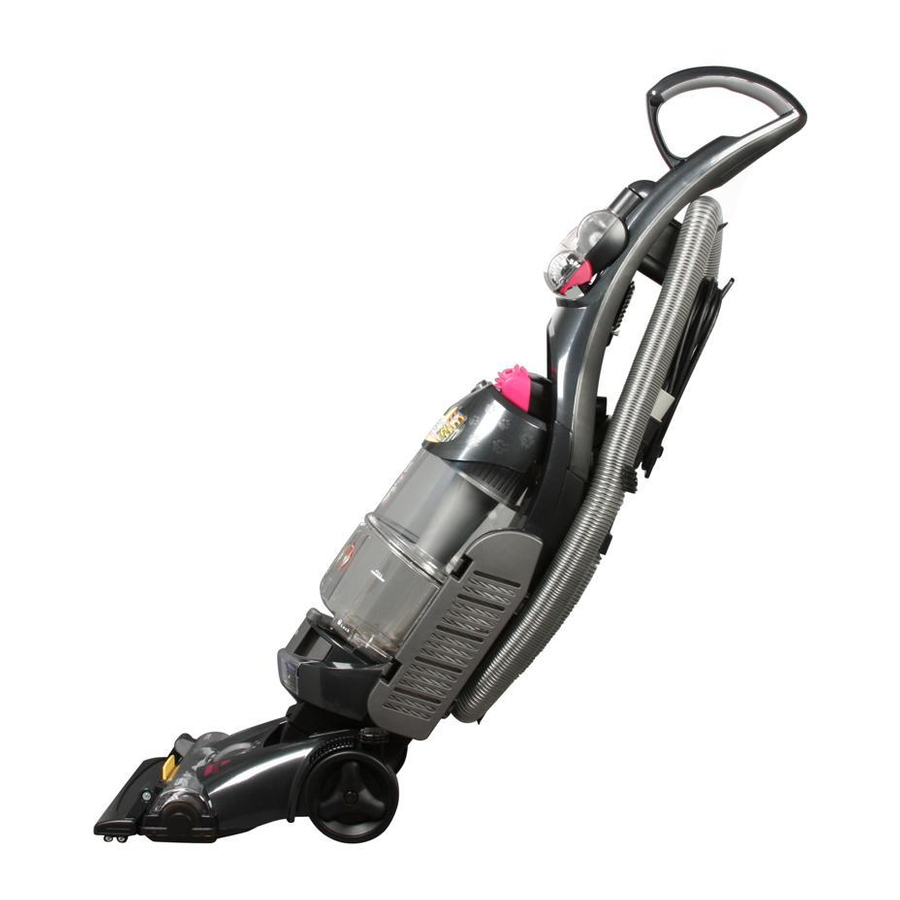
Page 4: Product View
roduct view Ergonomic Loop Handle TurboBrush ™ Pet Contour Tool ™ Power Switch Upper Tank Easy Empty ™ Dirt Container Washable Pre-Motor Filter Headlight Foot Window Pet Hair Lifter Wide Cleaning Foot w w w . b i s s e l l . c o m ug110-4048_3920E_508.indd 4 ug110-4048_3920E_508.indd 4 Hose and Cord Clip... -
Page 5: Attach Handle To Vacuum
The only tool you’ll need to assemble your vacuum cleaner is a Phillips screwdriver. Attach handle to vacuum Locate the handle and cord wrap. Remove the screw packet taped to the handle. Stand the vacuum upright and from the... -
Page 6: Power Switch
ssembly Attach vacuum hose and tools Line up the tabs on the base of the Twist ‘n Snap hose with the corresponding notches on the hose collar as shown. Turn the Twist ‘n Snap hose to the left to lock the hose into place. Connect the curved hose wand to the hose. -
Page 7: Handle Positions
perations Handle positions Press the handle release pedal, located on the lower left side of the vacuum, with your foot to place your vacuum into one of three cleaning positions. Upright – For storage and above floor cleaning with tools. Normal Cleaning –... -
Page 8: Transporting Cleaner
perations Transporting cleaner To move your cleaner from room to room, put the handle in the upright position, tilt the cleaner back on its rear wheels and push forward. The cleaner can also be moved by using the carry handle. Clean filter indicator The clean filter Indicator tells you when the air flow in your vacuum is reduced due to dirty filters or a... -
Page 9: Special On-Board Tools
Always place vacuum cleaner on the floor with handle in upright position when using tools. Never place your fingers under the cleaner when it is running. -
Page 10: Power Cord Usage
Unplug power cord by grasping the plug (NOT the cord) and disconnect from outlet. Loop power cord around cord wraps on rear of vacuum cleaner. Be sure to first return the quick release cord wraps back to their original position before wrapping the cord. - Page 11 aintenance and care Empty dirt container The dirt container needs to be emptied when the dirt reaches the “Full” line on the container. Unplug the vacuum from electrical outlet Slide the Lock ‘n Seal Lever to the “Unlock” position. Grasp handle and pull the dirt container straight out to remove from the vacuum.
- Page 12 Unplug the vacuum from electrical outlet. Place handle in low position and turn vacuum cleaner over so bottom side is facing up. Remove the screws marked 1 and 2, Release the latches marked 3 and 4. Lift off the brush cover.
- Page 13 NOTE: It is important that you use only genuine BISSELL replacement belts. Generic belts may not meet the exact specifications required to keep your vacuum operating at its peak performance.
-
Page 14: Replace Lightbulb
aintenance and care Replace lightbulb Unplug the vacuum from electrical outlet. Using a flat bladed screwdriver, pry the tab on the left and right side out and pull out to remove the lens. Remove the bulb from the socket by grasping the bulb and pulling gently. -
Page 15: Clearing Clogs
Clearing clogs Low suction or poor pickup may be due to a clog in the vacuum cleaner. If you notice a change in the sound of the motor, check for clogs. Unplug the vacuum from electrical outlet. - Page 16 aintenance and care Cleaning the upper tank Grasp the inner cyclone and twist to the left or to the unlocked marking, until the locking tabs stop the rotation. Pull down from the upper tank to remove it. Wipe out the inside of the upper tank and the inner cyclone with a damp cloth moistened with water or a mild cleaning solution.
-
Page 17: Troubleshooting
3. Dirt container installed incorrectly Other maintenance or service not included in the manual should be performed by an Thank you for selecting a BISSELL product. Please do not return this product to the store. w w w . b i s s e l l . c o m ug110-4048_3920E_508.indd 17... - Page 18 If your BISSELL product should require service: In the UK, Australia or New Zealand, call BISSELL Consumer Services at the numbers below and we will give you the location of a BISSELL Authorized Service Center in your area. For all other countries, contact your local in country distributor for questions, service, or repair.
- Page 19 - BISSELL vacuum Below is a list of common replacement parts. While not all of these parts may have come with your specific model, they are available for purchase if desired. Please note, all attachments may not store on board your vacuum.
-
Page 20: Limited One Year Warranty
Subject to the *EXCEPTIONS AND EXCLUSIONS identified below, BISSELL Homecare, Inc., will replace (with new or remanufactured components), at BISSELL’s option, free of charge from the date of purchase by the original purchaser, for one year any defective or malfunctioning part do to manufacturers defect.
Need help?
Do you have a question about the 3920 Series and is the answer not in the manual?
Questions and answers