Table of Contents
Advertisement
Advertisement
Table of Contents

Subscribe to Our Youtube Channel
Related Manuals for Signature Control Systems, Inc. EZ Pro Jr. 8300 Series

Summary of Contents for Signature Control Systems, Inc. EZ Pro Jr. 8300 Series
- Page 1 Remove Here...
- Page 2 EZ Pro ™ Jr. 8300 Series ™ THANK YOU for purchasing the EZ Pro ™ electronic irrigation controller. The EZ Pro Jr. is so "EZ", you’ll probably be able to install and program Installation and Programming Guide this feature-packed controller without instructions. For EZ Pro Jr.
-
Page 3: Table Of Contents
TABLE OF CONTENTS FEATURES Features Installation 6-10 • Lithium battery back-up stores programs without AC or Terminal Strip Battery power (AA) Connecting Master Valve or Pump-Start Relay Connecting Rain/Moisture Sensor • Programmable delay between zones Connecting Battery & Starting Controller •... -
Page 4: Installation
INSTALLATION INSTRUCTIONS INSTALLATION INSTRUCTIONS The EZ Pro ™ Jr. 8300 Series can be mounted indoors or outdoors. For models 8304, 8306, 8309, 8312 (see figure 1) Find a location near a 120V wiring source (230/240V for 8374, 8376, Remove the transformer cover by loosening the two screws. Attach 8379, and 8382 models). -
Page 5: Terminal Strip
INSTALLATION INSTRUCTIONS INSTALLATION INSTRUCTIONS For models 8374, 8376, 8379, 8382 (see figure 2) Terminal Strip Remove the transformer cover by loosening the two screws. Route All zone, pump and sensor wire connections made inside the EZ Pro ™ AC wires to connector provided. Cut and trim wires to install in Jr. -
Page 6: Programming Overview
INSTALLATION INSTRUCTIONS PROGRAMMING INSTRUCTIONS Connecting the batteries and starting the controller Programming Overview Remove the terminal panel under the LCD of the unit by pushing up on The EZ Pro ™ Jr. can be programmed under AC power or powered from the the tab. -
Page 7: Front Panel Layout
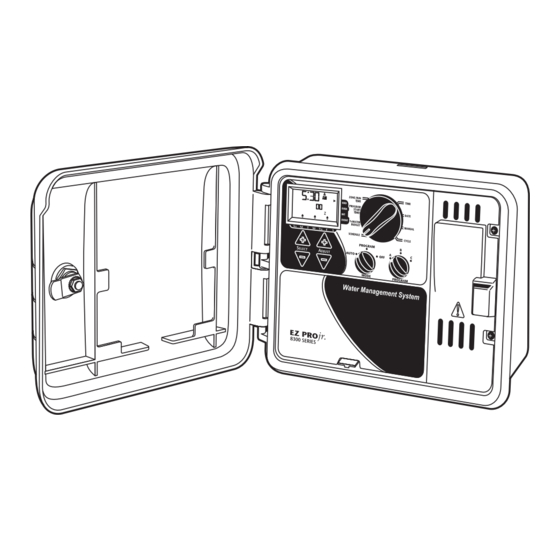
PROGRAMMING INSTRUCTIONS PROGRAMMING INSTRUCTIONS Front Panel Layout FIGURE 3 Looking at the front panel (see figure 3), you see a large LCD, 4 rubber buttons, one large rotary dial, and two small rotary dials. The rubber buttons are marked SELECT and ADJUST and are the core of Signature’s exclusive SELECT&ADJUST programming. -
Page 8: Set Time Of Day
PROGRAMMING INSTRUCTIONS PROGRAMMING INSTRUCTIONS Set Time of Day Set Start Times Turn the large dial to the TIME position. Press SELECT to select A START TIME is the time of day a program will start running. between hours, minutes, and 12/24 hour mode. Press ADJUST to The EZ Pro ™... -
Page 9: Set % Water Budget By Month
PROGRAMMING INSTRUCTIONS-PROGRAM MODE PROGRAMMING INSTRUCTIONS-PROGRAM MODE If % WATER BUDGET is set for 110% or greater, the EZ Pro ™ Jr. will split • INTERVAL waters every X number of days (from 1 to 30 days) the run time in half to reduce runoff. Half of the calculated run time will (i.e., water every 3 days, waters every 10 days, etc.). -
Page 10: Set Odd/Even Day Scheduling Option
PROGRAMMING INSTRUCTIONS-PROGRAM MODE PROGRAMMING INSTRUCTIONS-PROGRAM MODE NOTE: Programming a WATER DAYS schedule deletes any other Set Event Days Programming (Optional) schedule for the selected program. Turn the large dial to the SCHEDULE position. The last scheduling option chosen for the current program appears on the LCD. Press both Set Odd/Even Day Scheduling Option the SELECT ‘+’... -
Page 11: Set Master Valve Or Pump
PROGRAMMING INSTRUCTIONS-PROGRAM MODE PROGRAMMING INSTRUCTIONS-OFF MODE Set Master Valve or Pump Delay Turning the Controller Off You can delay the time between when the Master Valve/Pump turns on Turn the MODE dial to the OFF position. This suspends all watering and the time the zones start. -
Page 12: Advanced Features
ADVANCED FEATURES - AUTO MODE ADVANCED FEATURES - AUTO MODE The EZ Pro ™ Jr. incorporates two manual/test procedures for checking The EZ Pro ™ Jr. incorporates Signature’s ManualAdvance feature in the the function of the controller or allowing you to bypass the current MANUAL procedure. -
Page 13: Technical Data/Specifications
TECHNICAL DATA TECHNICAL DATA 1. Transformer 6. Display 24 VAC internal transformer; 20 VA, .83A for zones and logic. The transformer can run a pump or master valve and one zone Program letter Time, Date, Start Time, valve, maximum. A, B or C Run Time, Basic Date, Water Budget Month 2. -
Page 14: Troubleshooting/Service
TECHNICAL DATA TROUBLESHOOTING/SERVICE SYMPTOM POSSIBLE CAUSE SOLUTION No output to zone, pump, master • AC disconnected • Check AC source, if AC is not 10. Default Settings (12 hour mode) valve or no AC indicator lit detected by the controller, the no 12:00 A.M. -
Page 15: Fcc Rules
FCC RULES This electronic irrigation controller generates and uses radio frequency energy and if not installed and used properly, that is, in strict accordance with the manufacturer’s instructions, may cause interference to radio and television reception. It has been type tested and found to comply with the limits for a Class B computing device in accordance with the specifications in Subpart J of Part 15 of FCC Rules, which are designed to provide reasonable protection against such interference in a residential installation.
Need help?
Do you have a question about the EZ Pro Jr. 8300 Series and is the answer not in the manual?
Questions and answers
when i start manualy or by timer the sprinlers turn on for about a minute than shut down for 2 to 3 minutes than start up and run full cycle. when it shuts down also well shuts down whats going on?
The EZ Pro Jr. 8300 Series controller has a 5-second delay before starting a manual or timed operation. If the % WATER BUDGET is set to 110% or greater, the system splits the run time in half to reduce runoff, which may create a pause between the two halves. This brief pause could appear as the system shutting down temporarily.
This answer is automatically generated
Where is the reset pads