Advertisement
Quick Links
Advertisement

Related Manuals for Paramount Fitness GF-WM-201/AF-05


Summary of Contents for Paramount Fitness GF-WM-201/AF-05
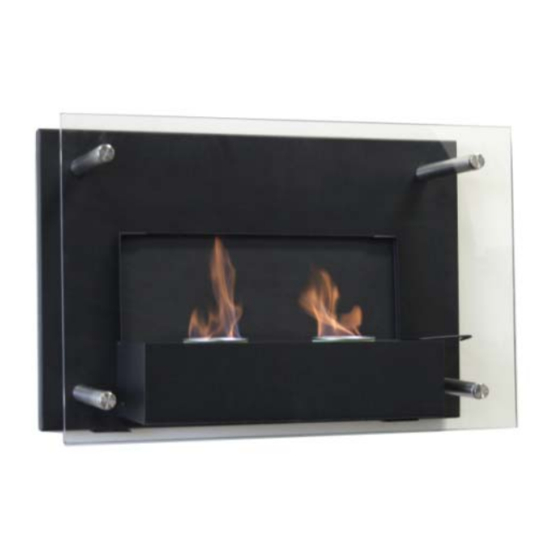
- Page 1 Model no. GF-WM-201 / AF-05 Gel Fuel Wall Mount STOP!! PLEASE READ BEFORE USE ***SAVE THIS MANUAL FOR FUTURE REFERENCE*** For customer service, parts or any warranty issues: Call 1-800-561-5550 Email: customercare@jrhome.c Unit 1 - 5628 Riverbend Drive Burnaby, BC Canada ...
- Page 2 PLEASE READ ALL DIRECTIONS INCLUDED BEFORE USE Risk of Indoor Air Pollution • Use unvented decorative appliance only in well-ventilated areas with either outside windows or doors of adjacent room open.. If the windows are closed while the appliance is in operation –...
- Page 3 • The area where the appliance is installed must be free from gasoline and other flammable liquids or vapors other than the 369g gel fuel canisters set in the appliance • Do not use unvented decorative appliance to heat or boil water or use as a cooking appliance ...
- Page 4 2 ...
-
Page 5: Directions For Use
DIRECTIONS FOR USE Gel fuelled fireplace appliances are an environmentally friendly solution to a real fire without the need for a wood or gas supply. There is no direct venting required with a gel fuel appliance, but a constant inflow of fresh air is required. ASSEMBLY &... -
Page 6: Safety And Maintenance
SAFETY & MAINTENANCE SAFETY INSTRUCTIONS − In a house of typical construction, that is, one that is not of unusually tight construction due to heavy insulation and tight seals against air infiltration, an adequate supply of air for combustion and ventilation is provided through infiltration. The unvented decorative appliance should not be used in a small room where less than 5.7 m cube (200 feet cube) of air space is provided for each 1’000 Btu per hour of the unit. - Page 7 PARTS 35mm 20mm Mounting screws 5 ...
- Page 8 ASSEMBLY 1. Remove the gel holder from the box (G) 2.Attach gel fuel holder (G) to the back plate (H) using 4x 20mm bolts (D) 3.Attach metal posts (A) to the back plate (H) using 35mm bolts (C) 5 ...
- Page 9 4.Secure glass (1) to metal posts (A) with bolts (B) 5 ...
-
Page 10: Installation
INSTALLATION 5. Find a stud on the wall and mark it with a pencil. Measure 16” over to find the second stud 6.Secure the horizontal bracket to the wall using the mounting hardware Note: Make sure the bracket is level ... - Page 11 7.Hook the two vertical brackets onto the horizontal bracket and secure with the mounting hardware . (make sure the vertical brackets are perpendicular) 8.Hook the assembled fireplace onto the mounting bracket 6 ...
- Page 12 9. After assembly follow these steps to add gel fuel: (follow all instructions on gel fuel can) - Place up to 2 gel fuel cans into the gel holder. - Remove gel fuel can lids and ignite. To light gel fuel, use long matches or a barbeque lighter.
- Page 13 IMPORTANT For questions, concerns or problems with our product please email our customer service department: customercare@jrhome.com or call 1-800-561-5550. DATED PROOF OF PURCHASE REQUIRED FOR WARRANTY SERVICE. WARRANTY This product is inspected, tested and carefully packaged to minimize the chance of damage during shipment. If a part (excluding light bulbs and fuses*) within one year from the date of purchase proves to be defective in material or fabrication under normal use, the part will be repaired or replaced. The company’s obligation under the warranty is to replace or repair defective parts at our discretion. Any expenses or damage resulting from the installation, removal or transportation of the product will be the responsibility of the owner and are not covered by this warranty. The owner assumes all other risks arising from the use or misuse of the product. The warranty will be void if the product damage or failure is deemed by the company to be caused by accident, alteration, misuse, abuse, incorrect installation or removal, or connection to an incorrect power source by the owner. The company neither assumes, nor authorizes any person or entity to assume for it any obligation or liability associated with its products. Lightbulbs and fuses are not covered under this warranty. If you have any questions regarding the warranty or service, please call our ...
Need help?
Do you have a question about the GF-WM-201/AF-05 and is the answer not in the manual?
Questions and answers