Table of Contents
Advertisement
Advertisement
Table of Contents

Subscribe to Our Youtube Channel
Related Manuals for Millipore Synergy R


Summary of Contents for Millipore Synergy R
- Page 1 Synergy R system ® Synergy UV-R system User manual...
- Page 3 Millipore SAS. Millipore SAS assumes no responsibility for any errors that might appear in this document. This manual is believed to be complete and accurate at the time of publication. In no event shall Millipore SAS be liable for incidental or consequential damages in connection with or arising from the use of this manual.
- Page 4 Product warranty and limitation of liability The applicable warranty and limitation of liability for the products listed in this publication may be found at http://www.millipore.com/ec/cp3/terms within the "Terms and Conditions of Sale" applicable to your purchase transaction. Directive 2002/96 EC: For European users only The symbol “crossed bin”...
-
Page 5: Table Of Contents
Hydrating the System ..............................16 Installation and Rinsing of the Final Filter ......................17 How to Calibrate the Flowrate from the Synergy R System (F02) ..............18 How to Show Resistivity or Conductivity Units (C01) ..................20 How to Set the Resistivity Setpoint (C02) ......................21 Using the Synergy R System .................... - Page 6 How to Replace the UV Lamp (UV System only) ....................35 How to View or Reset the UV Lamp Timer (C03) ....................38 Troubleshooting ........................41 Ordering Information ......................43 Catalogue Numbers for Synergy R Systems ......................43 Catalogue Numbers for Consumables ........................43 Catalogue Numbers for Accessories ........................43...
-
Page 7: Introduction
This User Manual is a guide for use during the installation, normal operation and maintenance of a Synergy or Synergy UV-R Water Purification System. ‘Synergy R’ is used in this manual to refer to either the Synergy or the Synergy UV-R unless otherwise noted. It is highly recommended to completely read this manual and to fully comprehend its contents before attempting normal operation or maintenance of the Water Purification System. -
Page 8: Contacting Millipore® Sas
Introduction Contacting Millipore® SAS Internet The Millipore SAS Internet Site can be used to find addresses, telephone/fax numbers and other information. Internet Site Address: www.millipore.com www.millipore.com/techservice www.millipore.com/lab_water Manufacturing Site Millipore SAS 67120 Molsheim FRANCE... -
Page 9: Product Information
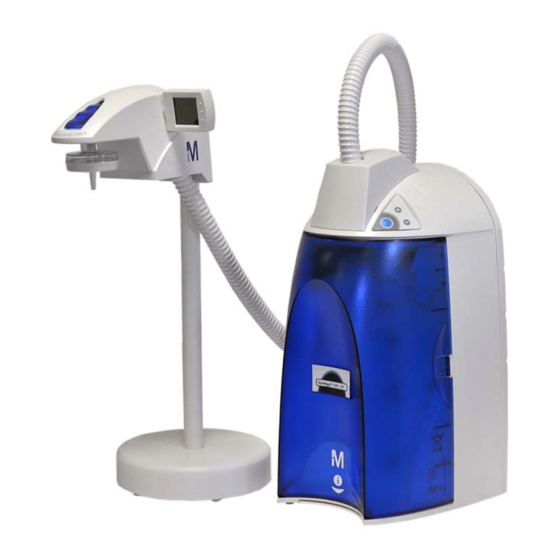
The DISPENSING BUTTON The KEYPAD is used to is used to get Product access operating functions Water. and system settings. Synergy R Product Water Specifications Water Flowrate Up to 1.5 LPM (with Final Filter) Specifications Product Water Resistivity 18.2 MΩ.cm @ 25 °C Quality <... -
Page 10: Schematic Of Main Components
8 Final Filter Operating principle The Synergy R Water Purification System is fed with pretreated water (Elix , RO, distilled or DI water) coming from a tank or a loop. When Product Water is being dispensed, the Inlet Solenoid Valve opens and the Booster Pump turns on. The pretreated water is then pumped into the UV Lamp (UV System). -
Page 11: Technical Specifications
12.2 kg 12.8 kg Noise Level A Synergy R System has a maximum noise level of 36 dB at a distance of 1 metre away. Electrical • 100 VAC ± 10%, 50/60 Hz. 0.56 amp source, 2 amp T (Time Lag) fuse, Power = 80 VA •... -
Page 13: Pre Installation
Installation Category Pollution Degree Optional Equipment You May Need Support and Bracket The Millipore SAS Catalogue Number for: The Wall Mounting Bracket is WMBSMT001. The Support for remote dispenser is RDHSTAND1 The Spacer for remote dispenser is RDHSPACE1 The Small mast for remote dispenser is RDHSMAST1 The mounting hardware for attaching the bracket to a wall is not included and must be supplied. -
Page 14: Unpacking The Synergy R System − What's Inside
Pre Installation Unpacking the Synergy R System − What’s Inside? Open the Synergy R System Shipping Box. Use the checklist included in the Accessories Bag to make sure all items were shipped and are accounted for. It is highly suggested to become familiar with the items that are shipped since these will be used in the Installation section of this manual. -
Page 15: Installation
Installation Connection of Tubing • Rotate the Synergy R system so you can see the back of the system (see photo A). Feedwater tubing Feedwater Tubing • Locate the Feedwater Tubing exiting from the bottom of the system (B). A 1/2 inch Female GAZ fitting with a screen filter is attached at the end of this tubing. - Page 16 Installation Connection of the Ultrapure (Type 1) water Dispenser • Locate the Ultrapure (Type 1) water dispenser. The Ultrapure (Type 1) water dispenser and the water system come separately. • For system installed underbench pass the sleeve through the bench hole.
- Page 17 Installation • Fix the hide panel cover with the screw. • Put the hide screw cover.
-
Page 18: Connection Of The Power Cord − Turning On The System Power
Installation Connection of the Power Cord − Turning on the System Power • Open the front cover of the system (A). This will allow the system to go into STANDBY mode once the system is powered. • Plug the Power Cord into the system (B). •... -
Page 19: Installation Of The Synergypak Cartridge
Installation Installation of the SynergyPak cartridge HAZARD Do not touch the UV Lamp when replacing the SynergyPak. Installation • Make sure the front cover is opened. STANDBY should be viewed on the Display (A). • Remove the SynergyPak cartridge from its shipping box. •... - Page 20 Installation • Install the SynergyPak cartridge until it is fully seated into the system ports as shown (C, D). • CLOSE THE FRONT COVER.
-
Page 21: Installation Of The Tygon® Tubing
Installation Installation of the Tygon® Tubing Do not use any white tape on the threads of the Barbed Fitting. An O-ring is ATTENTION located inside the POU Dispenser to ensure water tightness between the threads of the POU Dispenser and the Barbed Fitting. •... -
Page 22: Purging Air From The System
Installation Purging Air from the System • At this time you should have installed the SynergyPak cartridge, Barbed Fitting and the Tygon Tubing. Air trapped in the SynergyPak cartridge should now be purged from the system. • Press the Dispensing Button once to put the system into DISPENSING mode (A). -
Page 23: Installation And Rinsing Of The Final Filter
Installation Installation and Rinsing of the Final Filter • Obtain a Final Filter. • Remove the Tygon Tubing and the Barbed Fitting from the POU Dispenser. • Screw the Final Filter onto the end of the POU Dispenser. The Final Filter should be turned until it is hand tight (A). Do not over tighten the Final Filter. -
Page 24: How To Calibrate The Flowrate From The Synergy R System (F02)
How to Calibrate the Flowrate from the Synergy R System (F02) Before calibrating the Product flowrate from the Synergy R system, you will need a 1 Litre graduated cylinder to measure the total volume of water that will be dispensed. The Final Filter should be installed. - Page 25 Installation Measure the total volume of water (in Litres) dispensed from the system using a 1 L graduated cylinder. Press the “+” or “-“ Button to match the volume Display to the volume measured. To exit the menu, press and hold the Main Button for 2 seconds.
-
Page 26: How To Show Resistivity Or Conductivity Units (C01)
Installation How to Show Resistivity or Conductivity Units (C01) With Temperature Compensated or non Temperature Compensated values Temperature compensation is a way of ‘standardizing’ Resistivity or Conductivity to measurements that would be seen if the water temperature was 25 °C. Press the Main and “+“... -
Page 27: How To Set The Resistivity Setpoint (C02)
Resistivity display will flash and the red Pack Alarm will be blinking (see ). The factory default resistivity value is set to 15 MΩ. cm @25 °C. Synergy R System messages Press the Main and “+“ Buttons together to enter the menu. -
Page 29: Using The Synergy R System
Operating Modes Operating Parameters Maintenance or Alarms UV System only How to Get Water from the Synergy R System Using the Dispensing Button There are two ways to get water using the Dispensing Button: Press once and release. Press and hold down. -
Page 30: How To Dispense An Exact Amount Of Product Water (F01)
Using the Synergy R System How to Dispense an Exact Amount of Product Water (F01) Press the Main and “-“ Buttons together to enter the menu. The Display will show F01. Press the “+” or “-“ Button to adjust the exact amount of Product Water (in Litres) needed. -
Page 31: Operating Modes
Using the Synergy R System Operating Modes Standby STANDBY mode is displayed when the front cover is removed. The system will depressurize during which STANDBY will be blinking on the Display for 10 seconds. All system operations are disabled. STANDBY mode is selected before attempting maintenance on the system. - Page 32 AUTO-DISPENSING mode is displayed when selecting menu option F01. AUTO- DISPENSING mode is used to dispense pre- set volumes of water from the Synergy R system. The amount of water dispensed and the resistivity are shown while water is being dispensed.
-
Page 33: How To View The Product Resistivity And Temperature In Pre Operate Mode
Using the Synergy R System How to view the Product Resistivity and Temperature in Pre Operate mode Press: The Display will show the last Product resistivity and temperature values measured during DISPENSING mode or during RECIRCULATION. The values are displayed for 5 seconds. -
Page 34: How To Understand Synergy R System Messages
Using the Synergy R System How to Understand Synergy R System messages Pack Alarm • The system will prompt you to change the SynergyPak cartridge using a red Pack Alarm icon. The Display will show the red Pack Alarm blinking. The SynergyPak cartridge is changed due to either the amount of time it has been used or from the amount of water that has passed through it. -
Page 35: Maintenance
See Section How Flow When the Final Filter is replaced, or to Calibrate the Calibration periodically. Flowrate from the Synergy R System See Section How to Replace the UV UV Lamp When the UV Lamp (UV System Replacement Lamp Alarm... -
Page 36: How To Replace The Synergypak Cartridge
Maintenance How to Replace the SynergyPak cartridge HAZARD Do not touch the UV Lamp when replacing the SynergyPak cartridge. Removing the SynergyPak cartridge • Open the front cover to go into STANDBY mode. Press the Dispensing Button once. The system will dispense water. Wait for the system to depressurize. - Page 37 Maintenance Installation • Remove the new SynergyPak cartridge from its shipping box. • Remove the protective caps on the ports of the SynergyPak cartridge. • Locate the O-rings on the ports. Wet them with water. It is preferable to wet them with ultrapure water. •...
- Page 38 Maintenance Installing the Tygon Tubing • Install the Barbed Fitting and Tygon Tubing (G). (See Section Installation of the Tygon® Tubing) Purging Air from the System • (See Section Purging Air from the System) Hydrating the System. • Hydrate the system (H). (See Section Hydrating the System) •...
-
Page 39: How To Replace The Final Filter
Maintenance How to Replace the Final Filter The Final Filter is normally replaced when the SynergyPak cartridge is replaced or at an earlier time if it becomes clogged. A clogged Final Filter can reduce the Product Water flowrate. ATTENTION Make sure the SynergyPak cartridge has been hydrated overnight. •... -
Page 40: How To Clean The Screen Filter
Maintenance How to Clean the Screen Filter The purpose of the Screen Filter is to prevent large particles or other debris from entering the system. If the Screen Filter becomes blocked with debris, then the Feedwater will not flow freely to the system. It is recommended to clean the Screen Filter twice a year or whenever it may have become clogged. -
Page 41: How To Replace The Uv Lamp (Uv System Only)
Maintenance How to Replace the UV Lamp (UV System only) The red UV Lamp Alarm will be blinking on the Display when it is time to exchange the UV Lamp. The message is Section How to View or Reset the UV Lamp Timer (C03)). shown when the UV Timer has reached 0 days No electrical power should be going to the system at this time. - Page 42 Maintenance Removing the UV Lamp The UV Lamp contains metallic Mercury. Please dispose of the used UV Lamp in ATTENTION a manner that is environmentally safe. • Detach the Velcro belt of the UV housing. • Pull the UV housing out so that the UV Lamp cable is accessible (D). NOTE: Use the gloves supplied with the UV replacement kit.
- Page 43 Maintenance Installing the new UV Lamp • Ensure that you use the gloves supplied with the UV replacement kit. Plug the electrical cable to the new UV Lamp (G). • Carefully insert the UV Lamp into the UV housing (H). •...
-
Page 44: How To View Or Reset The Uv Lamp Timer (C03)
Maintenance How to View or Reset the UV Lamp Timer (C03) (see Section How to Replace the UV The UV Lamp Timer should be reset only after the UV Lamp has been replaced Lamp (UV System only)) . The UV Lamp Timer displays the time left until the UV Lamp needs to be replaced. The Display will show the red UV Lamp Alarm icon blinking when the Timer reaches 0 days. - Page 45 Maintenance How to Reset the UV Lamp Timer Press the Main and “+“ Buttons together to enter the menu. The Display will show C01. Press the Main Button 2 times. The Display will show C03 and “0” days left on the UV Timer. Press the “+”...
-
Page 47: Troubleshooting
Troubleshooting Problem Possible causes What to do • The power cord is not plugged • Check that the power cord is plugged in. • No source of electrical power. • Check the source of electrical The Display screen is blank. power. - Page 48 Troubleshooting Problem Possible causes What to do • The system may have been in • Recirculate the water in the Section How to STANDBY mode for a while. system. See recirculate water manually • The Product resistivity is below before dispensing. the Resistivity Setpoint set in •...
-
Page 49: Ordering Information
Ordering Information Catalogue Numbers for Synergy R Systems For 230 VAC, 120 VAC, 100 VAC: 0 = S YNERGY V = S YNERGY Catalogue Numbers for Consumables Consumable Item Catalogue Number SynergyPak 1 SYPK0SIA1 SynergyPak 2 SYPK0SIX2 SynergyPak 3 SYPK0SIX3 Millipak Express 20 (Non-Sterile) –... - Page 50 Quick access to most common procedures Checking water quality ............................... 26 Contacting Millipore SAS ............................. 2 Delivering a fixed ultrapure water volume ......................23 Delivering ultrapure water ............................23 Improving ultrapure water quality by recirculation before sourcing water ..........26 Replacing the Millipak end filter ..........................
Need help?
Do you have a question about the Synergy R and is the answer not in the manual?
Questions and answers