Table of Contents
Advertisement
15.720017-V6.0
Diaphragm Dosing Pump
DMX model 226
DMX 24-8
DMX 37-5
DMX 52-8
DMX 60-3
DMX 67-10
DMX 82-5
DMX 95-8
DMX 100-8
DMX 130-3
DMX 132-10 DMX 280-6
Installation and Operating Instructions
EN
Read this manual completely and keep it!
Subject to change.
DMX 142-8
DMX 280-8
DMX 152-6
DMX 315-3
DMX 160-5
DMX 321-4
DMX 190-8
DMX 321-6
DMX 190-10 DMX 380-3
DMX 199-8
DMX 460-3,5
DMX 224-5
DMX 460-6
DMX 249-3
DMX 525-3
DMX 255-3
DMX 765-3
Advertisement
Table of Contents

Related Manuals for Grundfos DMX 24-8


Summary of Contents for Grundfos DMX 24-8
- Page 1 Diaphragm Dosing Pump DMX model 226 DMX 24-8 DMX 142-8 DMX 280-8 DMX 37-5 DMX 152-6 DMX 315-3 DMX 52-8 DMX 160-5 DMX 321-4 DMX 60-3 DMX 190-8 DMX 321-6 DMX 67-10 DMX 190-10 DMX 380-3 DMX 82-5 DMX 199-8...
- Page 2 Tel.: +49 7240 61-0 www.grundfos.com/DK Telefax: +49 7240 61-177 China E-mail: alldos.de@alldos.com Argentina Grundfos Alldos Germany Bombas GRUNDFOS de Argentina S.A. Dosing & Disinfection Ruta Panamericana km. 37.500 Lote 34A ALLDOS (Shanghai) Water Technology Co. GRUNDFOS GMBH 1619 - Garin Ltd. Schlüterstr. 33 Pcia.
- Page 3 Telefax: +66-2-744 1775 ... 6 E-mail grundfos.moscow@grundfos.com Malaysia Turkey Serbia GRUNDFOS Pumps Sdn. Bhd. GRUNDFOS POMPA San. ve Tic. Ltd. Sti. 7 Jalan Peguam U1/25 GRUNDFOS Predstavništvo Beograd Gebze Organize Sanayi Bölgesi Glenmarie Industrial Park Dr. Milutina Ivkovića 2a/29 Ihsan dede Caddesi,...
-
Page 4: Table Of Contents
DMX model 226 en Contents Installation Data ..................... 48 Installation Diagram ..................48 Type key ......................49 Of General Interest ................50 In General ....................50 Using this Paper ..................50 Warranty ....................50 Safety Instructions ................51 Application of the Product ................. 51 Obligations of the Operating Authority ............ - Page 5 DMX model 226 en Operation ..................... 64 Description of the Device ................64 Switching on / off ..................64 6.2.1 Switching on .................. 64 6.2.2 Switching off .................. 64 Adjusting the Dosing Flow by Means of the Stroke length ......65 Adjusting the Stroke Length Adjustment ...........
-
Page 6: Installation Data
DMX model 226 en Installation Data NOTE Please fill in this form following commissioning. It will help you and your Grundfos servicing partner to adjust the device during subsequent corrections. Owner: Grundfos customer No.: Contract No.: Order No. of device:... -
Page 7: Type Key
DMX model 226 en Type key (Cannot be used for pump configuration.) Example: DME 2-18 A-PP/E/C-F-3 1 1E F Pump range DME... Code Mains plug EU (Schuko) Maximum pressure [bar] USA, CAN Control variant Code Standard Standard + alarm relay Standard + ProfIbus Code Connection,... -
Page 8: Of General Interest
This operation manual contains all information for safe operation of the described product. If you require further information or if any problems arise which are not reflected in detail in this manual, contact Grundfos directly for the information needed. 1.2 Using this Paper Descriptions are written as plain text. -
Page 9: Safety Instructions
The dosing pump described here is suitable for dosing liquid, non-abrasive and non- inflammable media strictly complying with the instructions of this manual. WARNING Other applications are not intended and are not permitted. Grundfos accept no responsibility for damages caused by unintended use. NOTE Explosion-proof pumps are indicated on the pump type identification label as well as on the motor type identification label. -
Page 10: Technical Data
Technical Data 3.1 Pump Types Stroke Order No. Dosing Motor volume head size Simple pump Double pump [ml] DMX 24-8 DMX 24-8/24-8 DMX 52-8 DMX 52-8/25-8 13,8 DMX 100-8 DMX 100-8/100-8 DMX 142-8 DMX 142-8/142-8 DMX 37-5 DMX 37-5/37-5 DMX 82-5... -
Page 11: Performance
Q [l/h] Q [l/h] p max * [bar] value [H/min] value [H/min] value [H/min] 3 AC 1 AC 3 AC 1 AC DMX 24-8 34,8 DMX 52-8 75,6 DMX 100-8 DMX 142-8 DMX 37-5 34,8 DMX 82-5 75,6 DMX 160-5... -
Page 12: Suction Heights
* lift ** height * lift ** height * lift ** DMX 24-8 DMX 24-8/24-8 2,5 m DMX 52-8 DMX 52-8/25-8 2,5 m DMX 100-8 DMX 100-8/100-8 DMX 142-8 DMX 142-8/142-8 DMX 37-5... -
Page 13: Dosing Curves
DMX model 226 en 3.4 Dosing Curves The dosing curves shown here are trend curves according to the ALLDOS factory standard No. 0010/0011 They refer to: Performance of single pump (the flow rate is doubled for the double pump) Water as the dosing medium Zero point of pump Q for specified pressure - see diagram. -
Page 14: Weight
DMX model 226 en 3.7 Weight Weight Weight Simple pump Double pump DMX 24-8 DMX 24-8/24-8 DMX 52-8 DMX 52-8/25-8 DMX 100-8 DMX 100-8/100-8 DMX 142-8 DMX 142-8/142-8 DMX 37-5 DMX 37-5/37-5 DMX 82-5 DMX 82-5/82-5 Approx. 15 kg Approx. 21 kg Approx. -
Page 15: Dimensional Drawing
DMX model 226 en 3.8 Dimensional Drawing D M X 2 4 -8 D M X 5 2 -8 3 0 2 3 1 0 9 7 , 5 1 9 0 1 7 8 1 5 2 8 5 ,5 4 2 5 2 0 8 1 0 4 , 5... - Page 16 DMX model 226 en D M X 6 7 -1 0 D M X 1 3 2 -1 0 3 8 0 3 7 2 1 3 6 2 2 2 1 7 8 1 4 0 1 2 3 4 4 0 2 0 8 2 3 3 (3 5 2 )
-
Page 17: Installation
DMX model 226 en Installation 4.1 Installation Information Picture of optimal installation: Dosing tank Electric agitator Extraction device Suction pulsation damper Dosing pump Overflow valve Pressure retention valve Pulsation damper Measuring glass Injection unit For easy deaeration of the pump: Install a ball valve (11) with bypass line (back to the dosing tank) immediately behind the pressure valve In case of long pressure lines:... - Page 18 DMX model 226 en In dosing systems that require a long suction line: Provide a properly dimensioned pulsation damper (4) directly in front of the suction valve of the dosing pump. Note for pressure side installation: to protect the piping use pulsations damper (8) for rigid piping longer than 3m and tubing longer than 5m.
-
Page 19: Transport And Storage
DMX model 226 en 4.2 Transport and Storage Handle with care, do not throw! Dry and cool storage place. Take heed of upright position of the dosing pump when storing it, so that gear grease can not leak out. CAUTION Observe permissible storing temperature! 4.3 Mounting Mount the pump horizontally with 4 screws M8 on the tank or on a console. -
Page 20: Electrical Connections
DMX model 226 en 4.5 Electrical Connections WARNING Prior to the mains connection check if the voltage indicated on the type plate corresponds with the local voltage! Switch off mains before connecting! No changes at the mains cable and the mains plug may be done! NOTE The pump is being switched by switching the mains... -
Page 21: Commissioning
DMX model 226 en Commissioning 5.1 Inspections before Commissioning Check the tightness of all connections. If necessary, retighten. Check the correctness of all electrical connections. Check if the voltage indicated on the type plate corresponds with the local voltage! 5.2 Commissioning CAUTION After initial start-up and after each diaphragm exchange, tighten the fixing screws of the dosing... -
Page 22: Operation
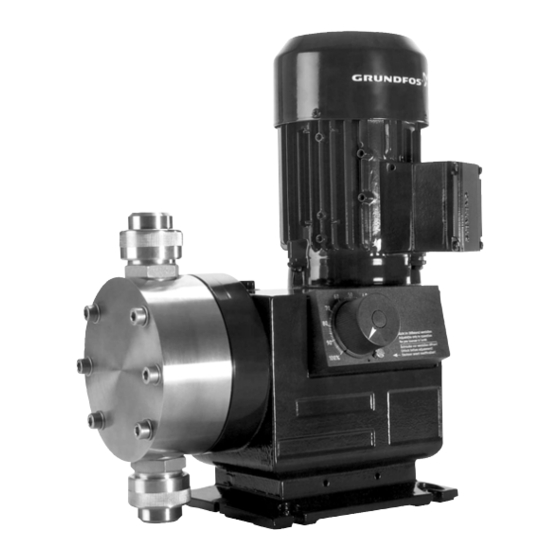
DMX model 226 en Operation 6.1 Description of the Device 1 Motor 2 Gears 3 Eccentric 4 Dosing diaphragm 5 Dosing head 6 Suction valve 7 Pressure valve 8 Stroke length adjustment knob 9 Hall sensor Principle of function Reciprocating displacement pump with electric motor and mechanical diaphragm guide. -
Page 23: Adjusting The Dosing Flow By Means Of The Stroke Length
DMX model 226 en 6.3 Adjusting the Dosing Flow by Means of the Stroke length CAUTION Adjust the stroke length only while the pump is running! Danger of damages. Loosen the locking screw (A) on the stroke length adjustment knob (8) a little using a screwdriver. -
Page 24: Possible Failures
Leaky suction line Exchange or seal the suction line Cross-section of the suction line too narrow or Check with specification of Grundfos or suction line too long Clogged suction line Rinse or replace the suction line Foot valve covered by sediment... -
Page 25: Operation With Other Electronics
DMX model 226 en Operation with Other Electronics CAUTION First refer to the general Section 6 "Operation". This Section 7 "Operation with Other Electronics" only describes the additional functions. 7.1 Electronics Version Stroke sensor Pump type with inductive proximity switch of two-wire design according to NAMUR DIN 19 234for signalling the strokes. -
Page 26: Function
DMX model 226 en 7.2.3 Function Pumps prepared for a diaphragm breakage indication: Special dosing head flange for inserting the optoelectronic sensor Optoelectronic sensor, contains infrared sender infrared receiver In case of a leaking diaphragm: Dosing liquid penetrates the dosing head flange. The light refraction will be changed. -
Page 27: Relay Outputs
DMX model 226 en 7.2.5 Relay Outputs NOTE The relay output connection depends on the application and the connected actuators. Interference suppression is required for inductive loads (also relays and contactors). If this is not possible, protect the relay contacts using a suppressor circuit as described below. -
Page 28: Commissioning
Sensor and electronics are ready for operation! One or more LED do not light: Sensor or electronics are defective! • Call Grundfos service. Carefully dry the senor. Only the green LED still lights: Sensor and electronics are ready for operation! -
Page 29: Maintenance
If it still does not operate correctly: Replace sensor. Description Optosensor with 3 m cable Electronics No maintenance possible by the user. • If it does not operate correctly: Call Grundfos service. WARNING Repair only by authorized qualified personnel. V6.0... -
Page 30: Integral Overflow Valve
DMX model 226 en Integral Overflow Valve 8.1 Function The integral overflow valve (option) protects the complete pressure side of the dosing line system from an impermissibly high buildup of pressure. The valve opens if the pressure rises above its set opening pressure, and the dosing medium can return to the solution tank. -
Page 31: Setting Of Opening Pressure
DMX model 226 en 8.4 Setting of Opening Pressure 8.4.1 General The opening pressure can only be set if a manometer is installed in the system between the pump and the next shut-off valve or pressure retention valve. WARNING Settings on the overflow valve must only be carried out by authorized specialists! The opening pressure of the overflow valve is set in the factory to the maximum pump back-pressure specified in the technical data. -
Page 32: Venting
DMX model 226 en 8.5 Venting The overflow valve can also be opened manually, thus serving as a venting valve at the same time. If manual venting is required (e.g. when commissioning or when the tank has been replaced): Rotate the knob such that the smaller cut-out rests on the nub of the dosing head (the rotary knob is then further away from the dosing head, the valve spring is unloaded (position B). -
Page 33: Maintenance
DMX model 226 en Maintenance WARNING When dosing dangerous media, observe the corresponding safety precautions! Wear protective gloves and glasses when executing work at the dosing head, connections or lines! Do not open the pump! Repair only by authorized personnel! Switch off the pump and disconnect from mains before doing maintenance and repair! 9.1 Replacing the Gear Grease... -
Page 34: Exchanging The Diaphragm
DMX model 226 en 9.4 Exchanging the Diaphragm WARNING Wear protective gloves and glasses when carrying out work on the dosing head, connections or lines! CAUTION Adjust the stroke length only while the pump is running! Danger of damage. While pump is running set the stroke length adjustment knob to 100%. Switch off pump and disconnect from power supply. -
Page 35: Appendix Dosing Curves
DMX model 226 Appendix Dosing Curves Q = flow rate h = stroke length V6.0... - Page 36 DMX model 226 DMX 24-8 (50Hz) Q = 3bar DMX 24-8 (60Hz) Q = 3bar Q [l/h] Q [l/h] 8bar 8bar 3bar 3bar 90 100 h [%] h [%] DMX 52-8 (60Hz) Q = 3bar DMX 52-8 (50Hz) Q = 3bar...
- Page 37 DMX model 226 DMX 37-5 (60Hz) Q = 3bar DMX 82-5 (50Hz) Q = 3bar Q [l/h] Q [l/h] 1,5bar 1,5bar 4bar 4bar 10 20 30 40 50 60 70 80 90 100 90 100 h [%] h [%] DMX 160-5 (50Hz) Q = 3bar DMX 82-5 (60Hz) Q = 3bar...
- Page 38 DMX model 226 DMX 130-3 (50Hz) Q = 3bar DMX 130-3 (60Hz) Q = 3bar Q [l/h] Q [l/h] p = 1,5bar 1,5bar p = 3bar 3bar 10 20 30 40 50 60 70 80 90 100 10 20 30 40 50 60 70 80 90 100 h [%] h [%] DMX 255-3 (50Hz) Q...
- Page 39 DMX model 226 DMX 132-10 (60Hz) Q = 3bar Q [l/h] 10bar 3bar 90 100 h [%] DMX 199-8 (50Hz) Q = 3bar Q [l/h] 3bar 6bar 8bar 90 100 h [%] DMX 280-8 (50Hz) Q DMX 190-10 (50Hz) Q DMX 95-8 (50Hz) Q DMX 199-8 (60Hz) Q = 3bar...
- Page 40 DMX model 226 DMX 280-6 (50Hz) Q = 3bar DMX 152-6 (50Hz) Q = 3bar Q [l/h] Q [l/h] 3bar 6bar 6bar 3bar 1,5bar 10 20 30 40 50 60 70 80 90 100 20 30 50 60 70 80 90 100 h [%] h [%]...
- Page 41 DMX model 226 DMX 249-3 (50Hz) Q = 3bar DMX 460-3,5 (50Hz) Q = 3bar Q [l/h] Q [l/h] 3bar 3bar 1,5bar 20 30 40 50 60 70 80 90 100 90 100 h [%] h [%] DMX 315-3 (50Hz) Q = 3bar DMX 249-3 (60Hz) Q = 3bar...
- Page 42 Declaration of Conformity Wir Grundfos erklären in alleiniger Verantwortung, dass die We Grundfos declare under our sole responsibility that the Produkte model 226 , auf die sich diese Erklärung bezieht, mit products model 226 to which this declaration relates, are in...
- Page 43 DMX model 226 V6.0...
- Page 44 Being responsible is our foundation Thinking ahead makes it possible Innovation is the essence 91834766 1107 Repl. — www.grundfos.com...
Need help?
Do you have a question about the DMX 24-8 and is the answer not in the manual?
Questions and answers