Roland TM-6 PRO Quick Start Manual
Trigger module
Hide thumbs
Also See for TM-6 PRO:
- Reference manual (49 pages) ,
- Manual (22 pages) ,
- Data list (37 pages)
Table of Contents
Advertisement
Quick Links
Download this manual
See also:
Reference Manual
Contents
. . . . . . . . . . . . . . . . . . . . . . . . . . . . . .
. . . . . . . . . . . . . . . . . . . . . . . . . . . . .
. . . . . . . . . . . . . . . . . . . . . . . . . . . . . . . . . . .
Panel Descriptions . . . . . . . . . . . . . . . . . . . . . . . . . . . . . .
Mounting the TM-6 PRO on the Stand . . . . . . . . . . . . .
Turning the Power On/Off . . . . . . . . . . . . . . . . . . . . . . .
Basic Operation . . . . . . . . . . . . . . . . . . . . . . . . . . . . . . . .
Drum Triggers That Can Be Connected . . . . . . . . . . . .
Footswitches That Can Be Connected . . . . . . . . . . . . .
Basic Procedure for Trigger Settings . . . . . . . . . . . . . . . 10
Specifying the Drum Trigger Type . . . . . . . . . . . . . . . . 10
(Threshold) . . . . . . . . . . . . . . . . . . . . . . . . . . . . . . . . . . . . 12
Making Hi-hat Settings . . . . . . . . . . . . . . . . . . . . . . . . . . 12
. . . . . . . . . . . . . . . . . . . . . . . . . . . . . . . . . . . . . . 13
Selecting a Kit . . . . . . . . . . . . . . . . . . . . . . . . . . . . . . . . . . 13
Playing with the Click . . . . . . . . . . . . . . . . . . . . . . . . . . . 13
Performing Along with a Song . . . . . . . . . . . . . . . . . . . 14
Quick Start (this document)
Read this first. It explains basic operation.
PDF Manual (download from the web)
5
Reference Manual
This explains all the functions of the TM-6 PRO.
5
Data List
This explains the parameters and sound of the
TM-6 PRO.
5
MIDI Implementation
This is detailed reference material regarding MIDI messages.
Before using this unit, carefully read "USING THE UNIT SAFELY" and "IMPORTANT NOTES" (the leaflet "USING THE UNIT SAFELY"
and the Owner's Manual (p. 25)). After reading, keep the document(s) where it will be available for immediate reference.
© 2018 Roland Corporation
. . . . . . . . . . . . . . . . . . . . . . . . . . . 10
2
. . . . . . . . . . . . . . . . . . . . . . . . . . . . . . . . . . . . . . . . . . . 16
Selecting and Editing an Instrument . . . . . . . . . . . . . . 16
3
Using the Sound Modify Knobs. . . . . . . . . . . . . . . . . . . 17
4
Editing a Kit . . . . . . . . . . . . . . . . . . . . . . . . . . . . . . . . . . . . 18
4
7
7
. . . . . . . . . . . . . . . . . . . . . . . . . . . . . . . . . 21
8
Basic Procedure for Settings . . . . . . . . . . . . . . . . . . . . . 21
8
Backing Up Data . . . . . . . . . . . . . . . . . . . . . . . . . . . . . . . 21
9
Formatting an SD Card . . . . . . . . . . . . . . . . . . . . . . . . . . 22
Connecting to a Computer for Playback . . . . . . . . . . . 22
Time (Auto Off ) . . . . . . . . . . . . . . . . . . . . . . . . . . . . . . . . 23
Returning to the Factory Settings . . . . . . . . . . . . . . . . . 23
. . . . . . . . . . . . . . . . . . . . . . . . . . . . . . . . . 24
To obtain the PDF manual
1.
Enter the following URL in your
computer.
http://www.roland.com/manuals/
I
2.
Choose "TM-6 PRO" as the product name.
Quick Start
. . . . . . . . . . . . . . . . . . . . . . . . . 25
. . . . . . . . . . . . . . . . . . . . . . . . . . . . . . 25
. . . . . . . . . . . . . . . . . . . . . . . . . . . . . . 26
Advertisement
Table of Contents

Subscribe to Our Youtube Channel
Related Manuals for Roland TM-6 PRO


Summary of Contents for Roland TM-6 PRO
-
Page 1: Table Of Contents
Importing and Playing Audio Files (USER SAMPLE) . . 19 Mounting the TM-6 PRO on the Stand ... . . Turning the Power On/Off ..... . . -
Page 2: Flow Of Operations
Flow of Operations Power supply OUTPUT jacks/PHONES jack TRIG IN jacks/HH CTRL jack Speaker/ Acoustic drum trigger/ AC adaptor Mixer/ V pad/ Headphones Hi-hat control pedal Connections page 6 page 8 * Subsequently in this manual, acoustic drum triggers and pads are collectively called “drum triggers. -
Page 3: Kits And Instruments
Kits and Instruments On the TM-6 PRO, the sound that you hear when you strike a connected drum trigger is Instrument called an “instrument” (INST). A set of instruments assigned to the various triggers is called a “kit. ” Kit 1–100... -
Page 4: Getting Ready
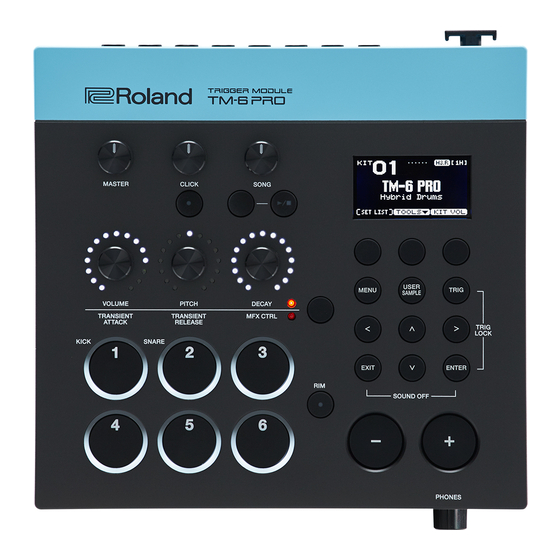
Getting Ready Panel Descriptions Top Panel Controller Explanation Page [MASTER] knob Adjusts the volume of the MASTER OUT jacks. – Adjusts the volume of the click. This can also adjust the volume of the click track [CLICK] knob (p. 15). p. - Page 5 8 By holding down the [ENTER] button and pressing another button, you can make settings for a variety of functions. Allows you to make settings for functions that affect the entire TM-6 PRO, such as [MENU] button p. 21 instrument or effect settings.
- Page 6 Getting Ready Rear Panel (Connect Your Equipment) FOOT SW jack HH CTRL jack TRIGGER IN 1–6 jacks You can connect By using this in conjunction You can connect acoustic drum triggers (sold separately: a footswitch (sold with the TRIGGER IN 6 jack you RT series), bar trigger pads (sold separately: BT-1), or pads separately: BOSS FS-5U, can play open/closed hi-hat...
-
Page 7: Mounting The Tm-6 Pro On The Stand
By using an all purpose clamp (sold separately: APC-33), you Turning the power on can attach the TM-6 PRO to a hi-hat stand or cymbal stand. You can also attach it to a pad stand (sold separately: PDS- Minimize the volume of the TM-6 PRO and 10). -
Page 8: Basic Operation
Getting Ready Basic Operation Drum Triggers That Can Be Connected The TM-6 PRO supports a variety of drum triggers. Switching and setting Drum trigger Explanation functions (function buttons) This is attached to an acoustic drum for use. Use these buttons to switch between... -
Page 9: Footswitches That Can Be Connected
Getting Ready Cymbal (CY series) About Performance Techniques Playing method Explanation The drum triggers that can be connected to the TM-6 PRO Bow shot respond to a variety of performance techniques. This is the most common Pad (PD/PDX series) performance technique of... -
Page 10: Trigger Settings (Trig)
You can specify the type of drum trigger (trigger type) used from the drum triggers can be accurately processed by the by each trigger input of the trigger bank. TM-6 PRO. Trigger type Reference For details on the parameters that can be edited, refer to The trigger type is a collection of various trigger “Data List”... - Page 11 Trigger Settings (TRIG) Press the [EXIT] button several times to Example drum trigger connections and return to the KIT screen. settings Reference For details on trigger settings, refer to “Reference Manual” (PDF). CY-5 PD-8 BT-1 RT-30HR Choosing a drum trigger to edit Choosing by hitting a drum trigger To edit the settings for a drum trigger, strike that drum trigger to select it.
-
Page 12: Adjusting The Drum Trigger's Minimum Sensitivity (Threshold)
Press the [EXIT] button several times to is less affected by the sound return to the KIT screen. Since the TM-6 PRO is intended for use on stage, the Reference drum trigger’s Threshold value is set relatively high by For details on more advanced drum trigger settings, refer default. -
Page 13: Performing
Press the [–] [+] buttons to select a kit. The CLICK screen appears. About the KIT screen This screen is the basic screen of the TM-6 PRO; it appears when you turn on the power. H&R icon (shown only if H&R Trigger meter (p. -
Page 14: Performing Along With A Song
Here’s how to perform along with a song. Move to the previous song (long- [F1] ( v ) button Insert an SD card into the TM-6 PRO (p. 5). press the button: rewind the song) Move to the next song (long-press [F2] ( w ) button Press the [SONG] button. - Page 15 In the case of the example, save “TM-6PRO.wav” and Playing an Internal Demo Song “TM-6PRO_Click.wav” in the same level. The TM-6 PRO contains built-in demo songs. The internal demo songs also provide a click track. * The internal demo songs cannot be played back if an SD card is inserted in the TM-6 PRO.
-
Page 16: Editing
5 Audio files that you created using your computer Settings are also saved when you turn off the power. can be loaded via an SD card into the TM-6 PRO, and played as an instrument (p. 19). Press the [EXIT] button several times to Selecting and Editing an Instrument return to the KIT screen. -
Page 17: Using The Sound Modify Knobs
Editing Example) PAD EQ settings Using the Sound Modify Knobs In the PAD EFFECT screen (p. 16), select “EQ” You can use the sound modify knobs to adjust the and press the [ENTER] button. parameters of the instrument or the pad effect. The PAD EQ screen appears. -
Page 18: Editing A Kit
Editing Turn a sound modify knob to edit the Editing a Kit parameter. The value of the parameter you’re editing is shown in a Here you can make settings such as the kit’s overall volume popup. and the kit name. Reference For details on the parameters that can be edited, refer to “Data List”... -
Page 19: Importing And Playing Audio Files (User Sample)
Audio files that you created on your computer can be Access the KIT COMMON screen (p. 18). imported from an SD card into the TM-6 PRO, and played as instruments (user sample function). You can edit the sound Use the cursor buttons to select “KIT NAME,”... - Page 20 Editing Use the cursor buttons to select the import- Reference destination number, and press the [F3] Just as any other instrument, you can adjust the sound of the user sample or apply effects to it. For details, refer to (IMPORT) button. “Reference Manual”...
-
Page 21: Settings (Menu)
“Reference Manual” (PDF). return to the KIT screen. Backing Up to SD Card Here’s how to save all settings that are stored in the TM-6 PRO (up to 99 sets). Insert an SD card into the TM-6 PRO (p. 5). -
Page 22: Formatting An Sd Card
Select the backup number. You can connect the TM-6 PRO to a computer, and record * If you load user samples, the user samples in the TM-6 PRO audio or MIDI. are overwritten by the user samples that are included in Reference the backup data. -
Page 23: Making The Power Automatically Turn Off After A Time (Auto Off)
(Auto Off function). When you execute this operation, all data and settings in the TM-6 PRO will be lost. Before you proceed, you If you do not want the power to be turned off automatically, should save any important data and settings to your SD disengage the Auto Off function. -
Page 24: Troubleshooting
Troubleshooting Problem Items to check Action Page Problems with sound Are the cables correctly connected to each Check the connections. p. 6 drum trigger and pedal? Could the instrument be “OFF”? Assign an instrument. p. 16 & PDF Could the instrument’s “Volume” be lowered? Adjust the instrument’s “Volume. ” &... -
Page 25: Using The Unit Safely
Roland its rubber feet may discolor or mar the Also, make sure to carefully observe all the Corporation. -
Page 26: Main Specifications
Main Specifications Roland TM-6 PRO: Trigger Module Kits Pad Equalizer: each pad (HEAD/RIM independently) Pad Transient: each pad (HEAD/RIM collectively) Pad Compressor: each pad (HEAD/RIM collectively) Effects Pad Multi-Effects: 30 types, each pad (HEAD/RIM collectively) Reverb Type: 5 types Master Compressor...
Need help?
Do you have a question about the TM-6 PRO and is the answer not in the manual?
Questions and answers