Roland TM-6 PRO Reference Manual
Trigger module
Hide thumbs
Also See for TM-6 PRO:
- Quick start manual (26 pages) ,
- Manual (22 pages) ,
- Data list (37 pages)
Table of Contents
Advertisement
Quick Links
Advertisement
Table of Contents

Subscribe to Our Youtube Channel
Related Manuals for Roland TM-6 PRO


Summary of Contents for Roland TM-6 PRO
- Page 1 Reference Manual © 2018 Roland Corporation...
-
Page 2: Table Of Contents
Side Panel Comparing or Returning to the Unedited Kit (Undo) 33 Rear Panel (Connect Your Equipment) Copying Settings (Copy) Mounting the TM-6 PRO on the Stand Recalling Kits Successively (SET LIST) Turning the Power On/Off Creating a Set List Basic Operation... -
Page 3: Flow Of Operations
Flow of Operations Power supply OUTPUT jacks/PHONES jack TRIGGER IN jacks/HH CTRL jack Speaker/ Acoustic drum trigger/ AC adaptor Mixer/ V pad/ Headphones Hi-hat control pedal Connections page 8 page 11 * Subsequently in this manual, acoustic drum triggers and pads are collectively called “drum triggers. -
Page 4: Kits And Instruments
Kits and Instruments On the TM-6 PRO, the sound that you hear when you strike a connected drum trigger is Instrument called an “instrument” (INST). A set of instruments assigned to the various triggers is called a “kit. ” Kit 1–100... -
Page 5: About Memory
About Memory The area in which settings such as kits and trigger settings are stored is called “memory. ” TM-6 PRO Preset memory User memory SD card LOAD Kits Kits Backup Set lists Trigger settings Kits Trigger settings SAVE COPY... -
Page 6: Getting Ready
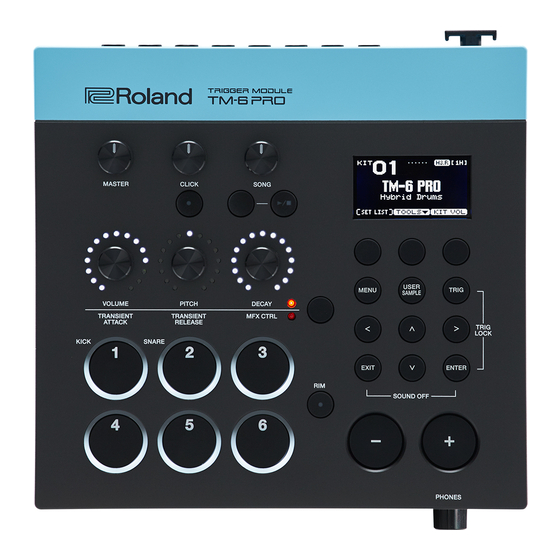
Getting Ready Panel Descriptions Top Panel Controller Explanation Page [MASTER] knob Adjusts the volume of the MASTER OUT jacks. – Adjusts the volume of the click. This can also adjust the volume of the click track [CLICK] knob (p. 22). p. -
Page 7: Side Panel
10 By holding down the [ENTER] button and pressing another button, you can make settings for a variety of functions. Allows you to make settings for functions that affect the entire TM-6 PRO, such as [MENU] button p. 37 instrument or effect settings. -
Page 8: Rear Panel (Connect Your Equipment)
Getting Ready Rear Panel (Connect Your Equipment) FOOT SW jack HH CTRL jack TRIGGER IN 1–6 jacks You can connect By using this in conjunction You can connect acoustic drum triggers (sold separately: a footswitch (sold with the TRIGGER IN 6 jack you RT series), bar trigger pads (sold separately: BT-1), or pads separately: BOSS FS-5U, can play open/closed hi-hat... -
Page 9: Mounting The Tm-6 Pro On The Stand
Mounting the TM-6 PRO on the Stand By using an all purpose clamp (sold separately: APC-33), you can attach the TM-6 PRO to a hi-hat stand or cymbal stand. You can also attach it to a pad stand (sold separately: PDS-10). -
Page 10: Turning The Power On/Off
Moving the cursor (cursor buttons) Cursor refers to the highlighted characters indicating an on screen When you turn the TM-6 PRO on, the following screen parameter that can be set. When there appears. is more than one possibility within the screen, use the cursor buttons to move it. -
Page 11: Drum Triggers That Can Be Connected
By using a connection cable (sold separately: 1/4” stereo phone plug # 1/4” phone plug x 2) you can connect two The TM-6 PRO supports a variety of drum triggers. drum triggers to one TRIGGER IN jack. The head and rim... -
Page 12: About Performance Techniques
Getting Ready Cymbal (CY series) About Performance Techniques Playing method Explanation The drum triggers that can be connected to the TM-6 PRO Bow shot respond to a variety of performance techniques. This is the most common Pad (PD/PDX series) performance technique of... -
Page 13: Footswitches That Can Be Connected
Getting Ready Bar trigger pad (BT-1) Playing method Explanation Hit the striking surface. Footswitches That Can Be Connected You can use a footswitch to switch between kits or set lists. The following footswitches (sold separately) are supported. Footswitch Explanation One or two of these footswitches can be connected. -
Page 14: Trigger Settings (Trig)
You can specify the type of drum trigger (trigger type) used from the drum triggers can be accurately processed by the by each trigger input of the trigger bank. TM-6 PRO. Press the [TRIG] button. Reference Use the cursor buttons to select “BANK,” and For details on the parameters that can be edited, refer to “Data List”... -
Page 15: Preventing The Drum Trigger Chosen For Editing From Being Switched (Trig Lock)
Trigger Settings (TRIG) Select the drum trigger that you want to Example drum trigger connections and edit. settings You can also use the cursor buttons to select this. Press the [–] [+] buttons to specify the CY-5 PD-8 BT-1 RT-30HR trigger type. -
Page 16: Adjusting The Drum Trigger's Minimum Sensitivity (Threshold)
[–] [+] buttons to adjust the sensitivity. is less affected by the sound Since the TM-6 PRO is intended for use on stage, the Press the [EXIT] button several times to drum trigger’s Threshold value is set relatively high by return to the KIT screen. -
Page 17: Detailed Trigger Settings
Explanation Compared to “LINEAR, ” a soft playing If you’re using a VH-10 or VH-11 V-hi-hat (subsequently produces a greater change. called a “VH”), adjust the offset on the TM-6 PRO. Volume Volume LOG1, LOG2 This adjustment is required in order to correctly detect open, close, and pedal operations. -
Page 18: Eliminate Crosstalk Between Drum Triggers (Crosstalk Cancellation)
Trigger Settings (TRIG) Example) If the sound of trigger input 2 is Eliminate Crosstalk Between Drum Triggers heard when you strike the drum trigger of (Crosstalk Cancellation) trigger input 1 If two drum triggers are attached to the same stand, the In the TRIGGER SETUP screen (p. -
Page 19: Viewing Trigger Information For Drum Trigger
Trigger Settings (TRIG) Press the [F3] (SET) button. Viewing Trigger Information for Drum In this case, the value is automatically set to “19, ” which is Trigger the minimum value that can cancel triggering for trigger input 2. You can view realtime information that shows the force Value Explanation (velocity) with which each drum trigger is struck, how far... -
Page 20: Performing
Press the [–] [+] buttons to select a kit. The CLICK screen appears. About the KIT screen This screen is the basic screen of the TM-6 PRO; it appears when you turn on the power. H&R icon (shown only if H&R Trigger meter (p. -
Page 21: Performing Along With A Song
[ ] button Move to the beginning of the song [ ] button Move to the end of the song Insert an SD card into the TM-6 PRO (p. 7). [<] button Rewind five seconds Press the [SONG] button. [>] button Fast-forward five seconds The SONG screen appears. -
Page 22: Changing The Settings Of Each Song
Performing Changing the Settings of Each Song Playing an Audio File as a Click (Click Track) Here’s how to specify the volume of the song and the click Separately from the song, you can prepare an audio file track, and how they play back. (WAV file) and play it back as a click (click track). -
Page 23: Playing An Internal Demo Song
For details, refer to “Audio Output Assignments” (p. 38). Playing an Internal Demo Song The TM-6 PRO contains built-in demo songs. The internal demo songs also provide a click track. * The internal demo songs cannot be played back if an SD card is inserted in the TM-6 PRO. -
Page 24: Editing
5 Audio files that you created using your computer Settings are also saved when you turn off the power. can be loaded via an SD card into the TM-6 PRO, and played as an instrument (p. 29). Selecting and Editing an Instrument Press the [EXIT] button several times to return to the KIT screen. -
Page 25: Applying Effects To Each Drum Trigger (Pad Effect)
Editing You can edit the LOW (low frequency), MID Applying Effects to Each Drum Trigger (mid frequency), and HIGH (high frequency) ranges individually. (Pad Effect) Parameter Explanation You can apply the following effects to each drum trigger. Width of the frequency band Effect Explanation Q (MID only) -
Page 26: Using The Sound Modify Knobs
Editing Press the [MENU] button. Using the Sound Modify Knobs The MENU screen appears. You can use the sound modify knobs to adjust the Use the cursor buttons to select “KIT-FX,” parameters of the instrument or the pad effect. and then press the [ENTER] button. The KIT EFFECT screen appears. -
Page 27: Editing A Kit
Editing Turn a sound modify knob to edit the Editing a Kit parameter. The value of the parameter you’re editing is shown in a Here you can make settings such as the kit’s overall volume popup. and the kit name. Reference For details on the parameters that can be edited, refer to “Data List”... -
Page 28: Editing The Hi-Hat's Volume
Editing Use the cursor buttons and the [–] [+] Editing the Hi-Hat’s Volume buttons to make mute group settings. Parameter Value Explanation Here’s how to set the volume of the hi-hat. Specify the mute group In the KIT COMMON screen (p. 27), select number. -
Page 29: Renaming The Kit
Audio files that you created on your computer can be entire TM-6 PRO (p. 20). imported from an SD card into the TM-6 PRO, and played as instruments (user sample function). You can edit the sound The tempo does not change of a user sample or apply effects to it in the same way as when you switch kits. -
Page 30: Assigning A User Sample To An Instrument And Playing It
Move the cursor to the instrument name, Insert an SD card into the TM-6 PRO (p. 7). and use the [–] [+] buttons to select a user Access the SAMPLE IMPORT screen (p. 29). -
Page 31: Viewing A List Of User Samples
Editing Viewing a List of User Samples Parameter Value Explanation -12–+12 Adjusts the volume of a Sample Gain [dB] user sample. Here’s how to view a list of all currently-loaded user samples. When you strike the Press the [USER SAMPLE] button. drum trigger, the ONESHOT currently-heard sound is... -
Page 32: Organizing User Samples
Editing Use the cursor buttons and the [–] [+] Use cursor buttons to select the function, buttons to edit the settings. and then press the [ENTER] button. A confirmation message appears. Parameter Explanation If you decide to cancel, select “CANCEL” and press the Zooms the waveform display in or out. -
Page 33: Convenient Functions
Comparing or Returning to the Unedited Copying Settings (Copy) Kit (Undo) The TM-6 PRO lets you copy various types of settings from internal memory or from an SD card. You can listen to the difference between the current You can also exchange settings between the copy-source settings and the settings just after the kit was selected, or and copy-destination. -
Page 34: Recalling Kits Successively (Set List)
Convenient Functions Recalling Kits Successively (SET LIST) Parameter Explanation Copies kits of preset memory. You can specify an order in which kits are recalled in 32 Choose this if you want to return to steps (step 1 through step 32). Such an order is called a “set the factory-set kit settings. -
Page 35: Using Set Lists
Backing Up Kit to an SD Card (1 Kit Save) [F1] (DELETE) button place. Here’s how settings of an individual kit stored in the TM-6 PRO can be backed up to an SD card (up to 999 kits). The same kit is inserted at the cursor position, and steps Insert an SD card into the TM-6 PRO (p. -
Page 36: Loading Kit Backup Data From An Sd Card (1 Kit Load)
Here’s how kit backup data that was saved on an SD card can be loaded into the TM-6 PRO. Insert an SD card into the TM-6 PRO (p. 7). In the KIT screen (p. 20), press the [F2] (TOOLS) button. -
Page 37: Settings (Menu)
Basic Procedure for Settings press the [ENTER] button. The MIDI screen appears. Here’s how to make overall settings for the TM-6 PRO, and for individual instruments and effects. Reference For details on the parameters that can be edited, refer to “Data List”... -
Page 38: Settings For The Entire Tm-6 Pro
Settings for the Entire TM-6 PRO Displays the output settings screen. Here’s how to make settings that apply to the entire If you select TM-6 PRO, such as output destination assignments or DIRECT1, the sound footswitch assignments. is output in mono to DIRECT1. -
Page 39: Backing Up Data
Here’s how backup data that was saved on an SD card can be loaded into the TM-6 PRO. Here’s how to save all settings that are stored in the TM-6 PRO (up to 99 sets). Insert an SD card into the TM-6 PRO (p. 7). - Page 40 Bank Select the backup number. button. * If you load user samples, the user samples in the TM-6 PRO The backup data is deleted from the SD card. are overwritten by the user samples that are included in the backup data. Also, depending on the size of the user Press the [EXIT] button several times to samples, it might take several minutes to load the data.
-
Page 41: Connecting To A Computer For Playback
Explanation Connecting to a Computer for Playback Use the driver provided by the operating system. GENERIC You can connect the TM-6 PRO to a computer, and record Operation is limited to audio or MIDI. USB MIDI. Driver Mode Use the TM-6 PRO’s dedicated driver provided by Roland. -
Page 42: Specifying The Output For Usb Audio
PHONES OUT (R) The sound that is output to each channel of USB audio MASTER OUT L corresponds to the output jacks of the TM-6 PRO module. This means that sound is output to each USB audio channel MASTER OUT R... -
Page 43: Checking The Usb Audio Input/Output Levels
Drum Triggers Foot switches (BOSS FS-5U, FS-6; sold separately) or Here’s how to check the input/output levels of the USB drum triggers that are connected to the TM-6 PRO can audio. be assigned to control functions such as switching kits or switching set lists. -
Page 44: Other Settings
“Options” and press the [ENTER] button. If the auto-off function is set to “4 HOURS, ” the message The OPTION screen appears. “MESSAGE: AUTO OFF, The TM-6 PRO will turn off in 30 min. ” will appear 30 minutes before turning the TM-6 PRO off. -
Page 45: Viewing Information For The Tm-6 Pro Itself
Itself The “Factory Reset” operation returns all data and settings stored in the TM-6 PRO to their factory-set condition. Here’s how to view information for the TM-6 PRO unit itself, NOTE such as its program version. When you execute this operation, all data and settings in the TM-6 PRO will be lost. -
Page 46: Error Messages
Insert an SD card correctly. connected! Copy the necessary data from the SD card, and then format the SD card on the TM-6 PRO SD Card Media Error! The contents of SD card are damaged. (p. 40). If this does not solve the problem, try a different SD card. -
Page 47: Troubleshooting
Troubleshooting Problem Items to check Action Page Problems with sound Are the cables correctly connected to each Check the connections. p. 8 drum trigger and pedal? Could the instrument be “OFF”? Assign an instrument. p. 24 Could the instrument’s “Volume” be lowered? Adjust the instrument’s “Volume. ” Are the output settings correct? Check the settings for “Output Assign. -
Page 48: Main Specifications
Main Specifications Roland TM-6 PRO: Trigger Module Kits Preset instruments: 268 Instruments Factory preloaded user samples: 500 Pad Equalizer: each pad (HEAD/RIM independently) Pad Transient: each pad (HEAD/RIM collectively) Pad Compressor: each pad (HEAD/RIM collectively) Effects Pad Multi-Effects: 30 types, each pad (HEAD/RIM collectively) - Page 49 *1: Audio files must be saved on an SD card. *2: Used when attaching the mounting plate. * This document explains the specifications of the product at the time that the document was issued. For the latest information, refer to the Roland website.
Need help?
Do you have a question about the TM-6 PRO and is the answer not in the manual?
Questions and answers