
Related Manuals for Airuno Amadeus


Summary of Contents for Airuno Amadeus
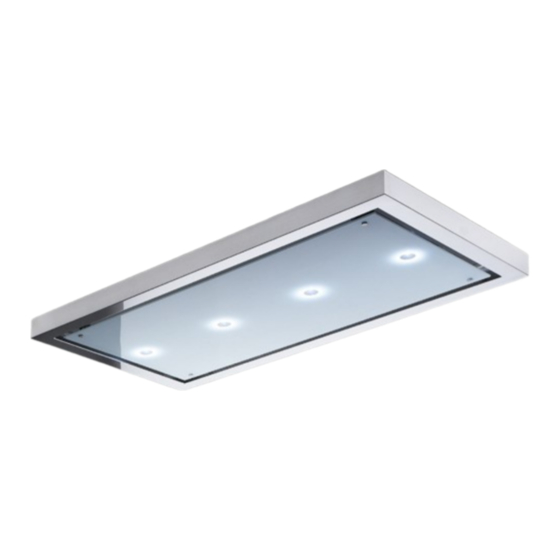
- Page 1 Amadeus Recirculating Ceiling Hood Installation & User Instructions Please read these instructions carefully before installing and operating this appliance...
-
Page 2: Table Of Contents
Contents 1. Introduction 2. Health and Safety 3. Warranty Information 4. Installation 4.1 Assembly Instructions 4.2 Electrical Wiring 4.2.1 Electrical Wiring Diagram 4.2.2 Controls 5. Use & Maintenance 5.1 Changing the Light Bulbs 5.2 Cleaning the Metal Filters 5.3 Carbon Filters 5.3.1 Polyester Carbon Filters 5.3.2 Long Life Carbon Filters 5.4 Cleaning the Hood... -
Page 3: Introduction
• 1. Introduction Install the cooker hood in accordance with the regulations in force in your local area, region Dear Customer, and country. • For the correct use of the appliance and to We wish to thank you for choosing this Air Uno prevent accidents, the instructions given in this cooker hood. -
Page 4: Warranty Information
3. Warranty Information 4. Installation We offer a 4 year warranty on all Airuno cooker hoods, which will start from the date of delivery. The minimum safety distance between the bottom The warranty covers parts and labour for the 4 year... -
Page 5: Assembly Instructions
The hood can be used for both filtering and suction. When the filtering function is operating, i.e. with air recycle, carbon filters must be used. When the suction function is operating i.e. exhausting the filtered air on the outside, a suitable compensation system must be used according to Ø9mm hole current standards in force. -
Page 6: Remove The Cap From The Bolt (Fig
Fig 8 Fig 5 7. Align the fixings to the holes on the hood and 4. Remove the cap from the bolt (Fig 6). tighten bolts to fix the hood to the bulkhead (Fig 9). Fig 6 Pull down at each side of the glass to open (Fig 7). Fig 9 8. -
Page 7: Electrical Wiring
under the conditions of overvoltage category III, in 4.2 Electrical Wiring accordance with the rules of installation. The plug or Omni polar switch must be accessible when the unit The electrical wiring must be performed by a is installed. specialised electrician fully respecting current If the power cord is damaged, it must be replaced by standards and legislation in force. -
Page 8: Controls
To reset this used for 2 hours every day). Saturated filters could press and hold the power button on the extractor be a fire hazard. The filters in the Amadeus are until the red light goes off. rectangular. -
Page 9: Cleaning The Hood
6. Technical Data Amadeus 120cm with AMA Motor Control remote control Colour/finish Stainless steel/Glass Lighting 4 x LED (4000K) Airflow (m 350-650 Pressure (Pa) Noise (db) 38-58 Power (W) Voltage (V) 220-240 Weight (kg) Energy Class Fig 14 5.4 Cleaning the Hood... -
Page 10: Troubleshooting
7. Troubleshooting Please make sure the below has been checked before logging a service call. NOISY − Check that the hood has correct size ducting (semi or rigid ideally). − Make sure there are no restrictions within the ducting outlet. −... -
Page 11: Dimensions
8. Dimensions... - Page 12 CD (UK) Ltd T/A Air Uno Unit L, Wakefield House Thistle Way Gildersome Spur Morley West Yorkshire LS27 7JZ CD (UK) Ltd T/A Air Uno is a company registered in England and Wales Registration No. 2905619 of this vested part not be reproduced of this are accurate at the date of...
Need help?
Do you have a question about the Amadeus and is the answer not in the manual?
Questions and answers