Advertisement
Micro Laser Distance Sensor for IO-Link (CMOS)
HG-C1000L Series
Thank you very much for purchasing Panasonic products. Please read this
Instruction Manual carefully and thoroughly for the correct and optimum
use of this product. Kindly keep this manual in a convenient place for quick
reference.
WARNING
● This product is intended to detect objects. Do not use it to carry out
safety control functions to prevent accidents.
● Never use this product as a sensing device for personnel protection.
● Do not look into the beam directly during operation.
1
CE marking
This product complies with the following standards and
regulations.
● For the EU: EMC Directive 2014/30/EC
Contact for CE:
Panasonic Marketing Europe GmbH
Panasonic Testing Center
Winsbergring 15, 22525 Hamburg, Germany
2
Confirmation of packed content
● Sensor
● Laser warning label (JIS Standards, GB Standard)
● FDA certification label
● Instruction Manual (Japanese, English)
3
Safe use of laser product
In order to prevent accidents caused by laser products and to protect the
users, IEC, JIS and FDA established the following standards:
IEC:
IEC 60825-1-2014 (EN 60825-1-2014)
JIS:
JIS C 6802-2014
FDA:
PART 1040 (Performance standards for light-emitting products)
These standards classify laser products according to their level of hazard
and provide safety measures for the respective classes.
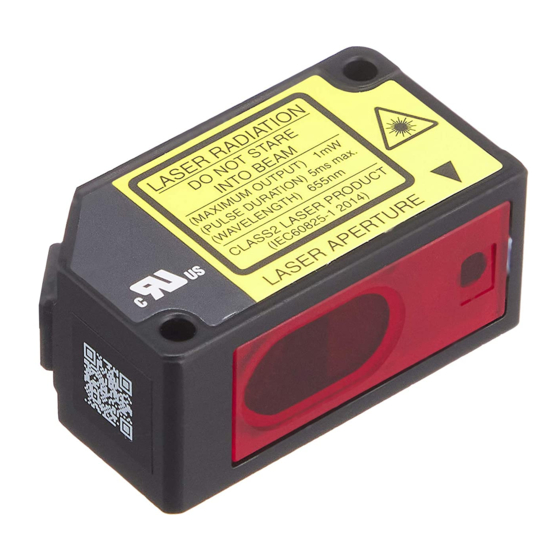
Warning label and position
LASER RADIATION
(MAXIMUM OUTPUT) 1mW
(PULSE DURATION) 5ms max.
CLASS2 LASER PRODUCT
LASER APERTURE
An English warning label is attached to this product.
4
Part description
1
2
3
4
5
INSTRUCTION MANUAL
ME-HGC1000LV1EN 09/2018
1pc.
1 set each
1pc.
1pc. per
language
DO NOT STARE
INTO BEAM
(WAVELENGTH) 655nm
(IEC60825-1 2007)
9
8
6
7
No.
Zero set indicator (Yellow)
1
Teaching indicator (Yellow).
2
Output operation indicator
3
(Orange)
Laser emission indicator
4
(Green)
TEACH key
5
UP key
6
DOWN key
7
Digital indicator (Red)
8
PRO indicator (Yellow)
9
5
Mounting
● When mounting this product, use M3 screws (prepare separately).
Use a tightening torque of 0.5 N m for mounting.
● When mounting this product using the sensor mounting bracket (op-
tional), also use a tightening torque of 0.5N·m
M3 screws
If the fixed ring loosens, the connector will come off, causing this product to gen-
erate a communication error. Before use, check that the fixed ring is not loose.
Firmly tighten the fixed ring by rotating it.
●
Mounting direction
● When performing measurements of moving objects with excessively
different materials and colors, mount the product in the following direc-
tions to minimize measurement errors.
● When performing measurements of rotating objects, mount the prod-
uct as follows. The effect of up/down deflection and position deviation
can be minimized by mounting the sensor in the correct direction.
1
Item
Lights when the zero set function is
enabled.
Lights when teaching is in process
Lights when the output is on
Lights when the laser beam is ON
Lights in Pro mode
Flashes in normal status during IO-Link
communication
OFF in normal status without IO-Link
communication
Mounting hole dimensions
18mm
Fixed ring
Advertisement
Table of Contents

Related Manuals for Panasonic HG-C1000L Series


Summary of Contents for Panasonic HG-C1000L Series
- Page 1 Lights when the output is on ME-HGC1000LV1EN 09/2018 (Orange) Laser emission indicator Thank you very much for purchasing Panasonic products. Please read this Lights when the laser beam is ON (Green) Instruction Manual carefully and thoroughly for the correct and optimum use of this product.
-
Page 2: List Of Functions
● When there is a step in the moving object, mount the product as fol- List of functions lows. The effect of reflection deviation by the edges of the steps can be minimized by mounting the sensor in the correct direction. Function Setting on main unit IO-Link communication setting... - Page 3 1-point teaching (window comparator mode) 2. Press the TEACH key when the sensing This mode is used for setting the threshold range for the distance from the object is present. reference value of the sensing object by performing a 1-point teaching. This (System command / Index2: 0x4D) mode is used for sensing within the threshold range.
-
Page 4: Threshold Value Fine Adjustment Function
For the setting method, refer to section 13, “PRO mode setting.” The threshold can be set by using the threshold value fine adjustment func- tion, see section 9, “Threshold value fine adjustment function”. Stable sensing is not possible. 3-point teaching (window comparator mode) 1. -
Page 5: Zero Set Function
Peak / bottom hold function Key lock function The peak / bottom hold function is for displaying the peak value and the bot- The key lock function is to prevent acceptance of key operations, so that tom value. the conditions in each setting mode are not changed accidentally. When the zero set function is executed while the peak / bottom hold func- When the key operation is performed after the key lock is set, ”... - Page 6 Procedure Setting Default setting Description Set the response time. Measurement display Response “ ”: High precision 10ms speed “ ”: Standard 5ms “ ”: High speed 1.5ms Output Select the control output operation mode. DOWN: Press for 3 seconds operation “...
-
Page 7: Error Indication
Error indication In case of error, attempt the following measures. Error Description Solution indication Hold OFF Insufficient amount of reflected Confirm that the sensing distance - - - - light. is within the specification range. Hold ON The sensing object is out of Adjust the installation angle of the the sensing range. - Page 8 Do not use or store in an environment pressurized to atmospheric pressure or higher at an altitude of 0m Panasonic Industrial Devices SUNX Co., Ltd. http://panasonic.net/id/pidsx/global Overseas Sales Dept. (Head Office) 2431-1 Ushiyama-cho, Kasugai-shi, Aichi, 486-0901, Japan Telefon: +81-(0)-568-33-7861 FAX: +81-568-33-8591 Europe Headquarter: Panasonic Electric Works Europe AG Robert-Koch-Straße 100, D-85521 Otttobrunn, Germany Telefon: +49-89-45354-1000...
Need help?
Do you have a question about the HG-C1000L Series and is the answer not in the manual?
Questions and answers