Table of Contents
Advertisement
Quick Links
Advertisement
Table of Contents

Related Manuals for Mindray BeneVision N1


Summary of Contents for Mindray BeneVision N1
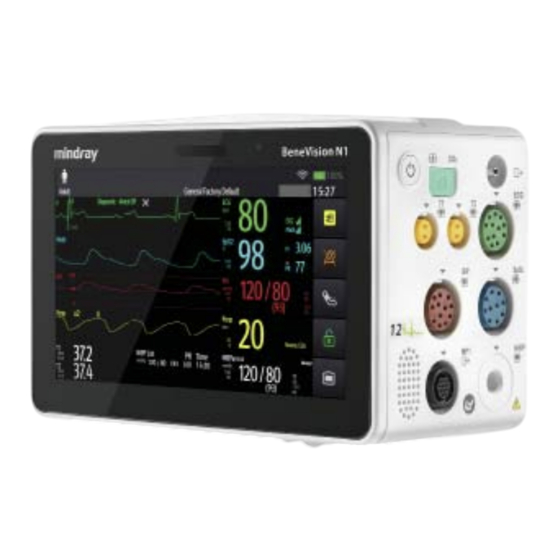
- Page 1 BeneVision N1 Quick Reference Guide...
- Page 2 Note: The BeneVision N1 Quick Reference Guide is not intended as a replacement to the Operating Instructions. This document is a guideline only to be used as an aid to comprehensive Inservice Training.
-
Page 3: Table Of Contents
Table of Contents Table of Contents QUICK KEYS ............1 GESTURES . - Page 4 Table of Contents (cont'd) Set A Non-Invasive Blood Pressure Measurement Interval ....9 Configure A Custom Sequence ......... . .10 Factors that Affect Blood Pressure Measurement Accuracy .
- Page 5 Table of Contents (cont'd) Cleaning the Equipment and Mounting Kits ......19 Disinfecting the Equipment and Mounting Kits .
-
Page 6: Quick Keys
BeneVision N1 Quick Reference Guide QUICK KEYS Alarm Reset Screen Setup Acknowledges alarms. Opens the Screen Setup dialog. Alarm Pause Print Pauses the current Initiates a real-time and future alarms for a report. preconfigured time. Audio Pause Standby Pauses alarm tone. -
Page 7: Gestures
BeneVision N1 Quick Reference Guide GESTURES Swipe down the touchscreen with two fingers to access the Discharge Patient dialog box. PATIENT SETUP Admit Patient And Enter Demographics (Manual Entry) The Patient Management dialog allows the clinician to admit a patient and enter patient demographics. -
Page 8: Enter Demographics From The Adt Database
BeneVision N1 Quick Reference Guide information is entered into the monitor. Enter Demographics from the Central Monitoring System (CMS) If the N1 monitor is connected to the CMS, entering patient information at the CMS will enter the patient information into the N1 monitor. In addition, entering demographic information into the N1 monitor will automatically enter information into the CMS. -
Page 9: Standby
BeneVision N1 Quick Reference Guide • Select the Main Menu quick key, and select Discharge from the Patient Management column. • Select Discharge patient from the standby screen. And select Discharge to confirm. STANDBY Enter Standby The Standby function allows the clinician to suspend monitoring on a patient. -
Page 10: Adjust Printed Waveforms
BeneVision N1 Quick Reference Guide c. Select Print. Adjust Printed Waveforms To adjust the waveforms printed for a patient on the N1 monitor: a. Select the Main Menu quick key, and select Report Setup from the Report column. b. Select Realtime Reports tab. -
Page 11: Ecg
BeneVision N1 Quick Reference Guide c. Enable Set As End Case Report. d. Select the Main Menu quick key or to return to the main display. Adjust ECG Lead The N1 monitor allow the clinician to adjust the leads being viewed on the main display. -
Page 12: Initiate Qt Analysis
BeneVision N1 Quick Reference Guide b. Select the ST tab. c. Select the Setup tab. d. Enable ST Analysis. e. Select the Main Menu quick key or to return to the main display. Initiate QT Analysis To enable the QT monitoring on the N1 monitor: a. -
Page 13: Nibp
BeneVision N1 Quick Reference Guide NIBP Initiate A Non-Invasive Blood Pressure Measurement (NIBP) To initiate a NIBP measurement: a. Press the NIBP Start/Stop quick key. a. Select NIBP tile on the main screen to access the NIBP dialog. b. Select Start NIBP. -
Page 14: Set A Non-Invasive Blood Pressure Measurement Interval
BeneVision N1 Quick Reference Guide Set A Non-Invasive Blood Pressure Measurement Interval The N1 monitor allows the clinician to set a pre-configured interval for a NIBP measurement to be obtained automatically. To set an automatic interval on the N1 monitor: a. - Page 15 BeneVision N1 Quick Reference Guide a cuff has been shown to result in the overestimation of BP (systolic and diastolic) while too large a cuff results in the underestimation of BP. Ensure that the cuff is wrapped directly over the patient’s skin. BP measurement could be 10 to 40 mmHg higher or lower than actual when the cuff is applied over clothing.
-
Page 16: Invasive Blood Pressures (Optional)
BeneVision N1 Quick Reference Guide Cuff Description Limb Circumference Adult Long 25 - 35 cm Large Adult Long 33 - 47 cm References: 1. American Association on Critical-Care Nurses (AACN): Practice Alert, Non-Invasive Blood Pressure Monitoring (April 2010)- http://www. aacn.org/wd/practice/docs/practicealerts/non-invasive-bp-monitoring. -
Page 17: Zero Invasive Blood Pressure
BeneVision N1 Quick Reference Guide • Waveform/Numeric tile -Select the IBP waveform/numeric tile. -Select the Setup tab. b. Select IBP Label and adjust the label. c. Select the Main Menu quick key or to return to the main display. Zero Invasive Blood Pressure To zero an invasive blood pressure transducer on the N1 monitor: a. -
Page 18: Changing Arrhythmia Alarm Settings(Arrhythmia Option Required)
BeneVision N1 Quick Reference Guide Changing Arrhythmia Alarm Settings To adjust a patient’s arrhythmia alarm on the N1 monitor: a. Select ECG waveform/numeric tile or Main Menu quick key. b. Select Arrhythmia tab. c. Scroll and select individual arrhythmia. d. Select •... -
Page 19: Reset Alarms
BeneVision N1 Quick Reference Guide a. Select the technical alarm information area to enter the Alarms dialog. b. Select the Technical Alarms tab. c. Select the desired alarm. d. Select the Main Menu quick key or to return to the main display. -
Page 20: Review
BeneVision N1 Quick Reference Guide Note1: The first waveform is always an ECG lead and HR is always located in the first digital tile in the Normal Screen selection. Note2: Digital and waveform display seelctions on the N1 monitor and Central Monitoring System are independent. -
Page 21: Full Disclosure
BeneVision N1 Quick Reference Guide f. Select the Main Menu quick key or to return to the main display. Note: The waveforms printed are determined by the Record Setup and Print Setup dialogs on the N1 monitor. Full Disclosure The N1 monitors have the ability to store configured waveforms and associated numeric information for up to 48 hours. -
Page 22: Beat Tone
BeneVision N1 Quick Reference Guide To adjust the key volume on the N1 monitor: a. Select the Main Menu quick key, and select Display from the Display column. b. Select Key Volume. c. Select volume ranging from 0-10 (0=Off 10=Max). -
Page 23: Parameter Colors
BeneVision N1 Quick Reference Guide b. Set Date and Time. c. Set Date Format. d. Enable 24 Hour Time if desired. e. Enable Daylight Saving Time if desired. f. Select the Main Menu quick key or to return to the main display. -
Page 24: Cleaning The Equipment And Mounting Kits
BeneVision N1 Quick Reference Guide To lock the touchscreen, select the Unlock quick key , and swipe the slider up as instructed. When the touchscreen is locked, the quick key changes to . To unlock the touchscreen, touch anywhere of the touchscreen and swipe the slider up as instructed. -
Page 25: Sterilization
BeneVision N1 Quick Reference Guide STERILIZATION Sterilization is not recommended for this equipment, related products, accessories, or supplies unless otherwise indicated in the Instructions for Use documentation accompanying the products, accessories or supplies. - Page 26 Mindray DS USA, Inc. 800 MacArthur Blvd., Mahwah, NJ 07430 Tel: 800.288.2121 or 201.995.8000 www.mindray.com 0 4 6 - 0 1 1 4 6 6 - 0 0 ( 2 . 0 )
Need help?
Do you have a question about the BeneVision N1 and is the answer not in the manual?
Questions and answers