Table of Contents
Advertisement
Advertisement
Table of Contents

Related Manuals for Xhorse CONDOR XC-009


Summary of Contents for Xhorse CONDOR XC-009
- Page 1 CONDOR Mechanical Key Cutting Machine XC-009 User Manual...
- Page 2 XC-009 Mechanical Key Cutting Machine...
-
Page 3: Table Of Contents
CONTENTS 1 Safety Precautions .................. 5 2 General Information ................6 2.1 Machine Description................ 6 2.2 Characteristics ................. 6 3 Product Packaging Checklist ..............7 4 Overview ....................10 4.1 Schematic ..................10 4.2 Specifications ................. 11 4.3 Main Parts and Function Declaration ..........13 4.3.1 Hand Wheel ................ - Page 4 5.4 Clamp Installing ................23 6 Use of Equipment ................. 24 6.1 Key Alignment ................24 6.1.1 Head spacing ................24 6.1.2 Shoulder spacing..............25 6.2 Clamp cutting surface selection ............ 26 6.3Use of needle .................. 27 7 Maintenance ..................28 8 Quality assurance and after-sales instructions........
-
Page 5: Safety Precautions
Mechanical Key Cutting Machine CONDOR XC-009 1 Safety Precautions To prevent personal injure or machine damage, users should carefully observe the instructions provided by this operation manual and adopt the following safety precautions: Use the machine under the safe condition ... -
Page 6: General Information
Please read it carefully before use. It is crucially important if you wish to operate the machine safely and efficiently. 2.2 Characteristics CONDOR XC-009 is a new generation of mechanical Key Cutting machine with the following characteristics: Beautifully designed, full of modernity and technology. -
Page 7: Product Packaging Checklist
Mechanical Key Cutting Machine CONDOR XC-009 3 Product Packaging Checklist Name Image Quantity Description Main Body Key Machine body Control handle, Handle accessory processing M6 screw Fixed handle Tools Tools placed Key spacer stopper 2.5mm Allen Tool for removing wrench... - Page 8 Mechanical Key Cutting Machine CONDOR XC-009 5mm Allen Tool for trimming wrench slide Tool change Change the cutter 19mm open Change the cutter spanner file Tool for polish φ1.2mm Tool for putting nozzle the key cleaner φ1.7mm Tool for putting...
- Page 9 Mechanical Key Cutting Machine CONDOR XC-009 Power cord Connect to power (1.5m) (European (optional) Standard) Power cord Connect to power (1.5m) (American (optional) Standard) Brush Tool for cleaning Quality Product delivery certificate inspection and Product certificate and Packaging packing Checklist...
-
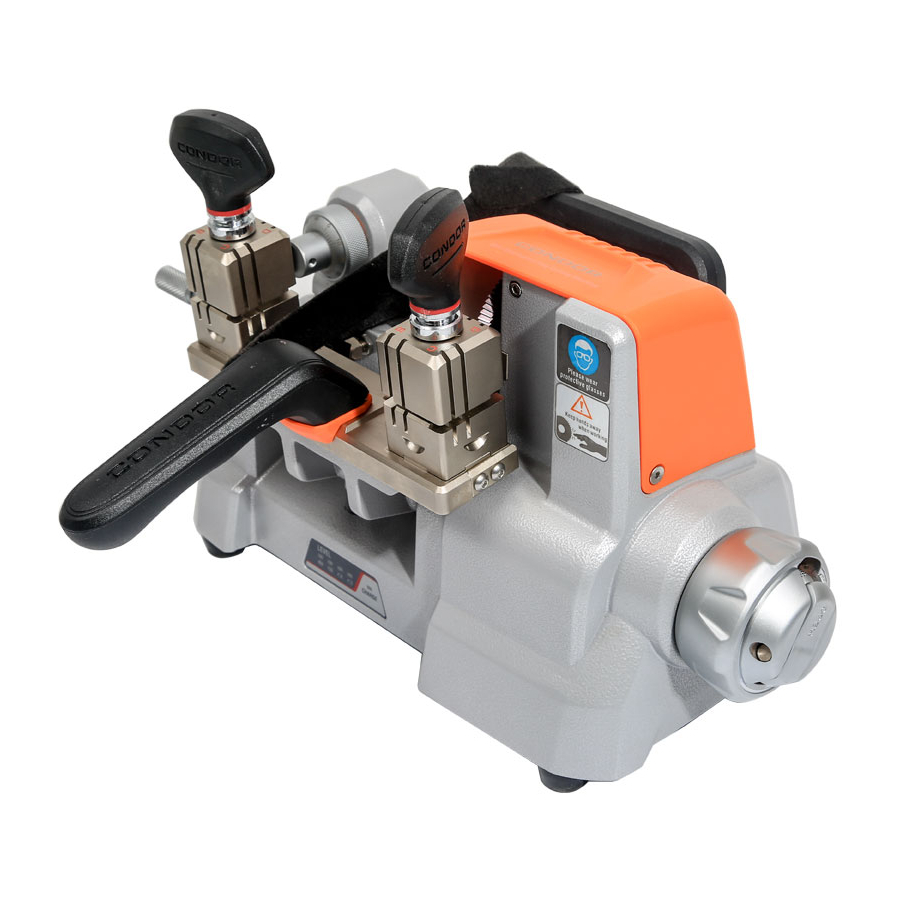
Page 10: Overview
Mechanical Key Cutting Machine CONDOR XC-009 4 Overview 4.1 Schematic LED light Handle Cutter LED switch Main clamp Micro-adjust slide Hand wheel Power jack 孔 Handrail KONG1KONG Power switch 1 KONG 孔 Shoulder space rod Power display Accessory clamp clamp... -
Page 11: Specifications
Mechanical Key Cutting Machine CONDOR XC-009 4.2 Specifications Input Voltage 90-264V AC Input Frequency 47-63Hz Consume 110W Power Parameter 12-18V DC /3A Battery Capacity 2600mAh/22.2V Spindle Speed 900rpm Motor Torque 1.2Nm Clamp Spacing 95mm Table Travel 46mm Working Temperature 0-50℃... - Page 12 Mechanical Key Cutting Machine CONDOR XC-009 200mm 175mm 285mm Machine Dimensions Packing Dimensions...
-
Page 13: Main Parts And Function Declaration
Mechanical Key Cutting Machine CONDOR XC-009 4.3 Main Parts and Function Declaration 4.3.1 Hand Wheel Unscrew the small hand wheel and turn the small hand wheel to achieve cutting feed. By rotating the hand wheel, the clamp slide can be controlled to move left and right, so as to achieve lateral feed during the cutting of the key. -
Page 14: Skid Platform
Mechanical Key Cutting Machine CONDOR XC-009 4.3.2 Skid Platform The clamp Skid Platform can be rotated about the axis of rotation and moved axially to achieve lateral and longitudinal feed of the key. Rotating the hand wheel to realize the lateral... -
Page 15: Micro-Adjust Slide
Mechanical Key Cutting Machine CONDOR XC-009 4.3.3 Micro-adjust slide Adjust the Micro-adjust slide to align the cutter with key cutting guide. -
Page 16: Clamp
Mechanical Key Cutting Machine CONDOR XC-009 4.3.4 Clamp Allocation and clamp the key, the four-side (A、 B、 C、 D)can be used to copy different key types. The left side is accessory clamp, placed original key, the right side is main clamp, placed blank key. -
Page 17: Power Parts
Mechanical Key Cutting Machine CONDOR XC-009 4.3.5 Power Parts There is a battery capacity indicator in front of the machine. When the power is low, the indicator is red. Please charge it in time. When power is fully, please unplug the power cord in time. -
Page 18: Equipment Installing And Debugging
Mechanical Key Cutting Machine CONDOR XC-009 5 Equipment Installing and Debugging 5.1 Handle Installing In order to save space, the handrail is separately from the whole machine in the package. Please open the box and install the handrail according to above picture. -
Page 19: Cutter Installing
Mechanical Key Cutting Machine CONDOR XC-009 5.2 Cutter Installing While the machine is stopped, slowly rotate the spindle, align the spindle pin hole with the host pin hole, and then insert the tool change rod into the end. Installing the cutter on the spindle. Pay Attention to the front and back surface of cutter (with the word facing left), install the cutter block and lock nut (anti-nut). -
Page 20: Micro-Adjust Slide Calibration
Mechanical Key Cutting Machine CONDOR XC-009 5.3 Micro-adjust Slide Calibration Micro-adjust slide calibration has been finished at the factory. If deviation or incorrect operations are found, please adjust it as follows. Firstly, both clamps are screw to A side, and clamp the Key spacer on both clamps. -
Page 21: Lateral Micro-Adjust Slide Calibration
Mechanical Key Cutting Machine CONDOR XC-009 5.3.1 Lateral Micro-adjust Slide Calibration Perform lateral adjustment. After clamping the Key spacer, rotate and slide the clamp slide,the left side of cutter is close to the Key spacer, loosen the slide fixing screw slightly, and slowly adjust the left adjustment screw with an Allen wrench. -
Page 22: Longitudinal Micro-Adjust Slide Calibration
Mechanical Key Cutting Machine CONDOR XC-009 5.3.2 Longitudinal Micro-adjust Slide Calibration When the longitudinal direction adjusting, slowly rotates the clamp skid platform, align the cutter with the key holder v groove, then rotates the Micro-adjust slide dial, align the key cutting guide with the key holder v groove, rotates the dial 1 small lattice, the key cutting guide moves 0.02mm than before. -
Page 23: Clamp Installing
Mechanical Key Cutting Machine CONDOR XC-009 5.4 Clamp Installing Do not remove the clamp under normal condition. If it is accidentally disassembled, please install according to the above figure. Pay attention to the clamp surface, otherwise it will not work normally. -
Page 24: Use Of Equipment
Mechanical Key Cutting Machine CONDOR XC-009 6 Use of Equipment 6.1 Key Alignment 6.1.1 Head spacing When the key head is spacing, use the alignment block, insert the positioning block into the spacing slot, slowly push the key until it touches the key spacer, the clamp is tightened to... -
Page 25: Shoulder Spacing
Mechanical Key Cutting Machine CONDOR XC-009 6.1.2 Shoulder spacing The original key is fixed on the accessory clamp, the shoulder spacer is aligned, then the blank key is aligned to the shoulder spacer, clamped, and finally the shoulder spacer is rotated to the initial state. -
Page 26: Clamp Cutting Surface Selection
Mechanical Key Cutting Machine CONDOR XC-009 6.2 Clamp cutting surface selection Clamp have A, B, C, D on all sides, different types of keys according to the above image to select the appropriate clamping surface, or reference appendix. -
Page 27: Use Of Needle
Mechanical Key Cutting Machine CONDOR XC-009 6.3Use of needle When using A or B surface, the clamping depth too deep, cutting less than the complete , you can use the needle, change the clamping depth to ensure normal processing, as shown in the following figure:... -
Page 28: Maintenance
8 Quality assurance and after-sales instructions CONDOR XC-009 warranty period is one year, subject to the date on the transaction voucher, if no transaction voucher or transaction voucher is lost, the factory record date shall prevail. - Page 29 Xhorse (WeChat: SZ-Xhorse). Xhorse league Xhorse reserve all rights to this manual. No person or organization is allowed to copy and disseminate any part of this manual in any form without permission. Due to product improvement, the contents of this manual may be changed without prior notice。...
-
Page 30: Appendix
Mechanical Key Cutting Machine CONDOR XC-009 9 Appendix 国内钥匙 名称 常见车型 钥匙特征 钥匙外形图 参考编号 外铣两轨迹 12 齿 BYD56 比亚迪 F3 56 号 头定 外铣两轨迹 6 齿 BYD66 比亚迪 F0 66 号 头定 外铣两轨迹 8 齿 BT74 奔腾 B50 74 号... - Page 31 Mechanical Key Cutting Machine CONDOR XC-009 南京菲亚特 派力奥 外铣两轨迹9 齿 GT15 60 号 周末风 老法拉利 肩定 捷达 桑塔纳 高尔 夫 老奥迪 100 红旗 外铣两轨迹7 齿 HU49 1 号 B4 246 桑塔纳 256 肩定 捷达 外铣两轨迹10 齿 HU46 欧宝 安德拉 肩定...
- Page 32 Mechanical Key Cutting Machine CONDOR XC-009 标致 206 207 C2 07 外铣两轨迹6 齿 NE72 53 号 款毕加索 肩定 老款尼桑巴宁风度 外铣两轨迹8 齿 NSN11 6 号 蓝鸟公爵 肩定 新款日产尼桑天籁 外铣两轨迹10 齿 NSN14 骐达颐达 22 号 头定(11 齿) 骊威智能卡小钥匙 奇瑞 A3, A5 瑞虎东...
Need help?
Do you have a question about the CONDOR XC-009 and is the answer not in the manual?
Questions and answers
Can you send me instructions manual