
Related Manuals for VENNSKAP Skotti


Summary of Contents for VENNSKAP Skotti
- Page 1 GRILL INSTR UCTOR U S E R I N S T R U CT I O N S FO R YO U R GA S G R I L L www.skotti-grill.eu...
- Page 3 WARNING IMPORTANT!
- Page 4 Skotti to the gas cartridge. • Before connecting the gas cartridge, make sure the gaskets between the • Use Skotti with a standard device and the gas cartrid- EN417 propane/butane gas mixture only. Use approved ge are in working order screwable gas cartridges and condition.
- Page 5 • Follow the user instruc- defective or worn out tions and warnings when gaskets. grilling. • Never use Skotti if the gas • Caution! outlet is defective or faulty Skotti and its individual or doesn’t work properly. parts can heat up to high temperatures.
- Page 6 Please read the user’s man- ual carefully to learn about the device before you connect it to a gas cartridge. Keep this manual to read again or give to other users. Keep this manual to read again or give to other users.
-
Page 7: Table Of Contents
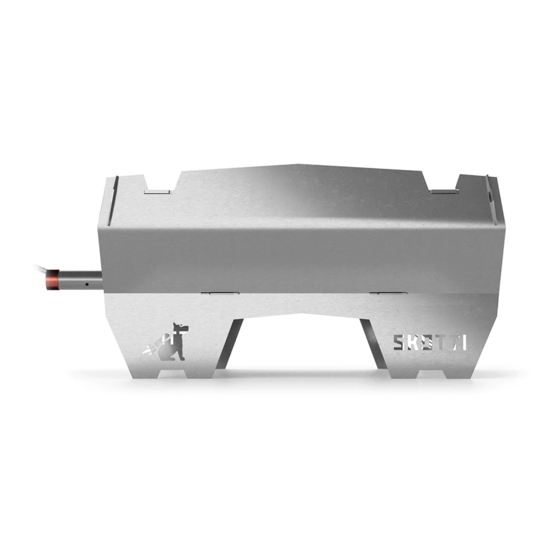
I N H A LT 1. Getting started: Skotti’s parts 2. Set up: Put Skotti together in 8 easy steps 3. Packing and Storing: How to put Skotti back in its bag. 4. Safety: Read before using • Warnings • Grilling with liquid gas •... - Page 8 S KOT T I ’ S PA RT S . Skotti is packed up in its handy waterproof bag. Each part has its own spot in the bag, saving lots of space. Your first time, put the bag on a hard, flat surface in front of you, with the company logo and the handles facing upwards.
- Page 9 • Take one long side panel with • Make sure that the smooth edge the Skotti logo on it in your left of the panel and the hooks and hand. Hold it and make sure the tabs are at an equal height with small triangle mark at the the slits.
- Page 10 Step 7: Insert grill rack • Slide the baffle plate into the Place Skotti in front of you with the burner pipe pointing to the right. remaining two slots above the center hole. It should look like a • Insert the grill rack with the Skotti logo into the corresponding rooftop over the pipe.
-
Page 11: Packing And Storing: How To Put Skotti Back In Its Bag
Put the hose back into the middle pocket of the bag. 2) To dismantle the grill, unlock the grill rack. Put Skotti in front of you so that the end of the burner pipe points to the right. Use both of your index fingers to lift both tabs from the grill rack on the opposite end. - Page 12 6) Pull the bottom panel away from the foot and side panels and place the dirty side on the grill rack. Unhook the other panels from each other. We recommend you put the parts on top of each other in the following order: grill rack / bottom panel (like a rooftop) / 2 side panels / head and foot panel / baffle plate...
-
Page 13: Safety: Read Before Using
• Never use the grill on flammable surfaces. subsides. • When using Skotti with gas, you can place it on the carrying bag. It can • When grilling, you should always have a bucket of sand nearby to catch drips and be cleaned afterwards. - Page 14 There is • If Skotti is used on sand, snow, ice or uneven surfaces and is at an angle, also a high risk of shooting flames or explosions. You will put yourself put a piece of wood or a rock under the bottom to balance it.
-
Page 15: Grilling With Liquid Gas
SEC URIT Y C H E C K BE FOR E I GN ITI O N • Skotti has different gas connections for the corresponding gaskets. Per- form leak checks before use. Mix liquid soap and water in a spray bottle to make a soapy water solution. -
Page 16: Ignition: Lighting Skotti
• Make sure that there is always enough space between Skotti and the to the properties of the cartridge. surface it is on. If Skotti starts sinking into the ground, use sticks or rocks to dig out space underneath it. Always ensure Skotti is in a stable and straight position. -
Page 17: Cleaning Tips: How To Keep Your Skotti Clean
HOW TO KEEP SKOTTI CLEAN CHECK HERE FOR FAQS • You can put all Skotti parts, except the burner pipe and the gas hose with Gas in the burner pipe won’t ignite. the nozzle and regulator, in the dishwasher. The Skotti bag can go in there •... -
Page 18: Maintenance Instructions: How To Enjoy Skotti For A Long Time
This includes the gas hose, gas nozzle and regulator, burner pipe and Skot- should give Skotti special attention once in a while to keep it in top shape: ti‘s bag. We are so sure of the quality of our product that we’ve even exten- ded the warranty: •... - Page 19 • Accident • Vandalism • Misuse or abuse • Our liability excludes special and indirect damage as well as successive damage. Meerbusch, 9 August 2018 Christian Battel / Individual entrepreneur Company: Vennskap Am Schwanenhof 15 40668 Meerbusch Germany www.skotti-grill.eu...