ResMed Astral 150 Information And User Manual For Qualified Professionals
Ventilator
Hide thumbs
Also See for Astral 150:
- User manual (36 pages) ,
- Quick start manual (14 pages) ,
- Quick setup manual (13 pages)

Related Manuals for ResMed Astral 150


Summary of Contents for ResMed Astral 150
- Page 1 Astral 150 Ventilator Information and User Guide for Qualified Professionals Children’s Long-Term Ventilation Service Clinical Team | Email:HospitaltoHomesupport@rbht.nhs.uk | Telephone: 0207 352 8121 x 84411...
-
Page 2: Table Of Contents
For non-qualified members of staff please use the alternative user guide titled ‘Astral 150 Ventilator: Information and User Guide for Home Care Workers’. Information was correct at time of printing and will be reviewed at next review date shown below. -
Page 3: Description Of Outside Of Ventilator
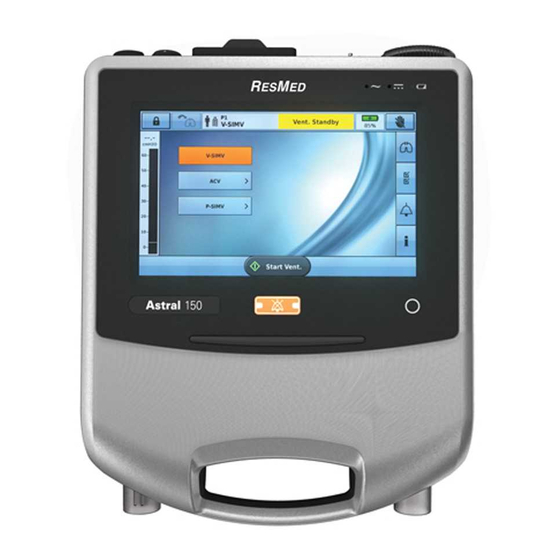
Description of Outside of Ventilator Expiratory Port: Expired air coming back to the ventilator Inspiratory Port: Air going to the patient Power Button USB Connector (to download monitoring data) Air Inlet Power Inlet Oxygen Connector V4: August 2018 Page 3 of 31 For Review: August 2019 Author: LTV Team/JT... - Page 4 1. Touch screen 2. Power source indicator 3. Ventilation on/off indicator 4. Alarm mute button 5. Alarm light V4: August 2018 Page 4 of 31 For Review: August 2019 Author: LTV Team/JT...
-
Page 5: Understanding The Screen
Understanding the Screen 1. Lock/unlock button to access clinical menu 2. Manual breath button (only shown if enabled and in some settings) 3. Information bar (see page 6 for more information) 4. Battery power indicator 5. Lock touch screen button 6. - Page 6 Information Bar (3) The Information bar is displayed at the top of the touch screen. The Information bar displays the operating status of the device, including patient type, current circuit configuration, programs, information messages, ventilation status, alarms and power status. Menu Bar (6) This provide access to the four main menus in the Astral Device.
-
Page 7: Power
Pressure Bar (11) Power The Astral runs on mains power and can be used with different power sources. These includes internal battery power, external battery power and car charger power source. Removing the power lead The power cord is equipped with a push-pull locking connector. - Page 8 Internal Battery Power The ventilator has an internal battery. Whilst the ventilator is connected to mains power the internal battery will charge. When the mains power is disconnected the ventilator will automatically switch to using the internal battery (assuming no external batttery is connected). There is no interuption to ventilation when this happens. The ventilator will notify you of this change by sounding an alarm.
- Page 9 External Battery Power The external battery will power the device for approximately 8 hours. A maximum of two external batteries can be connected to the Astral device. Please Note: • There will be slight variations in the battery life dependent on the individual child’s ventilator parameters and the child’s respiratory pattern.
-
Page 10: Types Of Ventilation Circuits
Using a car Charger When using a car adapter, start the car before connecting the adapter. If the power source drops the ventilator will switch automatically to internal battery power. Connect to power source Types of Ventilation Circuits Types of Adapters V4: August 2018 Page 10 of 31 For Review: August 2019... - Page 11 The whole circuit should be changed weekly at home (i.e. once every 7 days). See local hospital guideline for antibacterial filter. Order code: 7073800 MR7LEAK15 from ResMed for circuit, 24988 from Resmed for additional leak valves (15 mm circuit). See equipment list for other order code.
- Page 12 The whole circuit should be changed every 7 days at home including antibacterial filter. See local hospital guideline for antibacterial filter. *Note: Heat Moisture Exchanger should be changed daily (i.e. once every 24hours) Order code: 7077399 7LEAK15 from Resmed for circuit (15mm circuit), 1850 from Intersurgical for HME. equipment list for other order code. Bacterial Filter...
-
Page 13: Turning On/Off
Double Circuit (dry) The whole circuit should be changed every 7 days at home including antibacterial filter. See local hospital guideline for antibacterial filter. Oder code: 5500 from Intersurgical Note: Heat Moisture Exchanger should be changed daily (i.e. once every 24hours). Order code: 1644 from Intersurgical for filter. -
Page 14: Circuit Calibration
Circuit Calibration The ventilator will need to have a ‘learn circuit’ run on initial set up and for any additional different circuit type that may be used i.e. a separate learn circuit is required for a wet circuit and then a dry circuit. The ‘learn circuit’ does not need to be run at each scheduled circuit change. -
Page 15: Programming Ventilation
Programming Ventilation Unlock the clinical menu, press and hold the padlock symbol for 3 seconds. Select 20 minutes or Unlimited then it will direct you to the main settings. You will be able to change the settings on this interface depending on the tab you are in. Main Settings Alarm Settings To exit clinical menu, press... - Page 16 A warning message will display then select Continue. Select the type of patient: adult or paediatric. Select the circuit type you wish to use. The ventilator will now prompt you to run a ‘learn circuit’ (see page 14). Following a successful ‘learn circuit’ you will now see the modes menu displayed - select the desired mode.
- Page 17 Once the desired mode is selected you will be taken directly to the settings screen. To enter the desired settings, highlight each parameter in turn. As a parameter is highlighted, up and down arrows will appear to the right hand side of the screen. Use these to select the desired value. Once you have finished press ‘apply’.
-
Page 18: Adding Additional Ventilation Programmes
Adding Additional Ventilation Programmes Up to 4 ventilation programmes may be enabled. To do this, unlock the clinical menu, press and hold the padlock symbol for 3 seconds. Select 20 minutes or Unlimited then it will direct you to the main settings. Then select ‘program’... -
Page 19: Changing Between Programmes
The active program highlighted will be activated when switched “ON” from the Tab. In the example below P2 is now on and active. After activating the additional program, select ‘set up assistant’ to select the patient type, circuit and run a ‘learn circuit’... -
Page 20: Starting And Stopping Ventilation
Starting/Stopping Ventilation To start ventilation press the start ventilation icon. To stop the ventilation, press and hold the stop ventilation icon for 3 seconds. Release when prompted and then select ‘confirm’. Entraining Oxygen Oxygen is entrained via the oxygen nozzle on the back of the machine. Note: When the machine is not in use oxygen should be turned off and when oxygen is not required the oxygen nozzle should be removed. -
Page 21: Replacing Air Filter
Replacing the air filter The condition of the air filter should be inspected and checked weekly to see if it is blocked by dust or dirt. If it the filter is deemed in good condition is should be changed monthly. If on a weekly inspection it is found to be blocked that is advisable to change the filter even if the filter is less than 4 weeks old. -
Page 22: Locking/Unlocking
Locking/Unlocking The closed padlock icon indicates that the ventilator is in the ‘patient mode’. In this mode settings and monitoring of ventilation may be viewed but manipulation of parameters is not possible. To unlock the clinical menu press and hold the padlock symbol for 3 seconds. You will then have the option to unlock for 20 minutes or unlimited time. -
Page 23: Altering Parameters
Altering Parameters To change a ventilation parameter, first ensure the clinical menu is unlocked. Select the settings menu from the right hand side of the screen. Select ‘Settings’ then highlight the parameter you wish to alter. As a parameter is highlighted, up and down arrows will appear to the right hand side of the screen. Use these to select the desired value. -
Page 24: Activated Alarms
Select the alarm parameter you wish to adjust in each tab above. Use the arrows to alter the parameter then press ‘apply’ to confirm your selection. Activated Alarms When an alarm is activated the ventilator will provide both audible and visual alerts. A message is also displayed detailing the nature of the alarm. -
Page 25: Testing Alarms
IMPORTANT: All alarms should be responded to no matter what the priority. The priority indicator aims to guide the urgency in which the situation needs to be resolved. Testing Alarms Alarm Checks - Must be carried out at the beginning of each shift. A good time to do this would be when the patient requires suctioning. -
Page 26: Understanding Alarms
Understanding Alarms Low VTE/Low MVE Disconnection/leak 1 Assess child Action 1 Assess child Action Accidental Immediately insert Possible Emergency decannulation tracheostomy causes algorithm: (i.e. tracheostomy If difficulty follow include: 1. Suction has come out) emergency Blocked 2. Emergency algorithm tracheostomy tracheostomy change 2 Assess... -
Page 27: Troubleshooting Common Problems
Troubleshooting Common Problems Machine Failure • Hand-ventilate immediately and change ventilator. Organise a new ventilator. Children ventilated >12 hours should have a backup machine. Learn Circuit Failure • May be due to a. Any leaks in the circuit e.g. heater wire loose in the humidifier. b. - Page 28 Patient upset, uncomfortable or experiencing abdominal expansion due to feeds therefore shallow breathing Ventilator Alarming High Volume (VTE or MVe) • May be due to a. Could be caused by disconnection/leak in the circuit. Check circuit for splits, check for disconnection at the tracheostomy, of the humidifier wires and at the machine.
-
Page 29: Using Nebulisers
Using Nebulisers Nebulisers are attached to the ventilator circuit as shown below. The nebuliser is powered by an air compressor. Using a Nebuliser in a Double Limb Circuit The Double limb circuit is a closed system therefore particles will remain within the system. Swivel Elbow T piece Attach to air compressor... - Page 30 Note: For dry circuit, HME may be removed during nebulisation For nebulising antibiotics in a single leaked circuit, an antibacterial filter must be used in between the nebuliser chamber and expiratory leak to prevent particles escaping into the atmosphere. Temp Probe Swivel Elbow T-piece Leak valve...
-
Page 31: Consumables
Lock the machine after the appropriate settings are entered to avoid accidental tampering. Useful Contact Information For further advice on the ResMed Astral 150 ventilator machine on the phone during week working hours: ResMed (UK) Registered address: 8 Wimpole Street, London, United Kingdom, W1G 9SP Customer Services: 01235862997 Check your service agreement for your options.
Need help?
Do you have a question about the Astral 150 and is the answer not in the manual?
Questions and answers