ResMed Astral 150 Quick Start Manual
Astral series
Hide thumbs
Also See for Astral 150:
- User manual (36 pages) ,
- Information and user manual for qualified professionals (31 pages) ,
- Quick setup manual (13 pages)
Advertisement
Table of Contents
- 1 The Astral Device
- 2 The Astral Device Interface
- 3 Touch Screen
- 4 Patient Circuits
- 5 Fitting the Circuit Adapter
- 6 Powering on the Device
- 7 Accessing Clinical Mode
- 8 Using the Setup Assistant
- 9 Navigating the Menus
- 10 Attaching a Humidifier
- 11 Attaching a Heat Moisture Exchange (HME)
- 12 Attaching an Antibacterial Filter
- Download this manual
See also:
User Manual
Advertisement
Table of Contents

Related Manuals for ResMed Astral 150


Summary of Contents for ResMed Astral 150
- Page 1 Quick start guide English...
-
Page 2: The Astral Device
The Astral device 1. Adapter port Can be fitted with single limb adapter, single limb leak adapter or double limb adapter (Astral 150 only) 2. Handle 3. Inspiratory port (to patient) 4. Ethernet connector (service use only) 5. USB connector... -
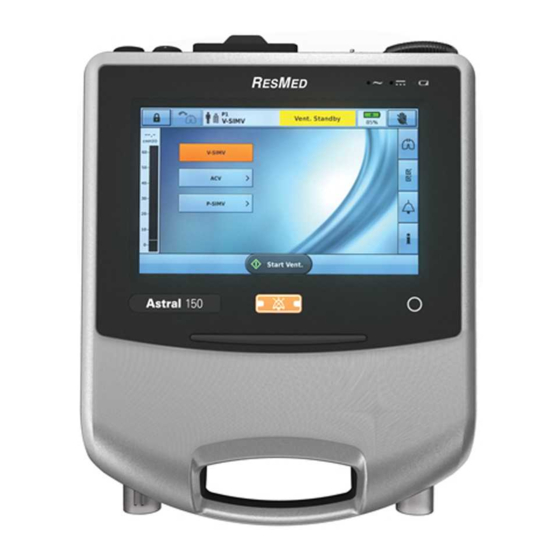
Page 3: The Astral Device Interface
1. Touch screen 2. Power source indicators AC (mains power supply) DC (external battery, car accessory adapter or ResMed Power Station II) Internal battery 3. Therapy on/off indicator Device ready Constant green display when the device is turned on but not ventilating. -
Page 4: Patient Circuits
The Astral device supports single and double limb circuits with the use of interchangeable circuit adapters. Breathing circuits may be of 10, 15 or 22 mm diameter. For recommended patient circuit components and compatible accessories, refer to www.resmed.com/astral/circuits. There are three circuit adapters: Adapter For use with 1. - Page 5 Single limb circuit with intentional leak or Single limb circuit with expiratory valve Mouthpiece circuit using ResMed proprietary circuit Single limb circuit with expiratory valve Double limb circuit (Astral 150 only) or using standard circuit single limb circuit with intentional leak and Mouthpiece circuit To patient...
-
Page 6: Powering On The Device
Powering on the device To power on the device, simply press the green power on/off switch at the back of the device. The device will perform a system check. On completion of the system check, the Patient Home screen and active program is displayed. -
Page 7: Using The Setup Assistant
Using the Setup Assistant To quickly set up the Astral device and start ventilation for a new patient, use the Setup Assistant. 1. Access Clinical mode. 2. From the main menu, press 3. Select Setup Assistant and press Start. 4. A warning message will display. Select Continue. -
Page 8: Navigating The Menus
Navigating the menus Waveforms Displays the last 15 seconds of patient airway pressure and flow in a graph. The graph updates in real-time. Monitors Monitoring Displays all measured parameters in numerical form. Trends Displays trending of various parameters for the last 30 days. Programs* Setup Assistant* Circuit... - Page 9 Enabling additional programs The Astral device comes factory preset with one active program. Additional programs can be enabled. 1. Access Clinical mode. 2. From the Setup main menu, select Programs. 3. Enable additional programs by pressing the slider. Note: The current active program is highlighted in orange and cannot be disabled.
- Page 10 Enabling the ‘Big buttons’ mode The Astral device offers an enhanced access feature (‘Big buttons’ mode) to provide easier usability and accessibility for starting and stopping ventilation as well as Alarm mute. The ‘Big buttons’ mode can be switched on and off as required in either Clinical or Patient mode.
- Page 11 Alarms When an alarm is activated, the Astral device provides both audible and visual alerts, and displays an alarm message in the Alarm display on the Information bar. Indicator Description 1. Alarm Displays either the alarm display message for the highest priority active alarm, or the last alarm not yet reset.
-
Page 12: Attaching A Humidifier
For complete details on attaching patient circuit accessories, see Accessories in the Astral Clinical Guide. For a full list of accessories, see the Ventilation accessories guide on www.resmed.com. If you do not have internet access, please contact your ResMed representative. - Page 13 ResMed Ltd 1 Elizabeth Macarthur Drive, Bella Vista NSW 2153 Australia See ResMed.com for other ResMed locations worldwide. Astral is a trademark and/or registered trademark of the ResMed family of companies. For patent and other intellectual property information, see ResMed.com/ip.
Need help?
Do you have a question about the Astral 150 and is the answer not in the manual?
Questions and answers
when should you use the peds vers adult mode