Rigol DG1000 Series Service Manual
Dual-channel function/arbitrary waveform generator
Hide thumbs
Also See for DG1000 Series:
- User manual (150 pages) ,
- Programming manual (100 pages) ,
- Quick manual (25 pages)

Related Manuals for Rigol DG1000 Series


Summary of Contents for Rigol DG1000 Series
- Page 1 RIGOL Service Guide DG1000 Series Dual-channel Function/Arbitrary Waveform Generator Oct. 2015 RIGOL TECHNOLOGIES, INC.
- Page 3 Notices RIGOL products are covered by P.R.C. and foreign patents, issued and pending. RIGOL reserves the right to modify or change parts of or all the specifications and pricing policies at the company’s sole decision. Information in this publication replaces all previously released materials.
-
Page 4: Safety Requirement
Avoid Circuit or Wire Exposure. Do not touch exposed junctions and components when the unit is powered on. Do Not Operate With Suspected Failures. If you suspect damage occurs to the instrument, have it inspected by RIGOL DG1000 Service Guide... - Page 5 Use the Battery Properly. Do not expose the battery (if available) to high temperature or fire. Improper change of a battery (lithium battery) may cause an explosion. Use the RIGOL specified battery only. Handle with Caution.
-
Page 6: Safety Notices And Symbols
RIGOL Safety Notices and Symbols Safety Notices in this Manual: WARNING Indicates a potentially hazardous situation which, if not avoided, will result in death or serious injury. CAUTION Indicates a potentially hazardous situation which, if not avoided, could result in damage to the product or loss of important data. -
Page 7: Table Of Contents
Contents RIGOL Contents Guaranty and Declaration ................I Safety Requirement .................. II General Safety Summary ................II Safety Notices and Symbols ................ IV Chapter 1 Disassembly and Assembly..........1-1 Notices to Disassembly and Assembly ............1-1 Instrument Appearance ................1-2 Disassemble the Handle ................ -
Page 9: Chapter 1 Disassembly And Assembly
Note: DG1000 series dual-channel function/arbitrary waveform generator consists of two models: DG1022 and DG1022A. In this manual, DG1022 is taken as an example for illustration and the contents are also applicable to DG1022A. -
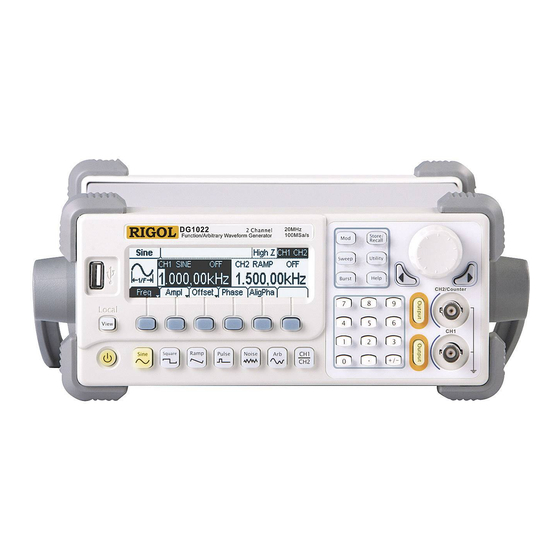
Page 10: Instrument Appearance
Chapter 1 Disassembly and Assembly Instrument Appearance The figure below is the appearance drawing of DG1000 series dual-channel function/arbitrary waveform generator. You need to get a basic understanding of the main parts of the instrument before disassembling and assembling the instrument. -
Page 11: Disassemble The Handle
Chapter 1 Disassembly and Assembly RIGOL Disassemble the Handle Handle Figure 1-2 Disassemble the Handle Disassembly Step: Rotate the handle upright and pull out from the sides of the instrument to remove the handle. DG1000 Service Guide... -
Page 12: Disassemble The Rear Cover
RIGOL Chapter 1 Disassembly and Assembly Disassemble the Rear Cover Rear Cover ① ① Figure 1-3 Disassemble the Rear Cover Part Description: ① 2 screws (M4×8 torx pan head screw, used for fastening the rear cover to the metal chassis) Disassembly Steps: 1. -
Page 13: Disassemble The Metal Enclosure
Chapter 1 Disassembly and Assembly RIGOL Disassemble the Metal Enclosure ① Metal Enclosure Figure 1-4 Disassemble the Metal Enclosure Part Description: ① 1 screw (M4×8, torx pan head screw, used for fastening the metal enclosure to the metal chassis) Disassembly Steps: 1. -
Page 14: Disassemble Rear Bnc Boards
RIGOL Chapter 1 Disassembly and Assembly Disassemble Rear BNC Boards Rear BNC Boards ① Figure 1-5 Disassemble Rear BNC Boards Part Description: ① 4 BNC nuts. Disassembly Steps: Remove 4 BNC nuts (①) using the BNC socket wrench. Take out two rear BNC boards from the metal chassis and remove two 10-pin cables that connect the main board. -
Page 15: Disassemble The Power Supply Board
Chapter 1 Disassembly and Assembly RIGOL Disassemble the Power Supply Board ① ① ① ① The position of the screw fixing the power supply ground wire Power Supply Board Figure 1-6 Disassemble the Power Supply Board Part Description: ① 4 screws (M3×6... -
Page 16: Disassemble The Main Board
RIGOL Chapter 1 Disassembly and Assembly Disassemble the Main Board ① ① ① ① ① Main Board ① Figure 1-7 Disassemble the Main Board Part Description: ① 6 screws (M3×6 torx pan head combination screws, used for fastening the main... -
Page 17: Disassemble The Front Panel And Lcd
Chapter 1 Disassembly and Assembly RIGOL Disassemble the Front Panel and LCD ① ② ② ① ② Front Panel Figure 1-8 Disassemble the Front Panel and LCD Part Description: ① 4 screws (PTP3×8 torx pan head self-tapping screw, used for fastening the front panel to the metal chassis) ②... -
Page 18: Disassemble The Keypad Board
RIGOL Chapter 1 Disassembly and Assembly Disassemble the Keypad Board Front USB Board ② Key Board ② Rubber Keys ① Figure 1-9 Disassemble the Keypad Board Part Description: ① 6 screws (M3×6 torx flat head countersunk screws, used for fastening the keypad board to the metal chassis) ②... -
Page 19: Assembly Procedures
Chapter 1 Disassembly and Assembly RIGOL Assembly Procedures The assembly procedures are simply the reversal of the disassembly procedures. Check whether the cables are correctly connected and whether all the screws are installed after completing each assembly procedure. 1-11 DG1000 Service Guide... -
Page 21: Chapter 2 Troubleshooting&Maintenance
The commonly encountered failures of DG1000 and their solutions are listed below. When you encounter those problems, please observe the following instructions to resolve them. If the problem still persists, please contact RIGOL. 1. The screen stays black/does not display anything after the instrument powers on. -
Page 22: Maintenance
RIGOL Chapter 2 Troubleshooting&Maintenance Maintenance System Maintenance In order to ensure the performance and prolong the service life of the instrument, please follow the recommendations below. 1. Get a full understanding of the instrument performance and its basic operating method before using it. -
Page 23: Exploded View Drawing And Replacement Parts List
Chapter 2 Troubleshooting&Maintenance RIGOL Exploded View Drawing and Replacement Parts List Figure 2-1 Exploded View Drawing DG1000 Service Guide... - Page 24 RIGOL Chapter 2 Troubleshooting&Maintenance Table 2-1 Replacement Parts List Part No. Qty. Name/Description 2010003209 Front Panel 1020000075 Front BNC Fixture 2010000088 Front BNC Board 1020000579 M3×6 Torx Flat Head Countersunk Screw 1020000074 Metal Chassis 2010003639 Main Board 2010003319 Rear BNC Board...
-
Page 25: Warranty
To get repair service, please contact with your nearest RIGOL sales and service office. There is no other warranty, expressed or implied, except such as is expressly set forth herein or other applicable warranty card. -
Page 26: Care And Cleaning
RIGOL Chapter 2 Troubleshooting&Maintenance Care and Cleaning Care Do not store or leave the instrument where it may be exposed to direct sunlight for long periods of time. Cleaning Clean the instrument regularly according to its operating conditions. To clean the exterior surface, perform the following steps: Disconnect the instrument from all power sources.
Need help?
Do you have a question about the DG1000 Series and is the answer not in the manual?
Questions and answers