Table of Contents
Advertisement
Advertisement
Table of Contents

Related Manuals for Orion i Series


Summary of Contents for Orion i Series
- Page 1 Orion i Series Welding System User Manual...
-
Page 2: Table Of Contents
Series User Manual Table of Contents Chapter 1: Welder Setup and Assembly . . . . . . . . . . . . . . . . . . . . . -
Page 3: Chapter 1: Welder Setup And Assembly
Chapter 1: Welder Setup & Assembly What is in the Box BOX WITHIN MAIN BOX: The Orion i2 Series System will arrive in 1 box . (1) Welder Power Cord (1) Stylus Hand Piece MAIN BOX: (1) Pair Alligator Clips (1) Foot Pedal (1) User Manual &... -
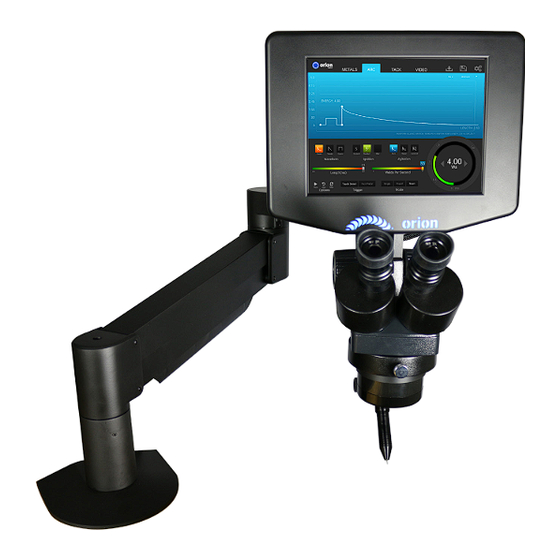
Page 4: Microscope Arm Setup
6 . Plug the other end of the microscope cable into the RJ45 “Shutter” port on the back of the touch screen box . *Orion RJ45 ports are not compatible with any other RJ45 ports . Connecting them to other devices may damage the welder and/or the other devices . -
Page 5: External Power Supply Setup
SET UP THE EXTERNAL POWER SUPPLY The Orion has an internal switching power supply that can accept 90VAC to 240VAC . 1 . Plug the female end of the power cable into the “AC Power” port on the side of the external power supply . -
Page 6: Adjustments On The Microscope Arm
Sunstone Engineering has developed a truly revolutionary optical LCD welding filter . The True Color TM Optical LCD shutter system allows Orion users an unimpeded full color view of the welding work-piece before welding . During a weld the Orion pre-darkens the shutter to provide complete eye protection . -
Page 7: Become Familiar With The Microscope
Become Familiar with the Microscope The Orion Microscope has been designed to provide maximum visual clarity, eye protection and ease of use . One challenge using the microscope is getting used to bringing the work-piece to the welding electrode while looking through the microscope . - Page 8 Series User Manual 0 .6 - 0 .7in (1 .5 – 2cm) of the electrode protruding from the stylus shaft . This will allow the electrode enough room to stick out from the stylus once the stylus hull is placed back on the stylus .
-
Page 9: Make A Weld
above . 4 . Set the electrode on the diamond disk at a 10-degree angle and begin to spin the electrode with the thumb and middle finger . *A helpful way to get a sharp electrode is to push down on the electrode with your index finger while twisting the electrode with the thumb and middle finger . -
Page 10: Chapter 2: User Interface Overview
Series User Manual Chapter 2: User Interface Overview Header Area METALS, ARC, TACK, AND VIDEOS TABS These four tabs contain features and settings specific to each view and will be discussed in further detail below . SAVE ICON The save icon allows users to create a custom weld parameter based on their current weld settings . Users can create up to 1000 custom weld parameters . -
Page 11: Arc Tab - Controls Area
The waveform selections determine and control how energy is released when welds are made . Classic - The classic waveform is the default waveform for welding on all Orion welders . It has a high peak current, which is the peak of the energy level, followed by a curved discharge slope . The curved discharge slope allows the weld spots to cool with less internal stress, and without surface ripples . - Page 12 Series User Manual Triangle - The Triangle waveform is similar to the classic waveform’s ability to make smooth and uniform weld results . One key advantage of the triangle waveform is the ability to set the peak and the length independently . Meaning, a weld could have a very high peak and a very short time, or a very low peak with a very long time, or any other combination of these two parameters .
- Page 13 automatically . Users will set the length and power independently in Triangle and Square waveform modes . Increasing or decreasing Length allows for more or less total weld energy and will change the size and penetration of the weld spots . PLAY/PAUSE, UNDO, AND RESET OPTIONS Play/Pause - Pressing the Play/Pause icon, toggles between Play and pause .
-
Page 14: Additional Information On Seam Mode
. Because of Seam modes’ longer weld length, and the high intensity of the welding flash, it is important never to look at the arc directly . Always view the welding arc through the protective Orion welding shutter, or other safety approved welding filters (minimum shade number 10 required) . - Page 15 . The Orion i will continue to adjust the filter for each unique setting, based upon your preference . Safety measures have been installed that will not allow the user to change the darkness/brightness to an unsafe level (e .g .
-
Page 16: Tack Tab - Controls Area
Video Tab The Video Tab takes users to our instructional videos page . It’s like having the Orion YouTube page on your welder . See welding tips and tricks here and other instructional videos . Simply select the video from the list on the left hand side on the screen . -
Page 17: Load Tab
Load Tab Touch the Load Button to open previously saved weld parameters . This feature will allow users to select from their list of previously saved weld parameters by simply scrolling through and touching the desired previously saved weld parameter they would like to load to the welder . -
Page 18: Chapter 3: Reading The Waveform Graph
Series User Manual state for an abnormally long time may require a longer post-flow delay to maintain good shielding at the weld spot . Purge - Touch this button to send a shot of shielding gas through the gas flow system . This is used to test if gas is flowing through the system properly, to check the pressure, and to clear the gas line of any oxygen that may have entered between welds . -
Page 19: Waveforms
STANDARD PLUS WELD IGNITION: Standard Plus weld ignition mode is similar to Standard weld mode, with the addition of a pilot arc . The weld timing is adjusted to have the weld take place soon after the electrode lifts off the work- piece surface . -
Page 20: Weld Time
Series User Manual Advantages: Good weld penetration with good weld smoothing . Deeper penetration welds can be produced with lower power and longer weld time . Disadvantages: Slightly more complicated to learn than classic mode . SQUARE Square waveforms produce a constant power/current for a specified weld time . Users are able to independently adjust both the power of the weld, as well as the length of the weld .
Need help?
Do you have a question about the i Series and is the answer not in the manual?
Questions and answers