Table of Contents
Advertisement
Advertisement
Table of Contents
Troubleshooting

Subscribe to Our Youtube Channel
Related Manuals for Orion 100C


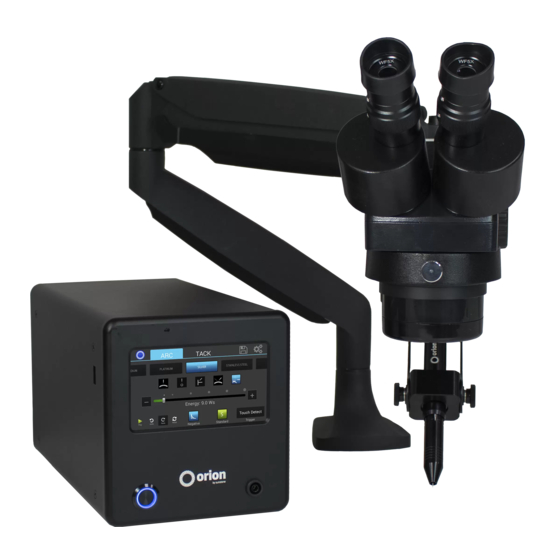
Summary of Contents for Orion 100C
- Page 1 Orion Pulse Arc Welders User Manual Orion 100c...
- Page 2 Chapter 5: Tungsten Electrodes . . . . . . . . . . . . . . . . . p . 3 2 Chapter 6: Orion Techniques, Tips and Tricks . . . p . 3 7 Chapter 7: Metals .
- Page 3 Thank You for Choosing Orion Welders and congratulations on your purchase! You are now the proud owner of an Orion 100c Welder . This manual was designed to help you set up the welder and begin welding . Please read and follow all safety precautions before proceeding with the welding process .
- Page 4 Touching live electrical parts can cause fatal shocks or severe burns . The input power circuit and the internal circuits of the Orion welder are live when the power switch is turned on . Additionally the internal capacitors remain charged for a period of time after the Orion is turned off and/or power is disconnected .
- Page 5 Welding produces fumes and gases . Breathing these fumes and gases can be hazardous to your health . The Orion produces minimal fumes and gases when compared to large-scale arc welders . Though not required, some form of ventilation is recommended .
- Page 6 100c User Manual MAGNETIC FIELDS CAN AFFECT IMPLANTED MEDICAL DEVICES • Wearers of pacemakers and other implanted medical devices should keep away . • Implanted medical device wearers should consult their doctor and the device manufacturer before going near arc welding, spot welding, gouging, plasma arc cutting, or induction heating operations .
- Page 7 A video explanation of these items below can be found at http://www . o rionwelders . c om/ resources/orion-c-series-resources/ The Orion 100c will arrive in 2 boxes . BOX 1: (1) User Manual & Quick Start/Quick Settings Guide (1) Orion 100c Power Supply...
- Page 8 Power Supply Setup (backside) SET UP THE BACK SIDE OF THE POWER SUPPLY The Orion has an internal switching power supply that can accept both 120 and 240VAC . A video explanation of the steps below can be found at http://www .
- Page 9 SET UP THE DARKENING LENS The Orion’s darkening lens system is easy to use . The darkening lens will automatically darken when the weld takes place . This allows the user to have a magnified view of the work piece and protection from the flash during the welding process .
- Page 10 . CONFIGURE THE BASE MICROSCOPE The microscope can be configured in many different ways to suit your individual preference . Orion highly recommends configuration # 3 as the simplest to use and implement . In this configuration the user has an unobstructed space for hand and work piece placement . This configuration also allows the welding stylus to easily be adjusted to different angles .
- Page 11 MICROSCOPE ARM MOUNTING OPTIONS A video explanation of the 3 different mounting options can be found at http://www . o rionwelders . c om/resources/orion-c-series-resources/ Mounting Option 1 - Clamp to table 1 . Determine the height of the tabletop . *If it is thicker than 2-3/4’...
- Page 12 100c User Manual MICROSCOPE ARM SETUP A video explanation of the microscope setup can be found at http://www . o rionwelders . c om/ resources/orion-c-series-resources/ 1 . Place the upper half of the microscope arm into the arm base .
- Page 13 . The Orion’s internal computer verifies the shutter has been closed before allowing the weld to take place . The Orion will not allow a weld to take place if the shutter does not completely shut .
- Page 14 *Remember to follow these steps once the welder is completely set up ready to begin welding . Electrode Setup The Orion welder comes standard with a 0 . 5 mm electrode collet and (5) 0 . 5 mm electrodes; and a 1 . 0 mm electrode collet and (5) 1 . 0 mm electrodes .
- Page 15 . The diamond disk can be attached to a flex shaft or Dremel tool . Follow these steps for sharpening the electrode . A video explanation of the steps below can be found at http://www . o rionwelders . c om/resources/orion-c-series-resources/ 1 . Completely remove the electrode from the stylus .
- Page 16 6 . Once the electrode has a flat/blunt tip, turn the Dremel off and insert the electrode back into the stylus as explained above . See the Orion Workbook for additional details about the Tungsten Electrodes . Shielding Gas Setup During the pulse-arc welding process high temperature plasma quickly melts metal into a molten pool .
- Page 17 SHIELDING GAS TANK AND REGULATOR SETUP A video explanation of the steps below can be found at http://www . o rionwelders . c om/ resources/orion-c-series-resources/ 1 . Ensure that your shielding gas tank is securely fastened to a stationary point near the welding area .
- Page 18 . Below is an explanation of all the various buttons and options found on the Orion interface . *Orion touch screens are resistive touch screens . This means they respond best to a little bit of pressure . The end of your fingernail or the tip of the alligator clip works best when touching the screen .
- Page 19 ch.2 Foot Pedal - When using the Foot Pedal mode, the weld will only initiate when the foot pedal is pressed (the work piece must be touching the electrode or nothing will happen when the user presses the foot pedal) . This mode is recommended if users need to reach a deep crevice or a tight area where they do not want the weld to automatically initiate if they accidentally touch a sidewall with the electrode .
- Page 20 “empty slot” until a User Created setting is saved . See save button to learn how to do this) . This feature allows users to tell the Orion what type of metal they are welding or which saved setting they would like to load .
- Page 21 ch.2 Settings Button The settings button gives users the ability to change system preferences . When users touch the settings button a page with four system preference tabs will appear . The four tabs are Interface, Gas, Pulse Arc Timing, and System . We will discuss each settings button tab below . INTERFACE TAB Here users can adjust the Screen Brightness, Audio Volume, and...
- Page 22 100c User Manual have a short distance from the electrode tip to the Stylus Hull opening . *It is recommended to use the default settings for all other applications . Post-flow Delay - Allows users to have control of the amount of shield gas released after the weld .
- Page 23 ch.2 welder . A longer discharge time will lead to a smoother weld surface and less internal stress within the weld spot . The length settings are split up into three ranges, which are short, medium, and long . Some users have found it helpful to use short or medium length with metals like gold (*see quick settings sheet for suggestions on when to do this) .
- Page 24 The Orion’s welding process (See image on top of next page) . 1 . The user touches the electrode to the surface with very light pressure . 2 . The Orion turns on the shielding gas (argon) . 3 . The Orion retracts the electrode and sends a burst of electrical energy –...
- Page 25 . We recommend that you read and complete the following sections while you are in front of the Orion . The Orion is very easy-to- use and many users will be making quality welds within minutes . The purpose of this section is to help the user to better understand some of the fundamental welding principles, to utilize all of the OrionWelders.com...
- Page 26 The two weld parameters (energy and time) can be understood with the following analogies . Consider the Orion welder to be like a water tower . The amount of water in the tower is like the energy stored in the welder . Firing the welder is like opening a large valve to let water out . The length parameter in the welder can be thought of as how long the valve is left open .
- Page 27 . The impact of the welding plasma causes vibrations on the molten pool’s surface, much like a stone causes ripples on the surface of a still body of water . The Orion welder’s energy discharge has been designed to ramp down the weld energy for longer weld time . This gives the molten metal vibrations time to smooth out before the metal re-solidifies .
- Page 28 100c User Manual CHAPTER 4: RESISTANCE WELDING Using Tack Mode TACK TAB - CONTROL AREA The Tack Screen controls the resistance welding aspect of the welder . Tack welding is typically used to temporarily hold pieces together . Users will generally utilize this type of welding to hold their work pieces together before soldering or performing a pulse arc weld .
- Page 29 . Because the heart of the Orion is an industrial capacitive resistance welder, everything from one time custom pieces to production welding is possible .
- Page 30 100c User Manual Sometimes it can be helpful to focus the energy of a resistance weld for larger parts . This can be done by using a weldment, or bump between the parts to be welded . This bump forces the electrical current to pass through a concentrated point (especially important for thicker parts) .
- Page 31 CABLES FOR RESISTANCE WELDING A true resistance welding hand piece should transfer as much energy to the weld location as possible . The Orion is capable of transferring over 3000 amperes to the weld location . To enable this full energy transfer: 1 .
- Page 32 THE SINGLE MOST IMPORTANT VARIABLE IN THE WELDING PROCESS IS THE ELECTRODE . The Orion welder comes standard with (5) 0 . 5 mm and (5) 1 . 0 mm electrodes . The 1 . 0 mm electrodes are a good all around electrode while the 0 . 5 mm electrode is excellent for very small projects . The larger 1mm electrode allows more energy to come out at one time .
- Page 33 ch.5 generated by the electrons impacting Material Melting Point (deg C) the work piece than the atoms striking Zinc the electrode . Aluminum Silver Gold 1064 Copper 1083 Stainless 304 1450 Carbon Steel 1500 Titanium 1660 Platinum 1772 Niobium 2468 Tungsten 3410 ELECTRODE SHAPE...
- Page 34 There are several considerations that can be helpful when selecting electrode shape (e . g . sharp, blunt, or a sharp tip with a small flatted end) . The most helpful of these is to spend time with the Orion and get to know how it responds to different electrode shapes and metals .
- Page 35 10 . How large you make the tip flat (e . g . a very small flat vs . a completely blunt electrode) is determined by the amount of energy the Orion will deliver . At low energies no flat is needed, where at maximum energy the tip can (if desired) be completely blunt .
- Page 36 100c User Manual Symptom Possible Problem Possible Solution Trouble igniting the arc Contaminated electrode Re-grind the electrode to remove con- tamination Electrode shape not conducive to Shape the electrode to a very sharp tip ignition at low energy Broken electrode, jagged edges...
- Page 37 . One for example is, instead of using small “laser wire” the Orion can weld a much larger wire or rod to fill in more metal in a single weld . There are several methods to aid in the addition of fill wire, which are mentioned below . The placement of the electrode relative to the wire is very important and will influence how the material behaves during the addition process .
- Page 38 100c User Manual Remember that for a larger fill wire the energy must be increased to completely melt the wire. If there is insufficient energy there may only be partial melting of the wire. However, in some situations this may be advantageous.
- Page 39 ch.6 A top electrode placement can work if the wire diameter is small compared to the energy setting. In this case there is enough plasma pressure to force the molten wire onto the base material. Placement of the electrode directly on top of the fill wire can melt the wire into the base if the energy is sufficient, or the wire is very small.
- Page 40 100c User Manual tries to push the molten metal, while the surface tension tries to keep it in place . This means: 1 . Some metals with lower surface tension (e . g . silver) are easier to “push” around than metals with high surface tension (e .
- Page 41 ch.6 In this example the vertical member is more heat sensitive or is thinner than the horizontal member. Material is pushed from the horizontal member onto the vertical member to prevent part damage. Pulse Arc Welding: Weld Cracking Some materials are prone to crack because of their metal properties . For example, High Carbon steel, Palladium (Pd), and some silver alloys .
- Page 42 Pulse Arc Welding: Joint Preparation The Orion 100c can be adjusted to a weld penetration of up to approximately 0 . 6 6 mm in depth (depending on the material) . However, deeper penetration usually also means large spot size around 1 .
- Page 43 This blackening can easily be wiped away with a clean rag or taken off with a glass brush (one is included with your Orion system), sand blaster or steam cleaner . During the welding process small amounts of metal will be vaporized from the weld joint and can be deposited elsewhere on the work piece .
- Page 44 100c User Manual Melting Point 1064 1083 1200 1300 1450 1500 1660 1772 2468 3410 Boiling Point 2467 2212 3080 2567 3100 2800 3000 3000 3287 3827 4742 5660 Specific Heat Electrical Resistivity 2 . 7 1 . 6 2 .
- Page 45 ch.7 This measure of weldability comes from properties of the metal like melting point, thermal conductivity, density etc., and is intended as a relative reference between the different metals. It can be thought of as how much spot size and penetration a given amount of weld energy will have on the metal.
- Page 46 100c User Manual Titanium and Niobium metals will oxidize readily at elevated temperatures and voltages. The charts show (Ti) and (Nb) “painting” with electricity (showing the voltage at which the color will appear). However, similar colors will appear due to heat if welding without sufficient shield gas.
- Page 47 ch.7 removed via glass brush or clean rag . Yellow gold physical properties and composition (one possible): 58-75% gold, 12-27% silver, 9-15% copper and some zinc White Gold: White gold is also a relatively simple metal to work with . There are two main types of white golds –...
- Page 48 . For very small welds, a sharp electrode poses no problem . This means that in the Orion’s arc mode, silver will typically behave well even with a concentrated, focused beam of energy (i . e . a very sharp electrode tip point) . However, as the desired spot size gets larger (bigger arc mode welds and almost all pulse arc mode welds) the liquid silver is easily pushed around by the welding pulse .
- Page 49 For best results select a low carbon steel without a zinc coating . Make sure the steel is free from other contaminates such as rust or oil . Remember that if using the Orion to produce welds in very thick pieces the weld joint may need to be prepared as discussed previously .
- Page 50 100c User Manual High Carbon Steels (Spring Steel / Tool Steel) High carbon steel welds easily but may become brittle after the welding process . To avoid weld failure the part must be heat treated after the welding process .
- Page 51 Sharpening or changing them out periodically is important to maintain weld consistency . The Orion’s electrodes are made of lanthanated tungsten . The small amounts of lanthinum found in the electrodes help the tips stay sharp and help improve weld performance . The electrodes are also double ended, meaning that either end can be used for welding .
- Page 52 . Never use abrasive cleaning implements on any part of the Orion . Do not blow compressed air into any part of the Orion as this may damage the internal components . Never use any chemicals besides mild detergents on any part of the Orion .
- Page 53 9/10 CHAPTER 9: UPDATING WELDER SOFTWARE Orion users are able to receive software and welder setting updates via email or through a software update download option on our website . As Orion engineers develop new software with more efficient settings and/or features to help users have the very best welding experience, they will place the update on the Orion website for user to download .
- Page 54 I WANT TO GET THE MOST POWER POSSIBLE OUT OF THE ORION . WHAT CAN I DO? The Orion is designed to deliver a tremendous amount of energy in Tack Mode . You can use up to 10AWG cabling to deliver more energy to the work area . NOTE: Using larger cabling (ex . 8 AWG or larger) may damage the welder and will void your warranty .
- Page 55 CAN I BUILD-UP OR ADD MATERIAL TO A WELD LOCATION? Yes, the Orion is very versatile . In Pulse Arc Mode, filler wire can be used to add metal to a weld location . In Tack Mode, filler wire or sheet filler can be permanently affixed to a location . Wire sizes up to and greater than 1mm in diameter can be added .
- Page 56 . For applications that require higher energy, the Orion is capable of adding up to 100 Joules (Ws) of energy to a weld . Until the user is familiar with the welding characteristics of the Orion, we recommend holding all parts with the pulse-arc attachments (e .
- Page 57 •Decrease the length of exposed electrode to bring the work-piece closer to the stylus nozzle . •Verify that there are no gas leaks at the gas receiver on the rear panel of the Orion and also at the stylus connector on the front panel . Note: Gas cannot leak from the stylus connector except during a weld .
- Page 58 . Stylus: On the Orion, the stylus is the main hand piece used for arc welding . It safely encloses the electrode and directs the shielding gas to the weld area . Tack / Fusion Welding: Tack welding can refer to a semi-permanent weld to place parts prior to permanent pulse arc welding .
- Page 59 In this manual, workpiece refers to anything being welded or worked on . WARRANTY AND CONTACT INFORMATION All Orion products come with a 2-year limited repair warranty . Orion Jewelry Welders will repair all defects in craftsmanship without charge during this time period (excluding the cost of shipping) .
- Page 60 Orion 100c User Manual Go to http://www . o rionwelders . c om/resources/orion-c-series-resources/ for full video tutorials . Orion Jewelry Welders 1693 American Way, Unit 5 Payson, UT 84651 USA + 1-801-658-0015 OrionWelders.com...
Need help?
Do you have a question about the 100C and is the answer not in the manual?
Questions and answers
donde puedo descargar actualizacion e software?