Table of Contents
Advertisement
Quick Links
Advertisement
Table of Contents

Related Manuals for Orion S Series


Summary of Contents for Orion S Series
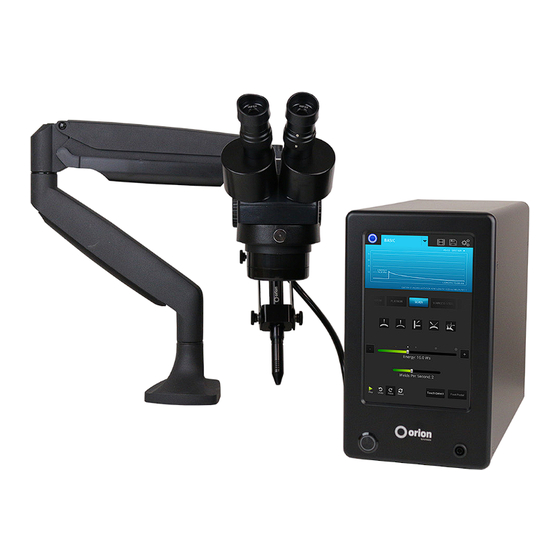
- Page 1 Orion s Series Welding System User Manual...
-
Page 3: Table Of Contents
Make a Tack Weld . . . . . . . . . . . . . . . . . . . . . . . . . . . . p . 1 8 Orion 150s Pulse Arc and Resistance Welder Weld Modes... - Page 4 150s User Manual...
-
Page 5: What Is In The Box
Power Supply Setup SET UP THE BACK SIDE OF THE POWER SUPPLY The Orion has an internal switching power supply that can accept both 120 and 240VAC . • Plug the female end of the power cable into the “90-240 VAC” Power port . -
Page 6: Microscope Arm Setup
150s User Manual SET UP THE FRONT SIDE OF THE POWER SUPPLY Look to the front on the Orion to power on the welder and control the touch screen . • Plug the pulse arc welding alligator clip in the port at the bottom right of the welder . - Page 7 Ensure the microscope cable is plugged into the “Shutter” port on the back of the power supply . *Orion RJ45 ports are not compatible with any other RJ45 ports . Connecting them to other devices may damage the welder and/or the other devices .
-
Page 8: Microscope Lcd Filter Shutter
Become Familiar with the Microscope The Orion Microscope has been designed to provide maximum visual clarity, eye protection and ease of use . One challenge using the microscope is getting used to bringing the work piece to the welding electrode while looking through the microscope . -
Page 9: Darkening Lens Setup
Electrode Setup The Orion welder comes standard with a 0 .5mm electrode collet and (5) 0 .5mm electrodes; and a 1 .0mm electrode collet and (5) 1 .0mm electrodes . The 1 .0mm electrodes are a good all around electrode while the 0 .5mm electrode is more for very small applications (less than 5ws of energy) . - Page 10 150s User Manual INSTALL THE TUNGSTEN ELECTRODE ONTO THE WELDING STYLUS Follow these steps to properly install the tungsten electrode . • Remove the stylus hull by pulling it away from the stylus shaft . • Loosen the collet cap by twisting it counter-clockwise . •...
-
Page 11: Shielding Gas Setup
WHEN TO FLATTEN/BLUNT THE ELECTRODE When working with silver, copper, and other highly conductive metals in energy levels above 20ws, it is recommended to blunt the electrode instead of sharpening it . • Completely remove the electrode from the stylus . •... -
Page 12: Basic Screen
7-10 psi . (This will adjust the dial on the left side of the regulator . ) Chapter 2: The Touch Screen Interface Below is an explanation of all the various buttons and options found on the Orion user interface . Basic Screen 1 . -
Page 13: Arc Screen
16 . Application Selector Button: Corner Weld: Unique to the basic screen, users can select the application that they are going to weld and receive recommended settings based on Sunstone’s experienced welders . 17 . Application Selector Button: Add Metal to a piece: Unique to the basic screen, users can select the application that they are going to weld and receive recommended settings based on Sunstone’s experienced welders . -
Page 14: Tack Screen
150s User Manual Tack Screen Tack Energy Slider: Adjusts the amount of weld energy that is being used . QUICK POWER SETTINGS: These buttons allow the user to quickly set a power setting that they would like . Low: With the Low setting the welder is set to 30 ws . Medium: With the medium setting the welder is set to 100 ws High: With the high setting the welder is set to 150 ws . -
Page 15: Settings Tab
Settings Tab INTERFACE SCREEN Interface Button: Allows the user to switch the setting screen displayed to the interface settings page . Gas Button: Allows the user to switch the setting screen displayed to the gas settings page . Timing Button: Allows the user to switch the setting screen displayed to the timing settings page . - Page 16 UPDATING WELDER SOFTWARE Orion users are able to receive software and welder setting updates via email . As Orion engineers develop new software with more efficient settings and/or features to help users have the very best welding experience, they will place the update...
-
Page 17: Media Screen
1 . Download update ZIP file from website or email . 2 . Unzip file, which produces files called “150Supdate .apk” . 3 . Plug USB into computer then Place the files in the root directory of the USB thumb drive . (Do not place the files into any subdirectory or folder on the USB drive and do not rename the update file or the welder will not be able to perform the update . -
Page 18: Chapter 3: Make A Weld
150s User Manual Chapter 3: Make a Weld Grey Waveform • When the welder is paused the waveform screen will appear grey . Remember to push play in order to perform welds . Make An Arc Weld (using the provided weld plate) 1 . - Page 19 Electrode Shaping: Stylus Cone Stylus Cone Sharp Electrode Tip Flat Electrode Tip Electrode placement examples: Add Metal Weld Add Metal Weld Butt Weld T-Joint Weld Add Metal Weld General Settings: 26 AWG wire/chain/jump ring Earring Post Metal Tip Shape Energy Length Agitation Metal...
Need help?
Do you have a question about the S Series and is the answer not in the manual?
Questions and answers
Как производить прихват?