
Related Manuals for DaytonAudio PPA800DSP


Summary of Contents for DaytonAudio PPA800DSP
- Page 1 2-WAY PLATE AMPLIFIER 800W 2-CHANNEL with DSP and BLUETOOTH Model: PPA800DSP User Manual...
- Page 2 SAFETY Read these instructions. Keep these instructions. Heed all warnings. Follow all instructions. Do not use this apparatus near water. Clean only with dry cloth. Do not block any ventilation openings. Install in accordance with the manufacturer's instructions. Do not install near any heat sources such as radiators, heat registers, stoves, or other apparatus (including amplifiers) that produce heat.
-
Page 3: Table Of Contents
2. Control Panel (I/O) Definition ....................5 3. Operation and Specifications ....................6 4. Windows Software Installation ..................7-8 5. Driver Installation ........................9 6. Connecting the PPA800DSP to the Windows Software .............10 7. Software Control ......................11-16 a. Volume and Phase Controls ................... 11 b. Filter Controls ......................12 c. -
Page 4: Product Overview And Features
Product Overview Dayton Audio’s PPA800DSP plate amplifier produces 800 watts of power split between 2-channels (600W for low frequencies; 200W for highs) with simple adjustable DSP making it an excellent am- plifier for building custom, high-output, active 2-way speaker designs. Thanks to the compact size, this amplifier is also a great choice for retrofitting existing passive designs. -
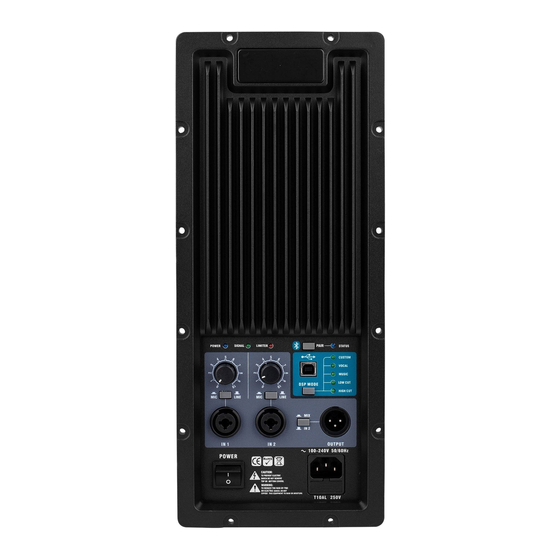
Page 5: Control Panel (I/O) Definition
Control Panel (I/O) Definition 1. Power Indicator: Illuminates when the unit is powered on. 2. Signal Indicator: Illuminates when signal is present 3. Limiter Indicator: Illuminates just prior to the amp clipping and distorting. Adjust input levels so that this LED illuminates only briefly, if at all, during the loudest peaks in your program material. -
Page 6: Operation And Specifications
Operation 1. Ensure that all your equipment is OFF, and lower all volume, gain, and level controls before making connections. 2. You may connect a dynamic microphone, or line level audio device (mixing console, CD player, electronic keyboard, etc.) to each of the INPUT 1 and INPUT 2 jacks, using the appropriate cables. -
Page 7: Windows Software Installation
Software Installation Guide ● Download the software from the Dayton Audio Website and double click PPA800DSP.exe using a Windows PC to open the installer. Follow the prompts as shown below. ● Accept the terms in the license agreement and press “Next”. - Page 8 Software Installation Guide – Continued ● Fill out your desired user name and organization and press “Next”. ● Make sure “Launch the program” is checked in the screen below. This will open the driver setup file. ● Press “Finish” to complete the software installation.
-
Page 9: Driver Installation
Software Installation Guide - Driver ● If you enabled “Launch the program” in the previous Window, a driver installation window will open. ● Note: If “User Account Control” asks you to allow the program to make changes to the com- puter, allow it. -
Page 10: Connecting The Ppa800Dsp To The Windows Software
Connecting the PPA800DSP to the Windows Software ● Find the PPA800DSP shortcut in your start menu. If it cannot be found, the default installa- tion path for the PPA800DSP software is “C:\Program Files (x86)\ Dayton Audio\PPA800D- SP\PPA800DSP.exe”. ● The software will automatically connect to the device if it is powered on and connected with USB. -
Page 11: Software Control
Software - Volume and Phase Controls A. Input Level: Control the input volume of the system by moving the slider up or down, or by entering a value into the text box. B. Low Pass Volume: Control the output volume sent to the low pass output of the system by moving the slider up and down, or by entering a value into the text box. -
Page 12: Filter Controls
Software - Filter Controls A. Graph: The graph shows a visual representation of the applied filters. When enabled, the LPF or HPF frequency can be changed by sliding the blue circles labeled L or H in the graph. B. LOW PASS or HIGH PASS Selection: Click the LOW PASS button to edit the low pass output (red wires) settings, or the HIGH PASS button to edit the high pass output (blue wires) settings. -
Page 13: Parametric Eq
Software - Parametric EQ A. Preset selection: When the PPA800DSP is connected, clicking one of the preset buttons will change the device into that preset and allow for real time editing. i. Changes must be downloaded (saved) to the preset using the tools menu before switching to another preset or they will be lost! ii. -
Page 14: Limiter
Software - Limiter A. Graph: This shows a simulated representation of the limiter settings that are selected. The blue handle can be dragged left or right to change the threshold of the limiter. The X axis is the input in dBu, and the Y axis is the output in dBu. B. -
Page 15: Adjustable Delay
Software - Adjustable Delay A. Low Pass Output Delay: Adjust the delay of the low pass output by moving the slider up or down. The value of the delay is represented on the right in milliseconds, meters and feet. B. High Pass Output Delay: Adjust the delay of the high pass output by moving the slider up or down. -
Page 16: External Led Status
Software - External LED Status ● An external LED can be attached to the back of the device through the 2 pin male header on the exposed board. It is circled in red in the image below. ● There are 3 possible settings for this LED. i. -
Page 17: Using Bluetooth As An Input Method
Using Bluetooth as an Input Method The PPA800DSP features simple to use bluetooth input. 1. To enable bluetooth, hold the “Pair” button (circled below) next to the Bluetooth symbol until you see the blue LED light up and flash next to it. If speakers are connected to the outputs, you will hear a beep when it is ready to pair. -
Page 18: Default Preset Settings
Default Preset Settings – CUSTOM... -
Page 19: Default Preset Settings
Default Preset Settings – VOCAL... - Page 20 Default Preset Settings – MUSIC...
- Page 21 Default Preset Settings – LOW CUT...
- Page 22 Default Preset Settings – HIGH CUT...
- Page 23 5-Year Limited Warranty See daytonaudio.com for details 705 Pleasant Valley Dr. daytonaudio.com Springboro, OH 45066 tel + 937.743.8248 info@daytonaudio.com Dayton Audio ® Last Revised: 10/17/2018...
Need help?
Do you have a question about the PPA800DSP and is the answer not in the manual?
Questions and answers