
Subscribe to Our Youtube Channel
Related Manuals for Baumr-AG SH0910


Summary of Contents for Baumr-AG SH0910
- Page 1 Chainsaw Sharpener User Manual RETAIN THIS MANUAL FOR FUTURE REFERENCE PLEASE READ THIS MANUAL CAREFULLY BEFORE USE...
-
Page 2: Table Of Contents
Chainsaw Sharpener Table of Contents PREFACE ..............................1 PARTS ..............................2 SAFETY INFORMATION ........................3 ELECTRICAL SAFETY ......................... 5 ASSEMBLY............................6 GRINDING .............................. 9 Grinding depth Delimiter ......................10 DIMENSIONS ............................11 SPECIFICATIONS ..........................14... -
Page 3: Preface
Chainsaw Sharpener Preface Thanks for buying the Chainsaw Sharpener, another high-quality machine from our company. To get the most out of your purchase, please read the manual before use. We ask you to please read this manual carefully beforehand in order to familiarise yourself with this product and after reading, please store this instructional manual for future reference. -
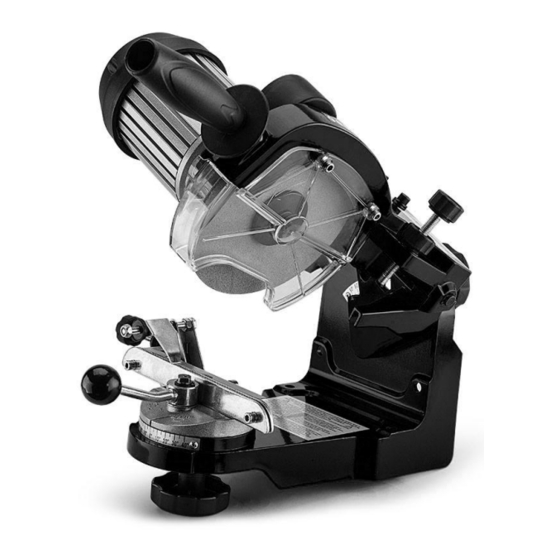
Page 4: Parts
Chainsaw Sharpener Parts Position Description Position Description Hand Piece Cutting Angle Setting Wheel Grinding Disk Lateral Guard Scale Depth of Grind Set Screw Mounting Screw (10a/10b) Cutting Edge Angle Set-Up Wheel Guide Plate Base Chain Stop Guide Screw Grinding Disk Rotary Table Grinding Disk Protective Enclosure... -
Page 5: Safety Information
Chainsaw Sharpener Safety Information Chainsaw sharpeners can be dangerous when used improperly. Please observe basic safety precautions to eliminate risk of fire, electric shock and personal injuries. Familiarise yourself with the sharpener before use. Only use the sharpener for the application if which it is designed. ... - Page 6 Chainsaw Sharpener Switch the machine off and remove the mains plug from the socket when: Carrying out repairs Maintenance and cleaning Storage Leaving the chainsaw sharpener (even in case of short-term interruptions) Maintain your chainsaw sharpener with care: ...
-
Page 7: Electrical Safety
Chainsaw Sharpener Electrical Safety Long and thin connection lines will result in a potential drop. Plugs and coupler outlets on connection cables must be made of rubber, non-rigid PVC or other thermoplastic material of the same mechanical stability. ... -
Page 8: Assembly
Chainsaw Sharpener Assembly The chainsaw sharpener is delivered pre-assembled. It consists of the base, on which the chain guide is located and the bearing arm with the motor and handgrip. The assembly should be performed with the machine unplugged. The sharpener is suited for both desk installation and wall mounting. When installing it on the desk, put the machine on the edge of the desk and screw it to the desk using the holes in the base. - Page 9 Chainsaw Sharpener Screw the supporting arm control holder on the screw in the grinding disk body. (Fig. 3). Fit the grinding disk enclosure in using the supplied screws and a respective wrench. (Fig. 4). When mounting on the wall, carefully mount the machine at a height of 120-130 cm from the floor to avoid working at eye height! To be able to install the disk, unscrew the auxiliary flange.
- Page 10 Chainsaw Sharpener After you have removed the ancillary flange, you can insert the grinding disk in the body from below. See that the ancillary flange and the disk abut against each other precisely. (Fig. 6). Do not tighten the screws too much to avoid damaging to the disk. The grinding disk on the hub torque is 7 Nm;...
-
Page 11: Grinding
Chainsaw Sharpener Grinding Before the start of grinding, the chain should be conducted between both the attachment guides. The sharpening angle must correspond to the guide’s position. The type of chain to be sharpened can be determined using the sharpening block provided on the dimension table. -
Page 12: Grinding Depth Delimiter
Chainsaw Sharpener With the clamping screw adjusted and the vice angle setup (RH and LH teeth are different) and pre-set to the top plate angle, set the distance with the help of the mounting screw (10a), lead the grinding disk down to the tooth by soft pushing the supporting strut. The grinding depth may be set by the set screw (K). -
Page 13: Dimensions
Chainsaw Sharpener Dimensions Chain Vise Top Plate Tilt Depth Gauge Oregon Stihl Sandvik Carlton Wheel Width Pitch Angle Angle Angle Gauge 1/4” 0.050”/1.3mm 30 ⁰ 60 ⁰ 10 ⁰ 1/8”3.2mm 0.025”/0.63mm 25AP 13RM 0.325” 0.050”/1.3mm 25 ⁰ 60 ⁰ 10 ⁰ 1/8”3.2mm 0.025”/0.63mm 20LP... - Page 14 Chainsaw Sharpener Chain Vise Top Plate Tilt Depth Gauge Oregon Stihl Sandvik Carlton Wheel Width Pitch Angle Angle Angle Gauge 1/8”3.2mm- 25 ⁰ 60 ⁰ 10 ⁰ 3/8” 0.058”/1.5mm 0.025”/0.63mm 73LP 35RS 58AG 3/16”/4.7mm 1/8”3.2mm- 25 ⁰ 60 ⁰ 10 ⁰ 3/8”...
- Page 15 Chainsaw Sharpener Chain Vise Top Plate Tilt Depth Gauge Oregon Stihl Sandvik Carlton Wheel Width Pitch Angle Angle Angle Gauge 1/8”3.2mm- 60 ⁰ 0 ⁰ 0.050”/1.3mm 0.025”/0.63mm 3/8 (91) 63PMX 5⁰ 3/16”/4.7mm 60 ⁰ 10 ⁰ 0.404” 0.058”/1.5mm 3/16”/4.7mm 0.025”/0.63mm B2LM 25⁰...
-
Page 16: Specifications
Chainsaw Sharpener Specifications SH0910 Type Operating Voltage 220-240V 230W Rated Power Max. Power Output: 350W @ 50% Duty Cycle Max. Motor RPM 3,000 RPM 350W Motor Rating P1 Max. Cutting Length 250mm 0.80" to 0.50" Vice Capacity Light Wattage Max. Working Angle 35 Degrees Left to Right 145 x 3.2 x 22.3mm Arbor... - Page 17 Some experts believe the incorrect or prolonged use of almost any product could cause serious injury or death. For information that may reduce your risk of serious injury or death consult thepoints below and additionall y , the information available at www.datastreamserver.com/safety - Consult all documentation, packaging and - The product has been supplied by a general merchandise...
Need help?
Do you have a question about the SH0910 and is the answer not in the manual?
Questions and answers