Sony TRINITRON BVM-20M4DE Operation Manual
Color video monitor
Hide thumbs
Also See for TRINITRON BVM-20M4DE:
- Installation manual for dealers (20 pages) ,
- Operation & maintence manual (46 pages)

Related Manuals for Sony TRINITRON BVM-20M4DE


Summary of Contents for Sony TRINITRON BVM-20M4DE
- Page 1 TRINITRON COLOR VIDEO MONITOR ® BVM-20M4DE BVM-20M4E BVM-14M4DE BVM-14M4E OPERATION MANUAL English/Italian 1st Edition (Revised 1)
- Page 2 L or In the event of a malfunction or when maintenance is coloured red. necessary, consult an authorized Sony dealer. Ensure that your equipment is connected correctly - If you are in any doubt consult a qualified electrician.
- Page 3 For the customers in Europe These products are designed for operation in the This product with the CE marking complies with both environments E1 to E4. During EMC stress, the the EMC Directive (89/336/EEC) and the Low Voltage performance (evaluated according to ITU/R 562-3 and Directive (73/23/EEC) issued by the Commission of ITU/R 500-4) may degrade as shown in Table 1.
-
Page 5: Table Of Contents
Do not throw away the carton and packing materials. They make an ideal container which to transport the unit. When shipping the unit to another location, repack it as illustrated on the carton. If you have any questions about this unit, contact your authorized Sony dealer. 1(E) -
Page 6: Features
......................................... 1) “Trinitron” is a registered trademark of Sony 3) SDI: Serial Digital Interface Corporation. 4) The Sony Component SDI Kit BKM-101C (for video) is 2) The NTSC system refers to an NTSC color system in built in BVM-20M4DE/14M4DE. 4.43 which the subcarrier frequency is modified to 4.43MHz. - Page 7 SDI (Serial Digital Interface) Kit (for audio) for checked simultaneously in the H/V delay mode. BVM-20M4DE/14M4DE By using the Sony BKM-102 Component SDI Kit (for Auto/manual degaussing audio, optional), you can monitor SMPTE 259M 4:2:2 Degaussing of the screen can be performed...
-
Page 8: Location And Function Of Parts And Controls . 4(E)
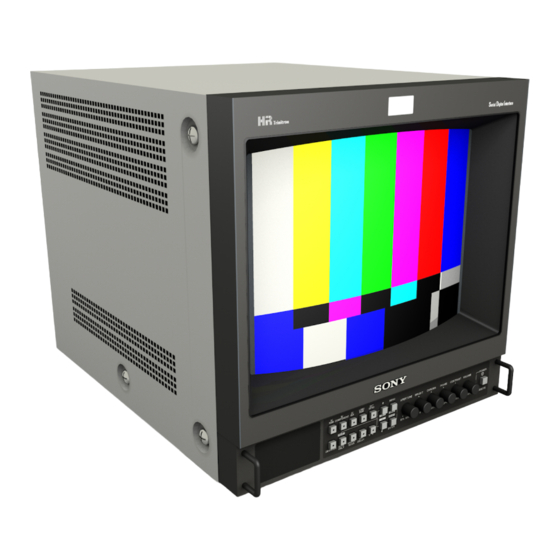
Location and Function of Parts and Controls Front !• @™ @¡ @º !ª LINE/ COMPONENT SYNC MENU APERTURE BRIGHT CHROMA PHASE CONTRAST VOLUME POWER E X I T RESET SELECT – MIN MAX PUR GRN MIN MAX MIN MAX DEGAUSS BLUE UNDER 16:9... - Page 9 !• EXT SYNC (external sync) selector Note • Set this selector to the off position (light off) to The PHASE (6), CHROMA (7) and APERTURE operate the monitor on the sync signal from the (9) controls have no effect on the pictures of RGB displayed video signal.
-
Page 10: Rear Panel
Location and Function of Parts and Controls Rear Panel (The mark indicates automatic termination.) COMPONENT SDI ACTIVE THROUGH LINE A LINE B LINE C AC IN VIDEO VIDEO REMOTE AUDIO AUDIO AUDIO R/R–Y B/B–Y AUDIO RGB/COMPONENT EXT SYNC 1 AC IN socket AUDIO IN (phono jack) Connect the supplied AC power cord to this socket and Connect to the audio output of a VCR or to a... - Page 11 Connect the SERIAL V/A OUT connectors of the Connect to the R-Y/Y/B-Y component signal outputs Digital BETACAM VTRs to allow input of SMPTE of a Sony Betacam video camera, etc. 259M/CCIR 656-III 4:2:2 serial digital signals. R/R-Y OUT, G/Y OUT, B/B-Y OUT (BNC)
-
Page 12: Using On-Screen Menus
Using On-Screen Menus You can make various settings and adjustments of the monitor using the on-screen menus. On-Screen Menu Configuration On-screen menu tree-chart Main menu You can enter another menu such as status menu or setting menu. Status menu 1 Main menu 2a STATUS 1 menu You can confirm the current settings. -
Page 13: Operation Through On-Screen Menus
Operating procedures Operation through On-Screen Menus To display the menu, follow this procedure. Menu operation buttons Press the MENU/EXIT (1) button. There are five menu operation buttons on the front panel of the monitor. MENU (1 : main menu) appears. 3 >/+ button MENU/EXIT Move the cursor (z) to the desired setting menu by... -
Page 14: Functions Of On-Screen Menus
Using On-Screen Menus 4COLOR TEMP/BAL menu To close the menu (to return to the regular screen) Select the color temperature from among D65, D93 Each time you press the MENU/EXIT (1) button, the and USER. USER is set to D65 as the factory setting. on-screen menu returns to the one previously You can adjust or change the color temperature in displayed. - Page 15 @ºCOMPONENT LEVEL menu !¡USER COPY menu Select the component level from among three modes. Store the factory setting of D65 or D93 as the value for N10/SMPTE for 100/0/100/0 signal USER mode. BETA 7.5 for 100/7.5/75/7.5 signal !™COLOR SYSTEM DISPLAY menu BETA 0 for 100/0/75/0 signal [N10/SMPTE]...
-
Page 16: Connections
Connections To remove the AC power cord How to Connect the AC Power Cord Pull out the AC plug holder while pressing the lock levers. Connect the AC power cord (supplied) to the AC IN socket and to a wall outlet. How to Connect a Cable to a BNC Connector Connect a coaxial cable with the BNC plugs to the BNC connectors on the rear panel as illustrated below. -
Page 17: Specifications
Specifications LINE C Video signal Y/C IN 4-pin mini-DIN (×1) Color system PAL, NTSC, SECAM, NTSC 4.43 See the pin assignment on page 14(E). Resolution 800 TV lines AUDIO IN Phono jack (×1), –5 dBu , more than Aperture correction 0 dB to +6 dB 47 kilo-ohms Frequency response RGB/COMPONENT... - Page 18 Specifications General REMOTE connector (20-pin) EBU phosphor Power consumption BVM-20M4DE/20M4E: 140 W BVM-14M4DE/14M4E: 99 W Power requirements 100 to 240 V AC, 50/60Hz Peak inrush current BVM-20M4DE/20M4E: (1) Power ON, current probe method: 18 A (240 V) (2) Hot switching inrush current, measured in accordance with Pin No.
- Page 19 15(E)
- Page 20 • Non lasciar cadere o collocare oggetti pesanti sul Nel caso di malfunzionamenti o di necessarie riparazioni dell’apparecchio, consultare un rivenditore cavo di alimentazione. Qualora il cavo di autorizzato Sony. alimentazione fosse danneggiato, spegnere immediatamente l’apparecchio. È pericoloso Per i clienti in Europa utilizzare un apparecchio con un cavo di Questo prodotto recante il marchio CE è...
- Page 21 Funzioni dei menu a schermo..... 10(I) Per ulteriori informazioni riguardanti il presente Collegamenti ............12(I) apparecchio, rivolgersi al più vicino rivenditore Collegamento del cavo di autorizzato Sony. alimentazione CA ........12(I) Collegamento di un cavo ad un connettore BNC ........12(I) Caratteristiche tecniche ........13(I) Il manuale Prima di usare l’apparecchio, leggere con attenzione...
- Page 22 Se ad un connettore esterno è collegato un cavo, la terminazione di 75 ohm viene automaticamente disattivata..............................................1) Trinitron è un marchio registrato della Sony 3) Il kit SDI componente BKM-101C (per video) è Corporation. incorporato nel modello BVM-20M4DE/14M4DE.
- Page 23 Menu a video 4:2:2 proveniente da un videoregistratore digitale (ad I menu a video permettono di impostare la temperatura esempio dal videoregistratore Sony 4:2:2). del colore ed altri parametri. – BKM-101C: kit SDI componente (per video) – BKM-102: kit SDI componente (per audio)
- Page 24 Posizione e funzioni delle parti e dei comandi Pannello anteriore @™ @¡ @º !ª !• LINE/ COMPONENT SYNC MENU APERTURE BRIGHT CHROMA PHASE CONTRAST VOLUME POWER E X I T RESET SELECT – MIN MAX PUR GRN MIN MAX MIN MAX DEGAUSS BLUE UNDER...
- Page 25 !¶ Tasto di smagnetizzazione (DEGAUSS) 9 Comando di regolazione dell’apertura (APERTURE) Premere questo tasto brevemente per smagnetizzare lo schermo. Attendere almeno 10 minuti prima di Ruotare in senso orario per aumentare la nitidezza e in riutilizzare il tasto. senso antiorario per ridurla. !•...
- Page 26 Posizione e funzioni delle parti e dei comandi Pannello posteriore (Il simbolo indica la terminazione automatica.) COMPONENT SDI ACTIVE THROUGH LINE A LINE B LINE C AC IN VIDEO VIDEO REMOTE AUDIO AUDIO AUDIO R/R–Y B/B–Y AUDIO RGB/COMPONENT EXT SYNC 1 Presa di alimentazione (AC IN) AUDIO IN (presa fono) Collegare il cavo di alimentazione in dotazione a...
- Page 27 Collegare i connettori SERIAL V/A OUT del Collegare alle uscite del segnale componente R-Y/Y/ videoregistratore Digital BETACAM per consentire B-Y di una videocamera Sony Betacam. l’ingresso dei segnali digitali seriali SMPTE 259M/ R/R-Y OUT, G/Y OUT, B/B-Y OUT (tipo BNC) CCIR 656-III 4:2:2.
- Page 28 Uso dei menu a schermo È possibile effettuare impostazioni e regolazioni del monitor di vario tipo utilizzando i menu a schermo. Configurazione dei menu a schermo Diagramma ad albero dei menu a schermo Menu principale È possibile inserire un altro menu quale il menu Stato o Impostazione.
- Page 29 Procedimenti operativi Operazioni tramite i menu a schermo Per visualizzare il menu, seguire i passi illustrati sotto. Tasti per l’utilizzo dei menu Premere il tasto MENU/EXIT (1). Sul pannello anteriore del monitor sono collocati cinque tasti per l’utilizzo dei menu. Appare 1 MENU (menu principale).
- Page 30 Uso dei menu a schermo Per selezionare la lingua 5a Menu AUDIO SDI (quando BKM-101C è installato per il modello BVM-20M4E/14M4E) Quando si accende il monitor per la prima volta, viene Quando non viene selezionato il suono (NONE) o il visualizzato il menu LANGUAGE (@£).
- Page 31 !™Menu VISUAL SISTEMA COLORE @ºMenu LIVELLO COMPONENT Selezionare il periodo di visualizzazione del sistema Selezionare il livello componente tra le tre modalità del colore dei segnali di ingresso correnti. disponibili. Quando è selezionato AUTO, il sistema di colore in N10/SMPTE per segnali 100/0/100/0 uso appare sullo schermo ogni volta che il segnale di BETA 7.5...
- Page 32 Collegamenti Per rimuovere il cavo di alimentazione CA Collegamento del cavo di alimentazione CA Estrarre il fermaspina mentre si premono le levette di bloccaggio. Collegare il cavo di alimentazione (in dotazione) alla presa AC IN e ad una presa di rete. Collegamento di un cavo ad un connettore BNC Collegare un cavo coassiale con prese BNC ai...
- Page 33 Caratteristiche tecniche LINE C Segnale video Y/C IN Mini DIN a 4 piedini (×1) Sistema del colore PAL, NTSC, SECAM, NTSC 4,43 Vedere la sezione sull’assegnazione Risoluzione 800 righe TV dei piedini alla pagina 14(I). Correzione dell’apertura AUDIO IN Presa fono (×1), –5 dBu , più...
- Page 34 Caratteristiche tecniche Informazioni generali Connettore REMOTE (20 piedini) Raggi catodici Fosforo EBU Consumo energetico BVM-20M4DE/20M4E: 140 W BVM-14M4DE/14M4E: 99 W Alimentazione CA da 100 a 240 V, 50/60 Hz Corrente di punta di entrata BVM-20M4DE/20M4E: (1) Stato di accensione (ON), metodo di sondaggio di corrente: 18 A (240 V) (2) Corrente di entrata a commutazione a Piedino N.
- Page 35 The material contained in this manual consists of information that is the property of Sony Corporation and is intended solely for use by the purchasers of the equipment described in this manual. Sony Corporation expressly prohibits the duplication of any...
- Page 36 BVM-20M4DE Sony Corporation BVM-20M4E BVM-14M4DE Communication System Solutions Network Company BVM-14M4E Printed in Japan 2000. 08. 08 3-861-850-12 (1) ©1997...
Need help?
Do you have a question about the TRINITRON BVM-20M4DE and is the answer not in the manual?
Questions and answers