Honeywell T6 Pro Z-Wave User Manual
Hide thumbs
Also See for T6 Pro Z-Wave:
- User manual (48 pages) ,
- Professional install manual (25 pages) ,
- Getting started (2 pages)
Table of Contents
Advertisement
Available languages
Available languages
T6 Pro Z-Wave
Programmable Thermostat
User Guide
*TH6320ZW2003 depicted. Other models may vary.
Actual size 4.09'' x 4.09'' x 1.06''
Welcome
This user guide is designed to help you get acquainted with your new T6 Pro Z-Wave
thermostat. Check out the table of contents on page 2 to browse by topic.
Need help? Get in touch.
Web: yourhome.honeywell.com/
Phone: 1-800-468-1502
Social: Twitter: @HoneywellHome, Facebook: Honeywell Home
Advertisement
Chapters
Table of Contents

Related Manuals for Honeywell T6 Pro Z-Wave


Summary of Contents for Honeywell T6 Pro Z-Wave
- Page 1 Actual size 4.09'' x 4.09'' x 1.06'' Welcome This user guide is designed to help you get acquainted with your new T6 Pro Z-Wave thermostat. Check out the table of contents on page 2 to browse by topic. Need help? Get in touch.
-
Page 2: Table Of Contents
Table of contents Thermostat features ........................ 3 Thermostat overview ....................... 4 Basic thermostat operation Adjusting the temperature ........................4 Program schedule overrides .........................5 Adjusting the temperature in Auto mode ..................6 Selecting system mode ...........................7 Built-in compressor protection ......................8 Setting the fan .............................8 Main menu settings Z-Wave setup ..............................9 Z-Wave connection status ........................10... -
Page 3: Thermostat Features
You can display actual temperature or % relative humidity, or to see whether your cooling / heating system is running. Auto change from heat to cool: When Auto mode is selected, the T6 Pro Z-Wave thermostat can automatically determine whether your home needs heating or cooling to reach the desired temperature at the right time. -
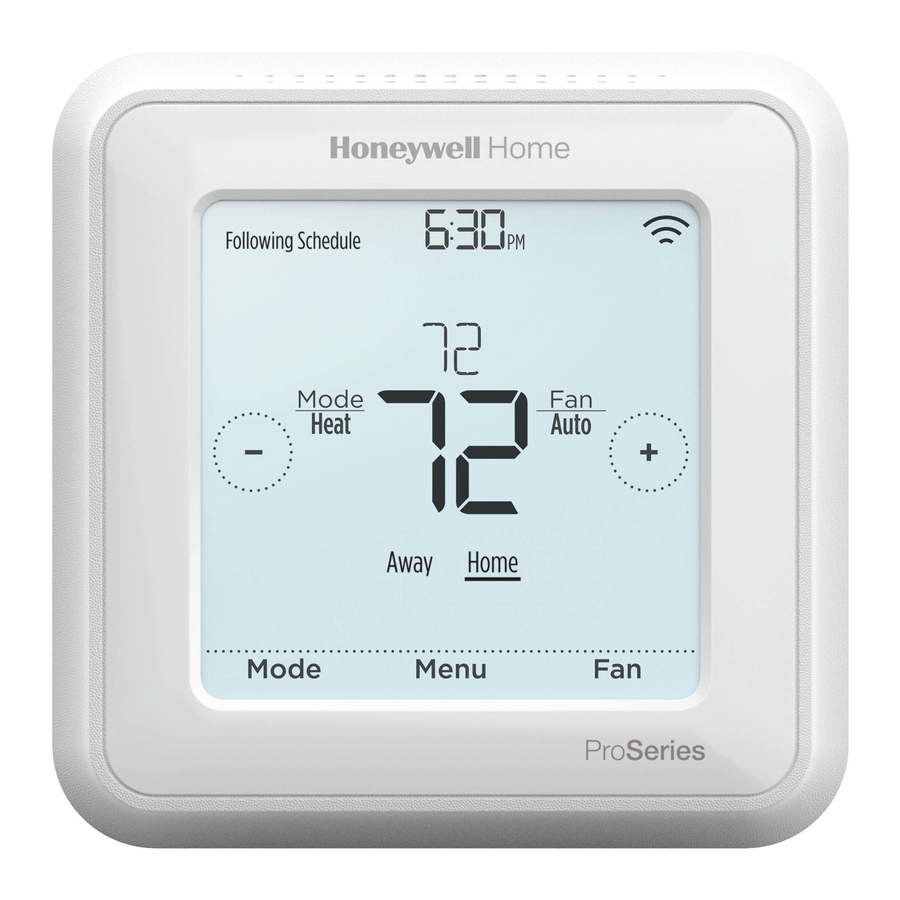
Page 4: Thermostat Overview
Thermostat overview Desired temperature Indoor Temperature/ Z-Wave connection Adjust temperature % Relative Indoor status Shows desired indoor Touch Humidity temperature. Shows Z-Wave set your desired Touch to display connection status. temperature. either indoor temperature or % relative indoor humidity. Mode Heat Auto Mode... -
Page 5: Program Schedule Overrides
Program schedule overrides If the thermostat is included in Z-Wave network it typically follows the setting on your Z-Wave controller. If you adjust the temperature setting, it overrides the current setting until new state (eg. Home/Away) and/or the new temperature setting is received from Z-Wave controller. -
Page 6: Adjusting The Temperature In Auto Mode
Adjusting the temperature in Auto mode Auto mode (when the thermostat automatically chooses heating or cooling to reach your desired temperature) is disabled by default. If your heating or cooling professional enabled it, you’ll see Auto appear as an option under Mode on the thermostat home screen. -
Page 7: Selecting System Mode
Selecting system mode Current system mode (Heat, Cool, Off, Em Heat*) Following Schedule is displayed on the thermostat home screen. Mode The mode that’s currently running (Heat On or Heat Auto Cool On) is displayed in the upper-left corner of Away Home the thermostat home screen. -
Page 8: Built-In Compressor Protection
Built-in compressor protection If the compressor is restarted too soon after Cool On Following Schedule a shutdown, system damage can occur. The built-in compressor protection feature forces Mode Auto Cool the compressor to wait a few minutes before restarting, helping to prevent damage to the Away Home heating or cooling system. -
Page 9: Z-Wave Setup
• For other specific tasks, such as adding the thermostat to home automation scenes or groups, refer to the Z-Wave controller instructions. • The T6 Pro Z-Wave thermostat works in the optional Z-Wave battery mode or normal power mode based on its power source. The Z-Wave power mode can only be changed when thermostat is NOT included in Z-Wave network. -
Page 10: Z-Wave Connection Status
Z-Wave connection status Z-Wave connection status is located in the upper-right Wifi is on and Following Schedule connected corner of the screen. • Thermostat is included and connected to a Mode Heat Auto Wifi is disconnected Z-Wave network. or wifi is not setup Wifi... -
Page 11: Main Menu Overview
Main menu overview Touch Menu on the thermostat screen and then use the arrows to page through the following options. SCHEDULE CLEAN SCREEN Edit local thermostat program Disable the touchscreen for schedule. (Available only if enabled 30 seconds so you can clean it. by your local heating or cooling TEMP SCALE professional.) -
Page 12: Scheduling Options
(optional): Z-Wave controllers from various manufacturers may or may not support the Z-Wave Thermostat General V2 Device class used by the Honeywell T6 Pro Z-Wave Thermostat. If your controller does not support full thermostat device class functions, it may still be able to control basic Home/Away (Energy Saving) modes of the thermostat through basic Z-Wave commands (On/Off) used by the controller for other Z-Wave devices (eg. - Page 13 Program schedule on the thermostat when not included in Z-Wave network (not operated by Z-Wave controller): The Honeywell T6 Pro Z-Wave thermostat will function as fully programmable thermostat when not operated by your controller. Each day can be programmed for different heating and cooling settings in 4 unique periods (Wake, Away, Home, Sleep) in the thermostat MENU/SCHEDULE.
-
Page 14: Setting A Schedule
Schedule period An active period is shown underlined on the Following Schedule Following Schedule thermostat home screen. Periods shown varies on whether thermostat is included in Z-Wave Mode Mode Heat Auto Heat Auto network and whether local thermostat schedule is enabled and turned On. Wake Away Mode... -
Page 15: Reset Schedule
Reset schedule To reset the thermostat schedule back to the default temperature settings (see "Scheduling options" on page 12), follow steps below. Touch Menu on the thermostat screen. Touch the arrows until you see Back Select Back Select RESET, then touch Select. Touch the arrows until you see SCHEDULE, then touch Select. -
Page 16: Adjusting Backlight Brightness
Unlocking the screen Following Schedule Touch the lock symbol on the thermostat Mode home screen. Heat Auto When prompted to enter a PIN number, Away Home Sleep touch to select the first number of the PIN code. Touch Select to confirm, and repeat for the remaining numbers. -
Page 17: Enabling/Disabling Adaptive Intelligent Recovery
Enabling/disabling Adaptive Intelligent Recovery Over time, your T6 Pro Z-Wave thermostat will learn how long it takes your system to reach the desired temperature. It can then turn on your heating or cooling equipment at the right time to make sure your home is comfortable by the time you expect. -
Page 18: Cleaning The Thermostat Screen
Cleaning the thermostat screen With the clean screen option, you can lock the thermostat screen so you don’t accidentally change your settings when you clean. Follow the steps below to activate clean screen mode. Touch Menu on the thermostat home screen. Touch the arrows until you see CLEAN SCREEN, then touch Select. -
Page 19: Viewing Equipment Status
Viewing equipment status You can check the status of your heating or cooling equipment and fan by following the steps below. Please note that system data may vary depending on thermostat model and how the thermostat was installed. Touch Menu on the thermostat home screen. Touch the arrows until you see EQMT STATUS, then touch Select. -
Page 20: Battery Replacement
Battery replacement Batteries are optional (to provide backup power) Following Schedule Auto Chg. On if your thermostat was wired to run on 24 VAC power when installed. If your thermostat was Mode Heat Auto wired to run on 24 VAC power, then batteries are NOT required. -
Page 21: Alerts And Maintenance Reminders
Alerts and maintenance reminders The T6 Pro Z-Wave thermostat comes with a set of Smart Alerts and Reminders that helps keep your heating and cooling system running correctly and efficiently. If Smart Reminders are set up by your heating or cooling professional, you can get reminded when it’s time to change the filter or when your system is not running correctly. - Page 22 Number Alert/Reminder Definition Replace Replace humidifier pad. Reset the timer by touching Humidifier Pad the “dismiss” button on the thermostat screen after it is replaced. Replace Replace the dehumidifier filter. Reset the timer by Dehumidifier touching "dismiss" button on thermostat screen after Filter it is replaced.
-
Page 23: Troubleshooting
Troubleshooting Screen is blank • Check circuit breaker and reset if necessary. • Make sure power switch at heating and cooling system is on. • Make sure furnace door is closed securely. • If only battery powered, make sure the batteries are fresh and correctly inserted. -
Page 24: 5-Year Warranty
This warranty does not cover removal or reinstallation costs. This warranty shall not apply if it is shown by Honeywell that the defect or malfunction was caused by damage which occurred while the product was in the possession of a consumer. -
Page 25: General System Information
CAUTION: MERCURY NOTICE If the T6 Pro Z-Wave thermostat is replacing a thermostat that contains mercury in a sealed tube, do not place the old thermostat in the trash. Please contact your local waste management authority for proper recycling or disposal instructions. - Page 26 Home and Building Technologies In the U.S.: Honeywell International Inc. 715 Peachtree Street NE Atlanta, GA 30308 http://customer.honeywell.com ® U.S. Registered Trademark. © 2018 Honeywell International Inc. 33-00296EFS—02 M.S. Rev. 03-18 33-00296EFS-02 Printed in U.S.A.
- Page 27 Z-Wave Pro T6. Veuillez consulter la table des matières à la page 2 pour effectuer une recherche par sujet. Besoin d’aide? Communiquez avec nous. Site Web : yourhome.honeywell.com/ Téléphone : 1 800 468-1502 Réseaux sociaux : Twitter : @HoneywellHome, Facebook : Honeywell Home...
- Page 28 Table des matières Caractéristiques du thermostat ..................3 Présentation du thermostat ....................4 Fonctionnement de base du thermostat Réglage de la température ........................4 Contournement du programme ......................5 Réglage de la température en mode Automatique ..............6 Sélection du mode du système ......................7 Protection du compresseur intégrée ....................8 Réglage du ventilateur ..........................8 Paramètres du menu principal...
-
Page 29: Caractéristiques Du Thermostat
Caractéristiques du thermostat Le thermostat programmable Z-Wave Pro T6 de Honeywell est un thermostat certifié Z-Wave Plus conçu pour fonctionner avec n’importe quel contrôleur ou passerelle Z-Wave compatible afin de faciliter la programmation et l’automatisation, et ainsi assurer confort et économie d’énergie. Vous pouvez utiliser le thermostat dans tout réseau Z-Wave avec d’autres appareils certifiés Z-Wave d’autres fabricants. -
Page 30: Présentation Du Thermostat
Présentation du thermostat Température Température État de la connexion Réglage de la souhaitée intérieure et Z-Wave température pourcentage Affiche la Affiche l’état de la Appuyez sur ou sur d’humidité intérieure température connexion Z-Wave. pour sélectionner relative intérieure souhaitée. la température Appuyez sur la souhaitée. -
Page 31: Contournement Du Programme
Contournement du programme Si le thermostat est inclus dans le réseau Z-Wave, il suit habituellement les programmes du contrôleur Z-Wave. Si vous réglez le point de consigne de température, celui-ci remplace le réglage actuel jusqu’au changement d’état (p. ex., Maison/Absent) ou jusqu’à la réception d’un nouveau point de consigne du contrôleur Z-Wave. -
Page 32: Réglage De La Température En Mode Automatique
Réglage de la température en mode Automatique Le mode Automatique (dans lequel le thermostat sélectionne automatiquement le chauffage ou la climatisation pour atteindre la température que vous souhaitez) est désactivé par défaut. Si le professionnel qui a installé votre système de chauffage ou de climatisation a activé cette option, vous verrez l’option Automatique s’afficher en dessous de Mode à... -
Page 33: Sélection Du Mode Du Système
Sélection du mode du système Le mode du système actuel (Heat (Chauffage), Cool Following Schedule (Climatisation), Off (Arrêt), Em Heat* (Chauffage d’urgence)) est affiché à la gauche de la température Mode Heat Auto intérieure actuelle qui est indiquée sur l’écran d’accueil du thermostat. -
Page 34: Protection Du Compresseur Intégrée
Protection du compresseur intégrée Si le compresseur est redémarré trop rapidement Cool On Following Schedule après un arrêt, le système peut être endommagé. La protection du compresseur intégré oblige Mode Auto Cool le compresseur à attendre quelques minutes avant de redémarrer, afin d’empêcher tout risque Away Home Sleep de dommage au système de chauffage ou de... -
Page 35: Configuration De Z-Wave
Configuration de Z-Wave Pour inclure ou exclure le thermostat du réseau Z-Wave, allez à l’option MENU/Z-WAVE SETUP (menu/configuration Z-Wave). • Appuyez sur Select (Sélectionner). Vous serez invité à définir votre contrôleur principal à INCLUDE MODE (Mode inclusion). Veuillez Back Select Back Select vous reporter au manuel de l’utilisateur de votre... -
Page 36: État De La Connexion Z-Wave
État de la connexion Z-Wave Wifi is on and L’icône d’état de connexion Z-Wave est située connected Following Schedule dans le coin supérieur droit de l’écran. • Le thermostat est inclus et connecté à un Mode Heat Auto Wifi is disconnected réseau Z-Wave. -
Page 37: Présentation Du Menu Principal
Présentation du menu principal Appuyez sur Menu sur l’écran d’accueil du thermostat, puis utilisez les flèches pour parcourir les options suivantes. SCHEDULE (PROGRAMME) CLEAN SCREEN (NETTOYAGE DE L'ECRAN) Modifiez le programme du thermostat local. Désactivez l’écran tactile pendant (Cette option est seulement disponible si 30 secondes afin de pouvoir le nettoyer. -
Page 38: Options De Programmation
Les contrôleurs Z-Wave des divers fabricants peuvent ou non prendre en charge la catégorie de thermostat général Z-Wave V2 utilisé par le thermostat Z-Wave Pro T6 de Honeywell. Si votre contrôleur ne prend pas en charge toutes les fonctions de la catégorie de thermostat, il peut peut-être commander les modes Maison/Absent (économie d’énergie) du thermostat au moyen des commandes Z-Wave de base (marche/arrêt) - Page 39 Programme du thermostat lorsqu’il n’est pas inclus dans le réseau Z-Wave (non commandé par un contrôleur Z-Wave) : Le thermostat Z-Wave Pro T6 de Honeywell peut également être utilisé comme un thermostat programmable lorsqu’il n’est pas commandé par votre contrôleur. Pour chaque journée, il est possible de régler des points de consigne de chauffage et de climatisation...
-
Page 40: Réglage D'une Programmation
Période du programme Following Schedule Following Schedule La période active est soulignée sur l’écran d’accueil du thermostat. Les périodes affichées varient selon Mode Mode Heat Auto Heat Auto que le thermostat soit ou non compris dans un réseau Z-Wave et selon que le programme local du thermostat Wake Away soit activé... -
Page 41: Réinitialisation Du Programme
Réinitialisation du programme Pour redéfinir les points de consigne de température par défaut du programme (voir la rubrique « Options de programmation » à la page 12) et suivez les étapes ci-dessous. Appuyez sur Menu sur l’écran du thermostat. Appuyez sur les flèches jusqu’à... -
Page 42: Réglage De La Luminosité Du Rétroéclairage
Déverrouillage de l’écran Following Schedule Appuyez sur le symbole de verrou sur l’écran d’accueil du thermostat. Mode Heat Auto Lorsque vous êtes invité à entrer le code NIP, appuyez sur pour sélectionner le premier Away Home Sleep chiffre du NIP. Appuyez sur Select (Sélectionner) pour confirmer et répétez l’opération pour les chiffres suivants. -
Page 43: Activation Et Désactivation De La Reprise Intelligente Adaptative
Activation et désactivation de la reprise intelligente adaptative Peu à peu, votre thermostat Z-Wave Pro T6 se souviendra du temps que prend votre système pour atteindre la température désirée. Il peut ainsi activer votre équipement de chauffage ou de climatisation à la bonne heure afin que votre maison soit à... -
Page 44: Nettoyage De L'écran Du Thermostat
Nettoyage de l’écran du thermostat Grâce à l’option de nettoyage d’écran, vous pouvez verrouiller l’écran du thermostat afin de ne pas modifier accidentellement les paramètres lors de cette opération. Pour activer le mode de nettoyage d’écran, effectuez les étapes ci-dessous. Appuyez sur Menu sur l’écran d’accueil du thermostat. -
Page 45: Affichage De L'état De L'équipement
Affichage de l’état de l’équipement Vous pouvez vérifier l’état de votre ventilateur et de votre équipement de chauffage ou de climatisation en effectuant les étapes ci-dessous. Veuillez noter que les données du système peuvent varier en fonction du modèle du thermostat et de l’installation de ce dernier. Appuyez sur Menu sur l’écran d’accueil du thermostat. -
Page 46: Remplacement De La Pile
Remplacement de la pile Les piles sont facultatives (pour fournir une Following Schedule Auto Chg. On alimentation de secours) si votre thermostat a été raccordé à une alimentation secteur de 24 V c.a. lors Mode de son installation. Si votre thermostat a été raccordé à Heat Auto une alimentation secteur de 24 V c.a., des piles ne sont... -
Page 47: Alertes Et Rappels D'entretien
Alertes et rappels d’entretien Le thermostat Z-Wave Pro T6 comporte un ensemble d’alertes et rappels intelligents qui vous aident à faire fonctionner votre système de chauffage et de climatisation correctement et efficacement. Si votre professionnel en chauffage ou climatisation configure les rappels intelligents, vous pouvez recevoir des rappels lorsque vient le temps de changer le filtre ou lorsque votre système ne fonctionne pas adéquatement. - Page 48 Code Alerte/Rappel Définition Remplacer le tam- Remplacer le tampon de l’humidificateur. Une fois le pon de l’humidifi- tampon remplacé, réinitialisez la minuterie en appuyant sur cateur le bouton « Dismiss » (effacer) sur l’écran du thermostat. Remplacer le filtre Remplacer le filtre du déshumidificateur. Une fois le filtre du déshumidifi- remplacé, réinitialisez la minuterie en appuyant sur le cateur...
-
Page 49: Dépannage
Dépannage L’écran est vide • Vérifiez le disjoncteur et réinitialisez-le si nécessaire. • Veillez à ce que l’interrupteur du système de chauffage ou de climatisation soit en position de marche. • Assurez-vous que la porte de l’appareil de chauffage est correctement fermée. -
Page 50: Garantie De 5 Ans
(i) le retourner, accompagné d’une preuve d’achat datée, au détaillant auprès de qui il a été acheté, ou (ii) appeler le service à la clientèle de Honeywell au 1 800 468-1502. Le service à la clientèle décidera si le produit doit être renvoyé à l’adresse suivante : Honeywell Return Goods, Dock 4 MN10-3860, 1985 Douglas Dr. -
Page 51: Informations Générales Relatives Au Système
Informations générales relatives au système ATTENTION : RISQUE ÉLECTRIQUE Peut provoquer une décharge électrique ou endommager l’équipement. Coupez l’alimentation avant de commencer l’installation. ATTENTION : RISQUE D’ENDOMMAGEMENT DE L’ÉQUIPEMENT La protection du compresseur est contournée lors du test. Pour empêcher tout dommage causé... - Page 52 Home and Building Technologies Aux États-Unis : Honeywell International Inc. 715 Peachtree Street NE Atlanta, GA 30308 http://customer.honeywell.com ® Marque déposée aux É.-U. © 2018 Honeywell International Inc. 33-00296EFS—02 M.S. Rev. 03-18 33-00296EFS-02 Imprimé aux États-Unis...
- Page 53 (10.3 cm x 10.3 cm x 2.6 cm) Bienvenido Esta guía del usuario está diseñada para ayudarlo a familiarizarse con el nuevo termostato T6 Pro Z-Wave. Consulte el índice de la página 2 para buscar por tema. ¿Necesita ayuda? Comuníquese con nosotros. Sitio web: yourhome.honeywell.com/ Teléfono: 1-800-468-1502...
- Page 54 Índice Características del termostato .................... 3 Descripción general del termostato .................. 4 Funcionamiento básico del termostato Ajustar la temperatura ..........................4 Anulaciones de la programación .......................5 Ajustar la temperatura en modo automático ................6 Seleccionar el modo de sistema ......................7 Protección incorporada para el compresor ..................8 Configurar el ventilador ..........................8 Configuraciones del menú...
-
Page 55: Características Del Termostato
Características del termostato El termostato programable T6 Pro Z-Wave de Honeywell es un termostato Z-Wave Plus certificado, diseñado para funcionar con cualquier controlador o puerta de enlace compatibles con Z-Wave para poder programar y automatizar el termostato de manera fácil, y así ahorrar energía y disfrutar del confort al mismo tiempo. El termostato puede funcionar en cualquier red Z-Wave junto con dispositivos Z-Wave certificados de otros fabricantes. -
Page 56: Descripción General Del Termostato
Descripción general del termostato Temperatura Temperatura Estado de la Ajustar la deseada interior/% de conexión a la red temperatura humedad relativa Z-Wave Indica la temperatura Presione el botón interior interior deseada. Muestra el estado para configurar Presione para de conexión a la red la temperatura mostrar la Z-Wave. -
Page 57: Anulaciones De La Programación
Anulaciones de la programación Si el termostato está incluido en la red Z-Wave, por lo general, sigue el ajuste de su controlador Z-Wave. Si cambia los ajustes de la temperatura, se anulan los ajustes actuales hasta que se reciba un nuevo estado (por ejemplo, Home [Hogar] o Away [Ausente]) o nuevos ajustes de temperatura desde el controlador Z-Wave. -
Page 58: Ajustar La Temperatura En Modo Automático
Ajustar la temperatura en modo automático El modo automático (cuando el termostato selecciona automáticamente la calefacción o refrigeración para alcanzar la temperatura deseada) está deshabilitado por defecto. Si su profesional de calefacción o refrigeración lo habilitó, podrá ver que aparecerá Auto (Automático) como una opción debajo de Mode (Modo) en la pantalla de inicio del termostato. -
Page 59: Seleccionar El Modo De Sistema
Seleccionar el modo de sistema El modo de sistema actual (Heat [Calefacción], Following Schedule Cool [Refrigeración], Off [Apagado], Em Heat [Calefacción de emergencia]*) se muestra en la Mode Heat Auto pantalla de inicio del termostato. El modo que se encuentra activo (Heat Away Home On [Calefacción encendida] o Cool On... -
Page 60: Protección Incorporada Para El Compresor
Protección incorporada para el compresor Si el compresor se reinicia demasiado rápido después Cool On Following Schedule de un cierre, se puede dañar el sistema. La función de protección incorporada para el compresor obliga Mode Auto al compresor a esperar unos minutos antes de Cool reiniciarse, lo que ayuda a prevenir daños en el sistema Away... -
Page 61: Configuración De Z-Wave
Z-Wave. • El termostato T6 Pro Z-Wave funciona en modo de batería o modo de energía normal opcional de Z-Wave, según su fuente de alimentación. El modo de alimentación de Z-Wave solo se puede modificar cuando el termostato NO está... -
Page 62: Estado De La Conexión A La Red Z-Wave
Estado de la conexión a la red Z-Wave El estado de la conexión a la red Z-Wave se Following Schedule encuentra en la esquina superior derecha de la Wifi is on and connected pantalla. Mode Heat Auto • Termostato está incluido y conectado a una Wifi... -
Page 63: Descripción General Del Menú Principal
Descripción general del menú principal Para ver las siguientes opciones, presione Menu (Menú) en la pantalla del termostato y, luego, utilice las flechas SCHEDULE (PROGRAMACION) CLEAN SCREEN (LIMPIAR PANTALLA) Edita la programación para el programa Deshabilite la pantalla táctil durante 30 del termostato local. -
Page 64: Opciones De Programación
Es posible que los controladores Z-Wave de terceros no tengan compatibilidad con la clase de dispositivo del termostato general V2 Z-Wave que se utiliza en el termostato T6 Pro Z-Wave de Honeywell. Si su controlador no es compatible con todas las funciones de la clase de dispositivo del termostato, es posible que, de todos modos, pueda controlar los modos básicos Home/Away... - Page 65 Cómo ajustar el programa del termostato si este no está incluido en una red Z-Wave (no controlado por un controlador Z-Wave): El termostato T6 Pro Z-Wave de Honeywell funciona como un termostato totalmente programable siempre que no esté operado por su controlador. Puede programar diferentes ajustes de temperatura de calefacción y refrigeración en cuatro períodos únicos (Wake [Activo],...
-
Page 66: Configurar Una Programación
Periodo de la programación Following Schedule Following Schedule En la pantalla de inicio del termostato, se muestra un período activo subrayado. Los períodos que se Mode Mode Heat Auto Heat Auto muestren dependerán de si su termostato está incluido en la red Z-Wave y si el programa del Wake Away termostato local está... -
Page 67: Restablecer La Programación
Restablecer la programación Para restablecer la programación del termostato a los ajustes de temperatura predeterminados (consulte la sección Opciones de programación en la página 12), siga los pasos a continuación. Presione Menu (Menú) en la pantalla del termostato. Back Select Back Select Presione las flechas... -
Page 68: Ajustar El Brillo De La Luz De Fondo
Desbloquear la pantalla Following Schedule Presione el símbolo de candado en la pantalla de inicio del termostato. Mode Heat Auto Cuando se le solicite que ingrese el número PIN, presione para seleccionar el primer número Away Home Sleep del código PIN. Presione Select (Seleccionar) para confirmar y repita los pasos para los demás números. -
Page 69: Habilitar/Deshabilitar La Función De Recuperación Inteligente De Adaptación
Habilitar/deshabilitar la función de recuperación inteligente de adaptación Con el tiempo, su termostato T6 Pro Z-Wave recordará cuánto tarda su sistema en alcanzar la temperatura deseada. Luego, puede encender su equipo de calefacción o refrigeración en el momento justo para asegurarse de que su hogar esté... -
Page 70: Limpiar La Pantalla Del Termostato
Limpiar la pantalla del termostato Con la opción de limpiar la pantalla, puede bloquear la pantalla del termostato para evitar que modifique las configuraciones por accidente cuando la limpie. Para activar el modo limpiar pantalla, siga los siguientes pasos. Presione Menu (Menú) en la pantalla de inicio del termostato. -
Page 71: Ver El Estado Del Equipo
Ver el estado del equipo Puede verificar el estado de su equipo de calefacción o refrigeración y del ventilador mediante los siguientes pasos. Tenga en cuenta que los datos del sistema pueden variar según el modelo del termostato y cómo se haya instalado. -
Page 72: Reemplazo De La Batería
Reemplazo de la batería Las baterías son opcionales (para proporcionar Following Schedule Auto Chg. On alimentación de respaldo) si el termostato se conectó para funcionar con corriente de 24 V CA al momento Mode de la instalación. Si el termostato se conectó para Heat Auto funcionar con corriente de 24 V CA, NO se necesitan... -
Page 73: Alertas Y Recordatorios De Mantenimiento
Alertas y recordatorios de mantenimiento El termostato T6 Pro Z-Wave cuenta con un conjunto de alertas y recordatorios inteligentes que ayudan a que su sistema de refrigeración y calefacción funcione de forma correcta y eficiente. Si un profesional de calefacción o refrigeración configura los recordatorios inteligentes, puede recibir un recordatorio cuando sea momento de cambiar el filtro o cuando el sistema no esté... - Page 74 Número Alerta/recordatorio Definición Limpiar o reempla- Limpie o reemplace el filtro del ventilador. Restablezca el zar el filtro del ven- temporizador presionando el botón Dismiss (Ignorar) en la tilador pantalla del termostato luego de reemplazar el filtro. Reemplazar la lám- Reemplace la lámpara UV (1).
-
Page 75: Solución De Problemas
Solución de problemas La pantalla está • Revise el disyuntor del circuito y restablezca si es necesario. en blanco. • Asegúrese de que el interruptor de alimentación del sistema de calefacción y refrigeración se encuentre encendido. • Asegúrese de que la puerta de la caldera se encuentre cerrada de forma segura. -
Page 76: Años De Garantía
(i) Devuélvalo con una factura de venta o algún otro comprobante de compra fechado, al lugar donde lo compró. (ii) O bien, llame a Atención al Cliente de Honeywell al 1-800-468-1502. Atención al Cliente determinará si el producto debe devolverse a la siguiente dirección: Honeywell Return Goods, Dock 4 MN10-3860, 1985 Douglas Dr. -
Page 77: Información General Del Sistema
PRECAUCIÓN: AVISO SOBRE EL MERCURIO Si el termostato T6 Pro Z-Wave reemplaza a un termostato que contiene mercurio en un tubo sellado, no arroje el termostato viejo a la basura. Comuníquese con la autoridad local de gestión de residuos para obtener instrucciones sobre cómo desecharlo o reciclarlo de forma apropiada. - Page 78 Home and Building Technologies En los EE. UU.: Honeywell International Inc. 715 Peachtree Street NE Atlanta, GA 30308 http://customer.honeywell.com ® Marca Registrada en los E.U.A. © 2018 Honeywell International Inc. 33-00296EFS—02 M.S. Rev. 03-18 33-00296EFS-02 Impreso en EE. UU.
Need help?
Do you have a question about the T6 Pro Z-Wave and is the answer not in the manual?
Questions and answers