Honeywell T6 Pro Hydronic User Manual
Hide thumbs
Also See for T6 Pro Hydronic:
- Installation instructions manual (13 pages) ,
- Installation instructions manual (37 pages) ,
- User manual
Table of Contents
Advertisement
T6 Pro Hydronic
Programmable Thermostat
User Guide
Package Includes:
• T6 Pro Hydronic Programmable
Thermostat
• Floor sensor (model AQ12C20)
• UWP™ Mounting System
• Honeywell Standard Installation
Adapter (J-box adapter)
• Honeywell Decorative Cover Plate –
Small; size 4-49/64 in x 4-49/64 in x
11/32 in (121 mm x 121 mm x 9 mm)
• Screws and anchors
• 2 AA Batteries
• Installation Instructions and User
Guide
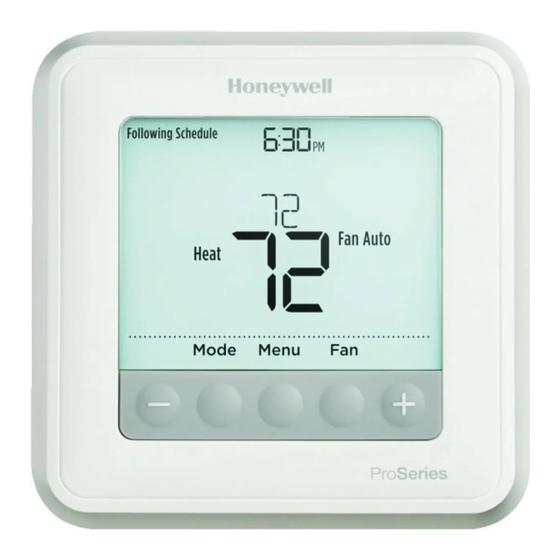
Thermostat controls
• System status
information
Heat On/Recovery
• Schedule information
Following time based
schedule
• Actual time
• Mode
Select system mode
Heat/Off
• Menu
Press to display options.
Start here to set a
program schedule
The screen will wake up by pressing any of the five buttons. If powered by the C wire, the screen stays lit for 45 seconds
after you complete changes. If powered by battery only, the screen stays lit for 8 seconds. Depending on how your
Customer assistance
Call Honeywell Customer Care toll-free at 1-800-468-1502.
thermostat was installed, the screen light may always be on.
• Indoor temperature
setpoint
Press + or – to change
temperature setting
• Actual indoor
temperature
• Temperature/
Navigation buttons
Press to increase or
decrease temperature
setpoint and to
navigate menus and
menu options
Advertisement
Table of Contents

Related Manuals for Honeywell T6 Pro Hydronic


Summary of Contents for Honeywell T6 Pro Hydronic
-
Page 1: Programmable Thermostat
The screen will wake up by pressing any of the five buttons. If powered by the C wire, the screen stays lit for 45 seconds after you complete changes. If powered by battery only, the screen stays lit for 8 seconds. Depending on how your thermostat was installed, the screen light may always be on. Customer assistance Call Honeywell Customer Care toll-free at 1-800-468-1502. -
Page 2: Temperature Control Modes
Temperature control modes Your T6 Pro Hydronic Programmable Thermostat can be set to operate in one of 3 different control modes. These settings determine which temperature is measured, controlled and displayed on the thermostat home screen. Each thermostat in your home can be set to a different control mode. Please ask your local heating professional which control mode is used for you to better control the Thermostat. -
Page 3: Set The Time And Date
System operation settings 1 Press the Mode button to cycle to the next available System mode. 2 Cycle through the modes until the required System mode is displayed and leave it to activate. System modes: ‒ Heat ‒ Off Set the time and date Time 1 Press Menu on your thermostat. -
Page 4: To Adjust Program Schedules
Program Schedule You can program four time periods each day, with different settings for weekdays and weekends. We recommend the pre-sets (shown in the table below), since they can reduce your heating expenses. Floor Wake - Set to the time you wake up and the Temperature Temperature temperature you want during the morning, until... -
Page 5: Program Schedule Override
Program schedule override (temporary) 1 Press to adjust the temperature. 2 Once at the desired setpoint temperature, no further action is needed. The new setpoint temperature will be held until the next scheduled time period begins. For more information on schedule time periods, see “Program Schedule”... -
Page 6: Eco (Economy) Mode
Vacation program schedule override (temporary) Vacation overrides the current program schedule for a longer period of time. You might use this feature when you know you’ll be away for awhile. 1 Press Menu on your thermostat. Select to go to VACA. Press Select. Days number 2 Press Home starts blinking. -
Page 7: Adaptive Intelligent Recovery
7 Press Back to go back a step to enter the correct number and press Select. Adaptive Intelligent Recovery Over time, the Honeywell T6 Pro Thermostat “learns” how long it takes your system to reach the temperature you want. It turns on the heating system earlier... -
Page 8: Battery Replacement
Battery replacement Batteries are optional (to provide backup power) if your thermostat was wired to run on AC power when installed. If your thermostat was not wired to run on AC power, then batteries are required. When the low battery warning appears, press Install fresh batteries immediately when the gently to loosen the... -
Page 9: Low Battery Warning
Alerts If there is an alert or reminder, the alert icon appears on the Home screen. Heat Low Battery Warning 1 The batteries need to be replaced when BATT, the alert icon , and the battery icon are displayed on the Home screen. 2 When the battery power is very low, the thermostat’s backlight is disabled to save battery power. -
Page 10: Troubleshooting
Troubleshooting If you have difficulty with your thermostat, please try the following suggestions. Most problems can be corrected quickly and easily. Display is • Check circuit breaker and reset if necessary. blank • Make sure power switch for heating system is on. •... -
Page 11: Year Limited Warranty
This warranty does not cover removal or reinstallation costs. This warranty shall not apply if it is shown by Honeywell that the defect or malfunction was caused by damage which occurred while the product was in the possession of a consumer. - Page 12 Home and Building Technologies In the U.S.: Honeywell 715 Peachtree Street NE Atlanta, GA 30308 http://yourhome.honeywell.com ® U.S. Registered Trademark. © 2017 Honeywell International Inc. 33-00343—01 M.S. 09-17 33-00343-01 Printed in U.S.A.
Need help?
Do you have a question about the T6 Pro Hydronic and is the answer not in the manual?
Questions and answers