Stinger Elev8 UN1880 Installation Manual
8" floating multimedia display system
Hide thumbs
Also See for Elev8 UN1880:
- Installation manual (12 pages) ,
- Installation manual (12 pages) ,
- User manual (36 pages)

Related Manuals for Stinger Elev8 UN1880


Summary of Contents for Stinger Elev8 UN1880
- Page 1 INSTALLATION GUIDE 8" FLOATING MULTIMEDIA DISPLAY SYSTEM MODEL NUMBER: UN1880 Copyright © 2018 StingerElectronics.com...
-
Page 2: Table Of Contents
Stinger is a Power Brand of AAMP Global its product. If you do not agree, please discontinue use 15500 Lightwave Drive, Suite 202 and contact STINGER. This product is intended for off- Clearwater, Florida 33760 road use and passenger use only. -
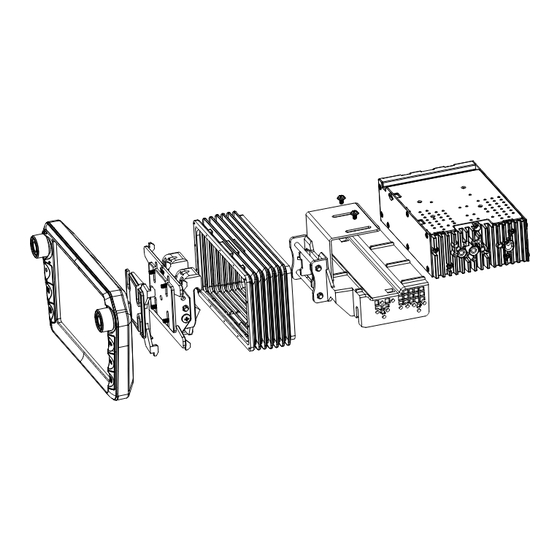
Page 3: Parts List
Parts List Hardware Guide DESCRIPTION PART NO Touch Panel Display UN1880-D M4 X 6 M4 X 10 M4 X 12 M4 X 14 M4 X 18 Radio Module UN1880-M Mounting Brackets / Hardware Plastic Dash Mounting Bracket Display Mounting Clamp #10 X 3/8 M5 X 10 SE-1000... -
Page 4: Pre-Assembly
Using a Double DIN Sub-Dash Kit (PAGE 10) Using a Double DIN Factory Radio Mounting Brackets (PAGE 12) Using a Single DIN ISO Mountable Dash Kit, relocating Radio Module (PAGE 14) Custom Mounting Applications. See Stinger website for TECH TIPS on vehicle specific installations. - Page 5 Using a Double DIN Dash Kit: Radio chassis mounts to the brackets attached to the kit main frame FIG. E Display Adjustment & Mounting: 4. Determine the desired position of the display: a. Display can be vertical or tilted up (FIG. E) b.
- Page 6 Using a Double DIN Dash Kit: Radio chassis mounts to the kit brackets in the sub-dash, not to the kit main frame FIG. J Display Adjustment & Mounting: 4. Attach the display to the mounting bracket 1. Use all 8 kit mounting screws to attach the radio module & plastic mounting bracket assembly to the kit assembly by hooking bottom spring hook and brackets at the front most location (not to exceed the front of the kit bracket).
- Page 7 Using Factory Radio Brackets: Radio chassis mounts to the factory brackets in the sub-dash FIG. O Display Adjustment & Mounting: 1. Use all 8 kit mounting screws to attach the radio module & plastic mounting bracket assembly to the 4. Attach the display to the mounting bracket factory brackets.
- Page 8 Using a Single DIN ISO Mountable Dash Kit: Radio chassis mounts separately into the sub-dash Display Adjustment & Mounting: FIG. T 4. Determine the desired position of the display: 1. Install the dash kit brackets to the main frame. a. Display can be vertical or tilted up (FIG. T) M5 X 10 b.
-
Page 9: Final Assembly
Final Assembly Wiring and Connections BOOT ASSEMBLY PLASTIC "TAB" HAS TO GO INTO A NOTCH (DISPLAY UNIT NOT SHOWN) If needed, attach the rubber boot to the display clamp assembly by aligning BOOT ASSEMBLY HOOKS the notch on the top edge as shown, AT 5 SPOTS (RUBBER BOOT NOT SHOWN) and hook the boot to the clamp at 5... - Page 10 Wiring and Connections Wiring and Connections 24 Pin AV / Rear Camera Harness 16 Pin Power / Speaker Harness Audio/Video Inputs & Outputs / Rear Camera Video Input / Resistive Steering Wheel Connect radio power and speaker connections to a vehicle specific harness Control Inputs - To program SWC, go to SETTINGS, then select the Gear Icon, (sold separately) referencing diagram below.
-
Page 11: Dimensions
Wiring and Connections Dimensions (in) 6 Pin SWI / IR Harness 3.5mm Input for optional Steering Wheel Control Interface (PAC Audio SWI-CP2 is recommended for full compatibility and advanced features. Visit PAC-Audio.com) Steering Wheel Control Input IR Input - Not Used 9.78 1.61 4 Pin Microphone / Camera Audio Harness... -
Page 12: Troubleshooting
Note: NTSC and PAL video formats only. feature. See the Parental Control section, on Page 17 of the User Guide available on the Apple CarPlay Stinger website, for more information on the Parental Control feature and how to access EchoMaster Apple CarPlay will not start/launch locked channels. - Page 13 NOTES: StingerElectronics.com IG-UN1880-REV.051319 Copyright © 2018...
Need help?
Do you have a question about the Elev8 UN1880 and is the answer not in the manual?
Questions and answers