Table of Contents

Related Manuals for Roland VR-1HD


Summary of Contents for Roland VR-1HD
-
Page 1: Table Of Contents
Checking a Specific Audio Input (Solo) Interlinking Audio Output to Video Switching (Audio Follow) Controlling the Volume Automatically (Auto Mixing) Playing Back Music Files Suppressing Echo in a Web Conference System (Echo Canceller) About the AUX Bus © 2019 Roland Corporation... -
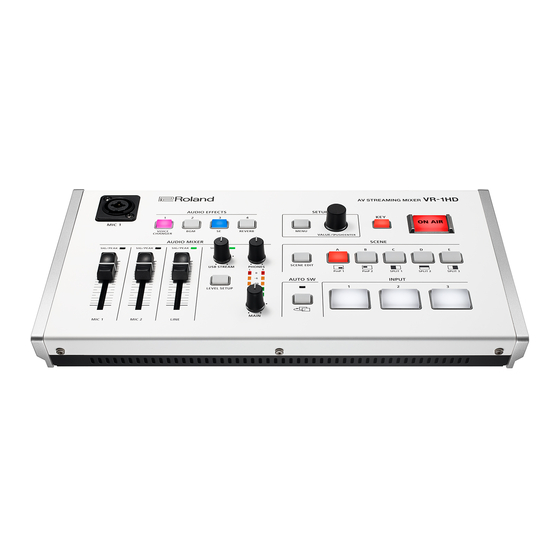
Page 2: Panel Description
5 Do not connect a mic that supports plug-in power, [4] (REVERB) Adds reverberation to the sound. or the mics that are included with Roland “VP-03” or “JD-Xi. ” Doing so will cause malfunctions * The above are the factory settings. You can also assign other functions to each of buttons. - Page 3 Panel Description SETUP area [KEY] button (p. 6) (p. 14) Turns on/off video compositing using a luminance key. When [MENU] button on (lit), two videos are composited and output. When this is on (lit), the menu appears on the display that’s connected to the MONITOR (MENU) connector.
-
Page 4: Rear Panel/Side Panel (Connecting Your Equipment)
You can use this to live- stream your video/audio. HDMI input connector This also inputs the audio playback from your computer into the VR-1HD. * If you are outputting HD video via USB, connect this to a USB 3.0 port of your computer. - Page 5 5 If you use a gooseneck mic, operating noise might be HDMI output connector picked up. 5 Do not connect a mic that supports plug-in power, or the mics that are included with Roland “VP-03” or “JD-Xi. ” Doing so will cause malfunctions. PHONES jack Connect headphones here.
-
Page 6: Basic Operations
For details, refer to “Shortcut List” (p. 48). The power to the VR-1HD turns off automatically when all of the following states persist for 240 minutes (Auto Off function). 5 If you want to temporarily change where the menu is shown... -
Page 7: Video Input/Output Settings
About frame rate 1920 x 1080/29.97p 1920 x 1080/25p The VR-1HD supports the frame rates “59.94 Hz” and “50 Hz. ” To specify the frame rate, use the [MENU] button 0 “SYSTEM” 0 7 Audio input format “FRAME RATE. ”... -
Page 8: Specifying The Input Format (Edid)
EDID is data that is transmitted from the VR-1HD to the source device when the VR-1HD is connected to a source device. EDID contains data such as the formats that can be input to the VR-1HD (resolution, color space, color depth) and audio information. -
Page 9: Adjusting Input Video
Video Input/Output Settings Adjusting Input Video Inputting Copy-Protected (HDCP) Video Here’s how to adjust the quality and scaling of the video signals that If you want to input HDCP-protected video from a BD player or other are assigned to the INPUT [1]–[3] buttons. device, you can enable HDCP input. -
Page 10: Video Operations
Video Operations Using Buttons to Switch the Video Switching the Video Automatically (Auto Switching) Here’s how to manually switch between the INPUT 1–3 video signals. The video of INPUT 1–3 or of scenes (p. 12) can be switched Press an INPUT [1]–[3] button to select the video. automatically (the auto switching function). - Page 11 Video Operations Specifying the operation mode Video follows audio [MENU] button 0 “AUTO SWITCHING” 0 select “TYPE.” Auto scan [MENU] button 0 “AUTO SWITCHING” 0 select “TYPE.” Turn the [VALUE] knob to select “AUTO SCAN,” and press to confirm. Turn the [VALUE] knob to select “VIDEO FOLLOWS Use the [VALUE] knob to select a menu item.
-
Page 12: Displaying A Combination Of Two Videos (Scene)
You can register a configuration of screens as a “scene” and show a combination of two videos. If you register your favorite configurations as scenes, you can instantly switch between those configurations just by pressing SCENE buttons. The VR-1HD provides five scenes. - Page 13 Video Operations Split Copying a scene [SCENE EDIT] button 0 “SCENE A”–“SCENE E” 0 select Here’s how to copy the settings registered in a scene to another scene. “TYPE.” [SCENE EDIT] button 0 select “COPY.” Shows the type of screen configuration that is currently registered.
-
Page 14: Compositing A Logo Or Image (Luminance Key)
Video Operations Compositing a Logo or Image Fading-In/Out the Main Output Video (Luminance Key) Here’s how to perform a fade-out from the main output video to a black screen, or a fade-in from a black screen to the main output Black or white portions of a logo or image can be cut out based on video. -
Page 15: Outputting A Loaded Still Image
5 When using a USB flash drive for the first time, you must [MENU] button 0 “VIDEO INPUT” 0 “INPUT 1”–“INPUT 3” format it using the VR-1HD (p. 27). 0 select “INPUT SOURCE.” 5 Depending on the USB flash drive, recognition of the flash drive might take some time. -
Page 16: Audio Operations
Audio Operations Adjusting the Mic’s Input Gain Adjusting the Volume Balance (Sensitivity) Here’s how to adjust the volume balance of each input and the overall volume. Here’s how to adjust the input gain so that the mic audio is at the Indicator (0 dB) appropriate level. -
Page 17: Reducing Acoustic Feedback (Howling Canceller)
Audio Operations Reducing Acoustic Feedback Changing the Character of a Voice (Howling Canceller) (Voice Changer) Here’s how to reduce the acoustic feedback that can occur when a Here’s how to modify the pitch or character of the voice that’s input mic is brought near a speaker (howling canceller function). -
Page 18: Applying Effects To Input Audio
Audio Operations Applying Effects to Input Audio You can apply effects to the input audio to adjust the character of the sound. The following table shows the effects that are available. Effect Input audio Reverb Gate Compressor Limiter Equalizer High-pass filter Voice changer MIC 1, 2 LINE... -
Page 19: Using An Effect Preset
Using an Effect Preset This adds reverberation to the sound. The VR-1HD provides effect presets for the mics. Simply by selecting [MENU] button 0 “AUDIO INPUT” 0 “MIC 1”–“PLAYBACK a preset, you can easily apply the effect that’s appropriate for your situation. -
Page 20: Applying Effects To Output Audio
Audio Operations Applying Effects to Output Audio Correcting a Time Difference Between Video and Audio (Delay) Here’s how to modify the tonal character by applying effects to the audio output. If there is a timing discrepancy between the video and audio, you can correct the output timing by delaying the audio output. -
Page 21: Silencing Only Specific Audio (Mute)
Audio Operations Silencing Only Specific Audio (Mute) Checking a Specific Audio Input (Solo) Here’s how to temporarily silence specific input audio or output Here’s how you can temporarily monitor a specific audio input via the audio (the mute function). headphones (solo function). * The solo function applies to the headphone output. -
Page 22: Interlinking Audio Output To Video Switching
(the audio follow function). operator can be controlled automatically (auto mixing function). Since this lets you leave the volume adjustments up to the VR-1HD, it can be used in situations where there is no dedicated operator. -
Page 23: Playing Back Music Files
5 Music files shorter than 10 ms might not play correctly. Specifying the playback method 5 The VR-1HD plays back the music file directly from the You can make the music file play as a loop, or make it fade-in/out. -
Page 24: Suppressing Echo In A Web Conference System
System (Echo Canceller) A “bus” is a destination to which input audio is mixed and sent. The VR-1HD has two buses: the “main bus” and the “AUX bus. ” In a conversation using the speaker and mic of a web conference With the exception of the MAIN connector, you can assign a system, an echo can occur when the other person’s voice heard... -
Page 25: Live Streaming
Live Streaming Outputting Video/Audio to a Computer for Streaming Here’s how the video and audio mixed by the VR-1HD can be output to a connected computer. You can also input audio that’s played back by the computer. By using an internet-connected computer with streaming software, you can distribute content as a live internet stream. -
Page 26: Other Features
5 When using a USB flash drive for the first time, you must [MENU] button 0 “USB MEMORY” 0 select “SAVE format it using the VR-1HD (p. 27). SETTINGS.” 5 Never turn off the power or remove the USB flash drive while the message “PROCESSING... -
Page 27: Formatting A Usb Flash Drive
Other Features Formatting a USB Flash Drive Disabling Panel Operations (Panel Lock) The first time that you use a USB flash drive, you must use the VR-1HD You can disable operation of the panel’s buttons and knobs to to format it. -
Page 28: Returning To The Factory Settings (Factory Reset)
Returning to the Factory Settings (Factory Reset) Here’s how you can return the settings of the VR-1HD to their factory- set state. If following the procedures described in this manual does not cause the result you expect, try executing a factory reset. -
Page 29: Menu List
Single-color screen DEFAULT Specifies the input format (EDID). 720p If this is “DEFAULT, ” EDID information for all formats that can be input to the VR-1HD will be 1080i transmitted. 1080p * When you change the setting, the change is not applied until you press the [VALUE] knob 1024x768 to confirm. -
Page 30: Video Output Menu
Adjusts the display position in the horizontal direction. POSITION V -1200–0–1200 Adjusts the display position in the vertical direction. Reconnects the computer and the VR-1HD when the video is garbled or when operation is CONNECTION RESET [EXEC] otherwise unstable. (*3) The valid range of setting values depends on conditions such as the input/output format. In some cases, changing the value of a setting might not... -
Page 31: Scene Menu
Menu List SCENE Menu Menu item Value Explanation (bold text: default value) SCENE A–E (*4) Adjusts the screen layouts that are registered in scenes A–E. Specifies the type of screen layout. An inset screen (a small different screen) is overlaid on the background video (picture-in- PinP TYPE picture). -
Page 32: Transition Menu
Menu List TRANSITION Menu Menu item Value Explanation (bold text: default value) Specifies what happens when scenes are switched. * INPUT 1–3 always transition using mix. SCENE TRANSITION BLACK FADE A fade effect enclosing a black screen is applied. All screens switch simultaneously. MIX FADE A fade effect is applied. -
Page 33: On Air Menu
Menu List ON AIR Menu Menu item Value Explanation (bold text: default value) OFF COLOR BLACK, WHITE Specifies the background color (black, white) used when fading-in/out the main output video. Specifies the operation when the [ON AIR] button is pressed. AUDIO FADE Only the video fades-in/out. - Page 34 Menu List Menu item Value Explanation (bold text: default value) Turns the high-pass filter on/off. OFF, ON HPF 75Hz Effect Cuts off unneeded low-band audio. The cutoff frequency is 75 Hz. Press the [VALUE] knob to see a preset list for the effects (high-pass filter, equalizer). When you select a preset, the settings of each effect are overwritten.
- Page 35 Menu List USB FROM PC Adjusts the audio that is input from the USB STREAM port. DIGITAL GAIN -42.0–0 0–42.0dB Adjusts the input gain (sensitivity). LEVEL -INF–0 0–10.0dB Adjusts the input volume. MUTE OFF, ON Turns the mute function on/off. If this is “ON, ” the audio is temporarily silenced. Turns the solo function on/off.
-
Page 36: Audio Output Menu
MAIN, AUX LINE OUT A “bus” is a destination to which input audio is mixed and sent. The VR-1HD has two buses: the “main bus” and the “AUX bus. ” With the exception of the MAIN connector, you can PHONES MAIN, AUX assign a desired bus to each output connector. -
Page 37: Audio Follows Video Menu
If this is “ON, ” the echo component of the voice picked up by a mic connected to the VR-1HD is MIC 2 SW OFF, ON suppressed, so that only your own voice is sent to the other party. -
Page 38: Audio Effects Menu
* Music files shorter than 10 ms might not play correctly. * The VR-1HD plays back the music file directly from the connected USB flash drive. Even if a music file on the USB flash drive is selected, it will not play unless the USB flash drive is connected. - Page 39 Menu List Menu item Value Explanation (bold text: default value) When ASSIGN = REVERB Turns reverb on/off. OFF, You can also turn this on/off using the AUDIO EFFECTS button to which the function is assigned. Specifies the operation of the AUDIO EFFECTS button. SW MODE MOMENTARY The effect is on only while you hold down the button, and turns off when you release the button.
-
Page 40: Usb Memory Menu
* An internal memory in which a still image is loaded is indicated by a “ ” symbol. * You can make the previously-loaded still image be automatically loaded when the VR-1HD starts. Save the same file in the root directory of the USB flash drive, and start the VR-1HD with the USB flash drive connected. -
Page 41: System Menu
* A “ “ symbol is shown for an internal memory in which a still image is loaded. Turns the Auto Off function on/off. If this is “ON, ” the power to the VR-1HD turns off automatically when all of the following states persist for 240 minutes. -
Page 42: Level Setup Menu
Menu List LEVEL SETUP Menu Press the [LEVEL SETUP] button to access this menu. Menu item Value Explanation (bold text: default value) LEVEL SETUP (LEVEL) (1/5) Adjusts the volume. HDMI 1 -INF–0 0–10.0dB 0–10.0dB HDMI 2 -INF–0 VIDEO INPUT 1–3 input HDMI 3 -INF–0 0–10.0dB... -
Page 43: Appendices
Appendices Troubleshooting If you suspect a malfunction, please check the following points. If this does not resolve the problem, contact a nearby Roland Service Center. Problem Items to check Action Page Video-related problems Could you be inputting copy-protected If you want to input copy-protected (HDCP) video, set the No picture is input. -
Page 44: Block Diagram
Appendices Block Diagram Video Mixer Block Video Mixer Block Video section HDMI 1 SCALER EDID HDMI 1 SCALER EDID HDMI 2 EDID SCALER CROSS- EDID SCALER HDMI 2 POINT CROSS- POINT HDMI 3 EDID SCALER HDMI 3 EDID SCALER USB MEMORY STILL IMAGE 1/2 USB MEMORY STILL IMAGE 1/2... - Page 45 Appendices COLOR MONITOR CORRECTOR COLOR MONITOR CORRECTOR ON AIR COLOR PinP MAIN SCALER FADE CORRECTOR ON AIR COLOR PinP MAIN SCALER FADE CORRECTOR SPLIT SPLIT USB STREAM SCALER USB STREAM SCALER up to 1080/30p up to 1080/30p HDMI 3 THRU HDMI 3 THRU INPUT BUS OUTPUT BUS...
-
Page 46: Main Specifications
Appendices Main Specifications Roland VR-1HD: AV Streaming Mixer 9 Video Video Processing 4:4:4 (Y/Pb/Pr), 10-bit HDMI type A x 3 Input Connectors VIDEO INPUT 1–3 connectors * HDCP Supported. * Multi-format Supported. MAIN connector HDMI type A MONITOR connector * HDCP Supported... -
Page 47: Dimensions
Startup Guide, Leaflet “USING THE UNIT SAFELY, ” AC adaptor, Power cord * 0 dBu=0.775 Vrms * This document explains the specifications of the product at the time that the document was issued. For the latest information, refer to the Roland website. Dimensions... -
Page 48: Shortcut List
VIDEO INPUT 3 5 Roland is an either registered trademark or trademark of Roland Corporation in the United States and/or other countries. 5 Company names and product names appearing in this document are registered trademarks or trademarks of their respective owners.
Need help?
Do you have a question about the VR-1HD and is the answer not in the manual?
Questions and answers