Table of Contents
Advertisement
Quick Links
Advertisement
Table of Contents

Related Manuals for Biddle HR 25

Summary of Contents for Biddle HR 25
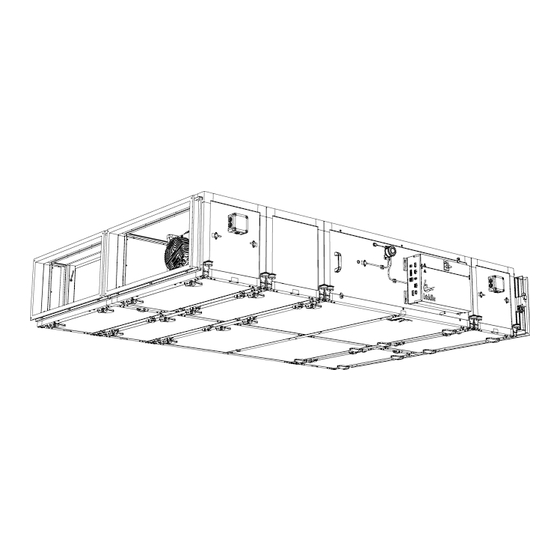
- Page 1 Manual Heat recovery unit Model HR 25/35/45 English Version 4.1 Original Manual...
-
Page 2: Table Of Contents
EAT RECOVERY UNIT . . . Contents Introduction About this manual How to read this manual About the unit Components and accessories Safety instructions Installation Inspection on delivery Hanging the unit up Connecting the unit to the ventilation system Connecting the unit to the central heating and heat recovery system Installing condensate drain Connecting components to electronics module Connecting the unit to Modbus... - Page 3 Cleaning the plate heat exchangers Removing the control circuit board Connecting the control circuit board Fuses Setting the unit code Resetting the PIN code Copying the settings Updating the software Composition of the Biddle control cable Dismantling Addresses Keywords Manual version 4.1 (26-07-2018) en-3...
-
Page 4: Introduction
. . Introduction About this manual This manual describes the installation, operation and mainte- nance of the heat-recovery unit HR. The manual also provides instructions and information for servicing activities. How to read this manual 1.2.1 Designations used in the manual The following symbols are used in the manual: Note: Refers to an important section in the text. -
Page 5: About The Unit
HR M ANUAL NTRODUCTION 1.2.2 Symbols used on the unit and in the manual The following symbols indicate possible risks or hazards. The same symbols will also be found on the unit. YMBOL ESCRIPTION You have accessed a section of the unit containing components which carry a voltage. - Page 6 Warning: Applications other than those described above are deemed to be ‘usage other than for the intended purpose’. Biddle is not liable for damage or loss resulting from usage other than for the intended purpose. Usage for the intended purpose also entails observance of the instructions in this manual.
- Page 7 HR M ANUAL NTRODUCTION 1.3.3 Symbols on the unit The modules are equipped with stickers and symbols. These symbols provide information on: • function • airflow components FUNCTION SYMBOL heat exchanger recirculation damper filter heating/cooling airflow AIRFLOW SYMBOL supply air extract air exhaust air fresh air...
- Page 8 Power see type plate Parameters of use for water-heated models Note: Consult Biddle if you want to connect a unit to a water flow-path with higher temperatures and higher pressure. Warning: The unit may not be used in potentially explosive environments, outdoors or in very dusty or aggressive air conditions.
- Page 9 ANUAL NTRODUCTION Sound levels Maximum sound power level in ducts OCTAVE BAND CENTRE FREQUENCY SOUND POWER LEVEL . 10 B(A) 1000 2000 4000 8000 HR 25 supply air 69.8 65.6 76.4 75.1 78.8 80.4 78.5 74.1 85.5 extract air 65.7 60.5...
-
Page 10: Components And Accessories
CE Declaration of Conformity can be found at: www.biddle.info. 1.3.7 Modifications and changes Without the approval of Biddle, no changes or modifications may be made to the unit that could adversely affect safety. The CE declaration is no longer valid if the unit has been modified or changed in any way. -
Page 11: Smoke Detector
• Pressure switch over extract air filter # • Dirty filter warning lamp (during transport, this is stored in the electronics module) • b-touch operating panel with Biddle control cable • Water-side control: valve and drive temperature sensor • Sensor for control: sensor •... - Page 12 NTRODUCTION EAT RECOVERY UNIT 1.5.2 Safety issues relating to installation, mainte- nance and servicing Danger: The unit may only be opened by qualified technical staff. Warning: Perform the following actions before opening the unit: 1. Switch the unit off,. 2. Allow the unit to cool down. Caution: The heat exchanger or, as the case may be, the heating elements, can get very hot.
-
Page 13: Installation
. . Installation Warning: Installation activities may only be performed by technical staff qualified for this purpose. Warning: Before starting installation: read the safety instructions. See also: "Safety instructions" on page 11 Inspection on delivery • Check the unit and the packaging to ensure that they have been delivered in good order. -
Page 14: Type Plate
NSTALLATION EAT RECOVERY UNIT • The plate heat exchangers are wedged between the side panels. To be able to remove them, space must be created by removing a side panel. Keep 30 cm of space free on the side of the unit. •... - Page 15 HR M ANUAL NSTALLATION SIZE TYPE DIMENSIONS HR 25 1558 mm HR 35 2158 mm HR 45 2758 mm all models 1450 mm all models 450 mm all models 54 mm Note: The threaded rods must be secured, otherwise the unit may fall down.
- Page 16 NSTALLATION EAT RECOVERY UNIT 5. Move the recirculation damper module into position. Note: Ensure that the wiring is on the side of the electronics module. 6. Attach the module in the same way as the heat exchanger module (steps 3 and 4). 7.
-
Page 17: Connecting The Unit To The Ventilation System
HR M ANUAL NSTALLATION 12. Place manchets (accessory) Mount the clamping profiles 5. To do so, use the sup- plied screws. Install the manchet 6. Tighten the clamping screws 7. Securing the unit 1. Secure the suspension to the threaded rods by tightening all lock nuts 3. -
Page 18: Connecting The Unit To The Central Heating And Heat Recovery System
The heating/cooling module can be fitted with a water-side control to control the temperature of the water battery. Caution: Biddle supplies suitable 2-way and 3-way valves as accessories. 1. Connect the control valve and the drive to the heat exchanger, in accordance with the diagram. In doing so, fol- low the instructions given in the control valve manual. -
Page 19: Installing Condensate Drain
HR M ANUAL NSTALLATION WIRING DIAGRAM WAY VALVE WIRING DIAGRAM WAY VALVE 2. Connect the drive to the valve in accordance with the wir- ing diagram. 3. Connect the drive to the building management system or another control system. 2.4.2 Connecting the unit 1. -
Page 20: Connecting Components To Electronics Module
NSTALLATION EAT RECOVERY UNIT Pay attention to the following installation criteria: Make sure the drainage pipe has a drop of at least 1:50. Fit the drainage pipe with a trap with dimensions as shown in the illustration. Fill this with water before the unit is used for the first time. -
Page 21: Connecting The Unit To Modbus
HR M ANUAL NSTALLATION Connecting the unit to Modbus 2.7.1 Communication parameters Standard values of the communication parameters for Mod- Bus are: COMMUNICATION PARAMETER VALUE Baud rate 9600 DATA Parity none Stop bits The turnaround time between the unit and Modbus is 4.2 msec. -
Page 22: Installing The B-Touch Control Panel (Accessory)
- Lay control cables out straight or roll them in a bifi- lar coil by folding cables in half before rolling them. As a result, the magnetic fields will cancel each other out to an important extent. Note: Use Biddle control cables only. Standard modular telephone cable is NOT suitable. en-22... - Page 23 HR M ANUAL NSTALLATION 2.8.2 Mounting and connecting the control panel 1. Lay the control cable. 2. Slide the control panel out of the wall holder. 3. Connect the control cable to terminal X397. 4. Screw the wall holder onto the electronics module, the junction box or against the wall.
-
Page 24: Connecting The Temperature Sensor (Accessory)
NSTALLATION EAT RECOVERY UNIT Connecting the temperature sensor (accessory) Only for models with HC6 heating/cooling module with water-side control A temperature sensor is included with the water-side control valve. 1. Position the temperature sensor in the channel for the supply air 1. Caution: Insofar as is possible, position the sensor in the centre of the channel. -
Page 25: Installing External Controls
HR M ANUAL NSTALLATION 2.10.1 Installing CO sensor With automatic CO control, the CO level is supplied by the building management system (BMS). If this information is not available, a CO sensor must be connected. 1. Place the CO sensor (accessory) in extract channel 1, in accordance with the supplied instructions. - Page 26 NSTALLATION EAT RECOVERY UNIT Unit output The unit has an output signal interface (X3). A warning lamp for dirty filters can be connected to this. Caution: Keep the cable length to a maximum of 3 metres. 2.11.2 Installing smoke detector or fire alarm (acces- sory) In emergencies, the unit can emit an alarm signal or even actively deal with the problem by functioning in a special...
-
Page 27: Connecting The Unit To The Mains Supply
HR M ANUAL NSTALLATION 2.11.3 Installing dirty filter warning lamp (accessory) The b-touch control panel gives an alert if one of the filters is dirty. If the control panel is not available or is hung out of sight, a warning lamp must be installed. Note: During transport, the warning lamp is stored in the electronics module. - Page 28 NSTALLATION EAT RECOVERY UNIT Note: The circuit breaker (if modified) must be at least type B. To prevent rapid disconnection, type K is recom- mended preferably with 300 mA. Warning: However, do make sure to switch the mains supply off if you are going to conduct maintenance on or repair electrical components.
-
Page 29: Switching On And Checking Operation
HR M ANUAL NSTALLATION 2.13 Switching on and checking operation 2.13.1 Introduction Danger: Make sure that all channel sections are connected to fresh air, inside air and ventilation units before you test the operation of the unit. 2.13.2 Visual checking 1. - Page 30 NSTALLATION EAT RECOVERY UNIT 3. Make a bridge between the two switch contacts (NO/ NC). Caution: Do not allow the bridge to remain for longer than 1 minute. Check the input value (step 4) within that time. If this takes longer, the unit must be powered down to reset the pressure switch.
- Page 31 HR M ANUAL NSTALLATION MODE FANS SPEED VALVES DESCRIPTION RECIRCU SUPPLY EXTRACT FRESH AIR EXHAUST AIR PASS LATION unit off closed closed open closed (no pressure (no pressure difference) difference) heat recovery open open closed closed speed 1 (pressure dif- (pressure dif- ference) ference)
- Page 32 NSTALLATION EAT RECOVERY UNIT en-32...
- Page 33 HR M ANUAL NSTALLATION Calibrate the extract fan: 1. Set the unit to ‘manual’ and to ventilate via the home screen of the b-touch control panel. 2. In the b-touch control panel, open the function menu > Maintenance > Calibrate air volume.
- Page 34 NSTALLATION EAT RECOVERY UNIT Calibrate the supply fan: 1. Connect the pressure difference meter to the pressure measurement points 1 of the supply fan 2. Calibrate the supply fan. Use the same method for this as described for the extract fan. 2.13.6 Setting the pressure switch The unit is fitted with freezing protection for the plate heat exchangers.
- Page 35 HR M ANUAL NSTALLATION Manual version 4.1 (26-07-2018) en-35...
- Page 36 NSTALLATION EAT RECOVERY UNIT 3. Set the pressure switch 7 to the pressure difference as specified in step 2. 4. Check whether the frost protection is not unnecessarily active: 1. Set the unit to fan speed 3. Note: If the unit was at a different speed, it will take approximately two minutes before the valve positions are adjusted.
-
Page 37: Operation Via B-Touch
. . Operation via b-touch The unit can be operated via the b-touch control panel and via Modbus. This chapter describes operation with the b-touch control panel Note: Some settings and functions can only be used via the b-touch control panel or, conversely, only via Modbus. Control panel The b-touch control panel is equipped with a touchscreen (touch screen) with which all the functions can be set:... -
Page 38: The Home Screen
PERATION VIA B TOUCH EAT RECOVERY UNIT The Home screen On the home screen, information can be read and entered by touching the symbols: • 1 on/off • 2 main menu • 3 extra information about the current point in the con- trol panel. - Page 39 In automatic mode, the strength of the airflow is controlled automatically. In the manual mode, the strength can be set manually (3 set- tings). Note: For minimum energy consumption, Biddle recommends selecting the lowest strength at which the desired air quality is achieved. 3.2.5 Errors The symbol ä...
-
Page 40: Main Menu
PERATION VIA B TOUCH EAT RECOVERY UNIT If an error has remedied itself, a corresponding message will be displayed. Touch this message to display the Error history and to read out the errors and the times of their occurrence. This list can also be read out via Maintenance >... -
Page 41: Preferences
Home screen. Also, a signal can be generated on one of the outputs. New filters are available from Biddle. Cleaning the display The screen can be cleaned using a damp, soft cloth. -
Page 42: Settings
PERATION VIA B TOUCH EAT RECOVERY UNIT Celsius / Fahrenheit Choose between a temperature display in degrees Celsius or degrees Fahrenheit. Display brightness Set the brightness of the screen to your personal preferences or to the specific situation. Show tips The control panel can show tips about the usage of the unit. -
Page 43: Configuration
HR M ANUAL PERATION VIA B TOUCH Warning: Be aware that the airflow of the unit can set objects in motion. This might set off an alarm system in the building at night time. 9. Calibration Adjust the temperature reading if this deviates from the actual temperature. - Page 44 PERATION VIA B TOUCH EAT RECOVERY UNIT Error display Some error messages may be caused by external factors such as the central heating system and do not necessarily have an influence on the functioning of the unit. Use this function to suppress these messages. Safety-related warnings will always be displayed.
- Page 45 HR M ANUAL PERATION VIA B TOUCH 35. Ventilation settings Ventilation control Only applicable to units with a recirculation module. The relationship between ventilation air and recirculated air can be determined in various ways: • Manual selection: Manual switching between ventilation and recirculation.
- Page 46 PERATION VIA B TOUCH EAT RECOVERY UNIT 60. Function of inputs The unit has an input (terminal block X1) which can be used to enable a function to be controlled by an external accessory such as a smoke or fire alarm. Values for input ALUE PTION...
- Page 47 HR M ANUAL PERATION VIA B TOUCH Release delay input 1 When you use input 1, you can make the effect of an input sig- nal persist for some time after the signal has been given (‘release delay’). 62. Automatic CO2 control Only with use of automatic CO control The unit can automatically adjust the fan speed and, if...
-
Page 48: Maintenance
PERATION VIA B TOUCH EAT RECOVERY UNIT Maintenance Maintenance menu contains information on the use of the unit and offers a number of functions which are necessary for remedying errors. Status The status screen displays general information about the installation and specific information per group and per unit connected. -
Page 49: Unit Code
HR M ANUAL PERATION VIA B TOUCH Installation This installation guide leads you through the most frequently required settings. The installation guide is started up automatically during the first start-up of the unit or after the resetting of the factory configuration. -
Page 50: Updating Software
Software update Biddle is working continuously on improving its products and recommends that you update the software of the control panel when updates become available. Consult www.bid- dle.info/software to see if updates are available. - Page 51 Dimensions: maximum 240 x 320 pixels; • Colour depth: 8-bit grayscale or 24-bit colour. Note: Uploading your own logo replaces the standard Biddle logo. Export/import settings For copying settings between control panels. See also: 7.7 Copying the settings Exporting system info Export the file ‘system_info’...
-
Page 52: Operation Via Modbus
This paragraph describes frequently-used functions and their corresponding register addresses. Caution: Do not adjust other register addresses without consulting Biddle. Note: It may occur that the system applied uses a value of 1 higher than the register addresses given here. In that case, use 101 for register address 100, for example. - Page 53 HR M ANUAL PERATION VIA ODBUS REGISTER ADDRESS DESCRIPTION 400 - 409 User functions: Current status 410 - 419 User functions: Changes via the b- touch control panel: 0 = permitted (default) 1 = not permitted 420 - 429 User functions: Modbus setpoint 4.1.1 General Operation REGISTER DESCRIPTION...
- Page 54 1 - 49 50 - 79 80 - 100 Note: For minimum energy consumption, Biddle recommends selecting the lowest strength at which the desired air quality is achieved. 4.1.3 Automatic operation The unit can only be controlled automatically if the functions...
- Page 55 HR M ANUAL PERATION VIA ODBUS REGISTER DESCRIPTION VALUE ADDRESS 275 (1) Select modes 2 = allowed: automatic 3 = allowed: manual, automatic 425 (0.6) Automatic or manual control 1 = automatic 4.1.4 Automatic CO control The unit automatically adjusts the fan speed (and any recircula- tion damper) to the CO level.
- Page 56 PERATION VIA ODBUS EAT RECOVERY UNIT 4.1.5 Ventilation/Recirculation/Night cooling REGISTER DESCRIPTION UNIT MINIMUM MAXIMUM DEFAULT ADDRESS Mode: ventilation/recirculation/ night cooling *ro = read only (read only) *rw = read & write (read and write) Mode: ventilation/recirculation/night The unit is designed to use heat recovery on ventilation air. cooling Depending on the type and the settings, the unit can also recirculate or supply ventilation air without heat recovery...
- Page 57 HR M ANUAL PERATION VIA ODBUS REGISTER DESCRIPTION UNIT MINIMUM MAXIMUM DEFAULT ADDRESS Alarm functions (activated by input 1 (i1) or by reg- ister address 435) Activate alarm functions (register address 337) 0 = inactive 1 = active *ro = read only (read only) *rw = read &...
-
Page 58: All Register Addresses
- speed 1 recirculation, manual - speed 2 recirculation, manual - speed 3 special operation night cooling fire mode (external signal) smoke extraction defrosting All register addresses An extensive list of register addresses for using ModBus is available at: www.biddle.info. en-58... -
Page 59: Errors
. . Errors Danger: All work on the inside of the unit may only be carried out by personnel who are technically qualified to do so. Warning: Before you begin: read the safety instructions. See also: "Safety instructions" on page 11 Resolving simple problems If you suspect an error, first try to resolve the problem using the table below. -
Page 60: Remedying Errors That Are Accompanied By An Error Message
RRORS EAT RECOVERY UNIT ROBLEM ROBABLE CAUSE HAT TO DO Only for models with The maximum discharge temperature is Check the value at 46. Maximum dis- heating: The unit is not limited. charge temperature heating or not heating Only for water-heated models: The central Check the central heating system. -
Page 61: Wiring
HR M ANUAL RRORS Error codes register 217/ErrorFlags[1] [1]; RROR LAGS OGERROR ODBUS ALUE ALUE ESCRIPTION Filters must be replaced 8192 Faulty CO sensor Error messages on the control panel For models with b-touch control panel Some errors are displayed with a symbol on the home screen of the b-touch panel. -
Page 62: Remedying Errors That Are Not Accompanied By An Error Message
RRORS EAT RECOVERY UNIT Remedying errors that are not accompanied by an error mes- sage If you suspect an error but no error message is displayed: 1. Referring to the preceding sections, check whether you can easily resolve the problem. 2. - Page 63 HR M ANUAL RRORS ROBLEM ROBABLE CAUSE HAT TO DO With automatic CO control: The CO settings are different than Check the CO settings (register The unit functions differently expected. addresses 351/352/353 of b-touch menu from expectations. 62. Automatic CO2 control) is not designated as the control Restore the factory configuration...
-
Page 64: Maintenance
1. Open the inspection hatch for the relevant filter. 2. Pull the clamps downward 3. 3. Remove the filter 4. 4. Replace the filter. New filters are available from Biddle. 5. Return the filter to its place. Note: Position the correct filter back into the correct place. -
Page 65: Cleaning The Unit
HR M ANUAL AINTENANCE Cleaning the unit You can clean the interior and exterior of the unit with a damp cloth and a domestic cleaning agent. Do not use any sol- vents. Scheduled maintenance It is recommended to have the following inspection and main- tenance activities performed annually by an installer or other technical expert. -
Page 66: Service
. . Service Warning: Servicing activities may only be carried out by personnel who are technically qualified to do Warning: Before you begin: read the safety instructions. See also: "Safety instructions" on page 11 Cleaning the plate heat exchangers Dirty plate heat exchangers can cause inefficient operation and a high noise level. - Page 67 HR M ANUAL ERVICE 3. Loosen the screws of the clamping strips so as to allow the strips to drop down slightly 3. 4. Remove the air separation plates: Unscrew bolts 4 and 5. Extract the plates. 5. Extract the plate heat exchangers: Via the side: 6.
-
Page 68: Removing The Control Circuit Board
ERVICE EAT RECOVERY UNIT Removing the control circuit board 1. Switch the unit off using the control panel or the building management system. Warning: Shut off the mains supply. 2. Open the electronic housing. 3. Disconnect all unit-connected connectors and grounded connections from the control circuit board. -
Page 69: Wiring Diagram
HR M ANUAL ERVICE Fuses The unit is fitted with various fuses: • In the electronics module 1. • On the control circuit board 2. The values are indicated on the fuses and/or are listed in the wiring diagram. Note: First identify and remove the cause of the error before replacing the fuses. -
Page 70: Resetting The Pin Code
ERVICE EAT RECOVERY UNIT 7.5.2 Setting the unit code via the control circuit board and the control panel 1. Connect the mains supply (insert the plug into the socket or move the isolation switch to ON). Warning: Do NOT touch any live parts. 2. -
Page 71: Copying The Settings
HR M ANUAL ERVICE Copying the settings The settings of the unit can be copied to another unit. 7.7.1 What you need Before copying the setting, check that you have the following: • An empty USB flash drive. The USB flash drive must be for- matted for FAT or DOS. -
Page 72: Updating The Software
7.8.3 Step 2: Download the most recent software 1. Connect the USB flash drive to a USB port on your PC. 2. On your PC, go to Biddle’s website and look under Down- loads. 3. Look for your product and the available software for your unit. - Page 73 If an error occurs during the update, start the procedure again. If the error continues to occur, contact Biddle. 1. Connect the USB flash drive (with the software update) to the USB port on the control panel.
-
Page 74: Composition Of The Biddle Control Cable
ERVICE EAT RECOVERY UNIT Composition of the Biddle control cable The control cable for the control system is constructed as fol- lows: • The plugs are modular connectors of the type 6P4C. • Connectors are untwisted, i.e. at both ends of the cable, cores are connected to the same electrode. -
Page 75: Dismantling
. . Dismantling The dismantling of the installation and the handling of the coolant, oil and other components must be carried out by a qualified fitter in accordance with the relevant local and national legislation and regulations. Pursuant to EU legislation, used electrical and electronic appli- ances must be collected for recycling. - Page 76 ISMANTLING EAT RECOVERY UNIT en-76...
-
Page 77: Addresses
. . Addresses If you have any comments or queries relating to this product, please do not hesitate to contact your Biddle branch. Biddle bv Biddle Air Systems Ltd. Biddle France P.O. Box 15 St. Mary’s Road, Nuneaton 21 Allée des Vendanges... -
Page 78: Keywords
EAT RECOVERY UNIT . . . Keywords accessories ......11 fan speeds......31 addresses . - Page 79 HR M ANUAL register addresses....52 safety instructions installation....12, 13 maintenance .
- Page 80 It helps us to improve the documentation still further. For more information If you have any comments or queries relating to this product, please do not hesitate to contact Biddle. You will find the contact information for your Biddle branch in chapter Addresses.
Need help?
Do you have a question about the HR 25 and is the answer not in the manual?
Questions and answers