Table of Contents
Advertisement
Quick Links
Advertisement
Table of Contents

Related Manuals for bObsweep Bob PetHair


Summary of Contents for bObsweep Bob PetHair
- Page 1 OWNER’S MANUAL bObsweep PetHair ™...
- Page 2 Congratulations on your new intelligent floor cleaner! Bob is now at your service. To see Bob at his best, please read the Quick Start Guide and this manual thoroughly. Welcome to the bObsweep family and happy cleaning! If you have any questions or concerns, feel free to contact our helpful team at support@bobsweep.com...
- Page 3 Bob’s Anatomy Important Safety What Comes in Instructions Bob’s Box? Get Bob Remote Control Charging Bob Ready to Clean Charging Station Syncing Bob's Remote Placement Install Bob’s Auto Charging Side Brush Syncing Bob's Charge Bob Charging Station Bob’s First Clean Manual Charging Standby Mode Charging Time...
- Page 4 Warranty Troubleshooting Sensors Information Trouble Numbers Maintenance Home Checkup Deactivate Edge Test Sensors Reactivate Edge Sensors Blindfold Stickers Cleaning Behavior Bob's Challenges FAQs End User Agreement...
-
Page 5: Important Safety Instructions
Do not operate Bob or his charging station if they have been damaged in any way. If Bob is not working as he should, or has been dropped, damaged, left outdoors, or dropped in water, contact our customer care center at support@bobsweep.com. •... - Page 6 • Leaks from battery cells can occur under extreme usage or temperature conditions. If the liquid gets on skin, wash quickly with water. If the liquid gets into the eyes, flush them immediately with clean water for a minimum of 10 minutes, and seek medical attention.
- Page 7 What Comes in Bob’s Box? Bob, Your Intelligent Floor Cleaner Charging Station Main Brush Charging Adapter Remote Control Flat Head Screwdriver 2 Side Brushes (1 Spare) Cleaning Tool Pack of Screws and Blindfold Stickers Mop Attachment 2 Microfiber Mopping Cloths Filter (Spare) Owner’s Manual, Quick Start Guide, and Warranty Card Bumper Stickers...
-
Page 9: Bob's Anatomy
Bob’s Anatomy Top View Bumper Transmitter Cover Buttons Display Screen... - Page 10 Bottom View Charging Plates Front Wheel Side Brush Main Brush ON/OFF Switch Dustbin UV Lamp Battery Left Wheel Right Wheel...
- Page 11 Remote Control Charging Station...
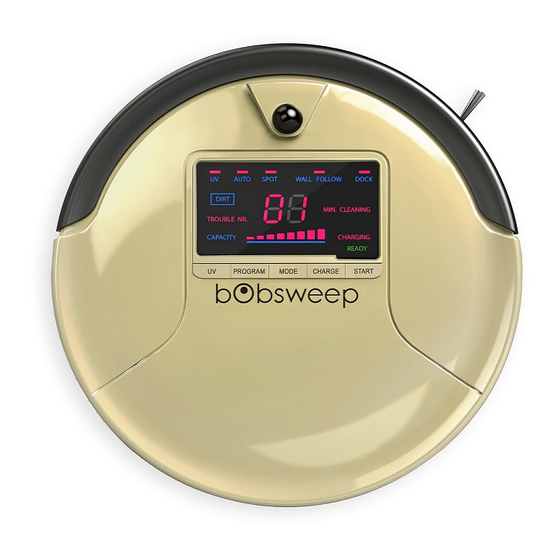
- Page 12 Cover Buttons Turn UV lamp OFF/ON PROGRAM Select Bob’s cleaning program MODE Select Bob’s cleaning mode CHARGE Send Bob to his charging station START Send Bob to clean AUTO SPOT WALL FOLLOW DOCK DIRT MIN. CLEANING TROUBLE NR. CAPACITY CHARGING READY...
- Page 13 Get Bob Ready to Clean...
-
Page 14: Install Bob's Side Brush
Install Bob’s Side Brush Before Bob’s first clean, you must install his side brush, which allows him to sweep along corners, walls, and other hard-to-reach places. You will need the following materials, all of which are included inside Bob’s box: a flat head screwdriver, a short screw, and a side brush. -
Page 15: Charge Bob
Charge Bob After installing Bob’s side brush, you must set him to charge. To charge Bob: Plug the charging adapter into the side Place Bob on his charging station with of the charging station. the metal plates on his underside sit- ting on top of the nodes on his station. -
Page 16: Bob's First Clean
Bob’s First Clean Bob is now ready to clean! First, remove the clear plastic cover on Bob's power switch and flip his power switch ON. Then, press START on his cover — or AUTO on his remote — and he will clean on his default setting (Robot mode). AUTO SPOT WALL FOLLOW... -
Page 17: Standby Mode
Standby Mode If Bob is left idle without charging or cleaning, his screen will go blank and he will enter standby mode to preserve his battery. In standby mode, Bob will remain asleep. You can also put Bob in and out of standby mode by pressing the power button on his remote. - Page 18 To send Bob to his charging station: To wake Bob, press any button on his Press CHARGE on Bob’s cover or remote. cover or the power button on his remote. AUTO SPOT WALL FOLLOW DOCK AUTO SPOT WALL FOLLOW DOCK DIRT DIRT MIN.
-
Page 19: Remote Control
Remote Control... - Page 20 Remote Control Bob’s remote requires 2 AAA batteries (not included). Remove the batteries if you are not using it on a regular basis. Keep the remote at room temperature. Power Auto Corners Spot Charge Speed Navigational Arrows Pause...
- Page 21 Flip Bob’s power switch OFF to have him fully power Power down. If Bob is left idle and • Puts Bob in and out of standby mode ON, he is in standby mode. Auto • Bob will start cleaning on his default setting (Robot mode) Corners •...
- Page 22 Charge • Sends Bob to his charging station Hold down the navigational buttons to keep Bob moving in the desired direction. Speed • Alternates between Bob's two speeds Navigational buttons • Guide Bob forward, backward, left, or right Pause • Pauses or resumes Bob’s movement...
-
Page 23: Syncing Bob's Remote
Syncing Bob’s Remote You will need to sync the remote if Bob is not responding to its commands. When you do this, make sure Bob is not on his charging station. To sync Bob’s remote: Flip Bob’s power switch While holding down the Bob will chirp twice to let OFF. -
Page 24: Charging Bob
Charging... -
Page 25: Charging Station Placement
Charging Station Placement • Position the charging station against a wall on a hard, flat surface. • Make sure there is at least 10 feet (3 m) of open space to the front and 2 feet (0.5 m) to the sides. 2 ft (0.5 m) 2 ft (0.5 ft) 6 –... -
Page 26: Auto Charging
Auto Charging Bob automatically returns to his charging station when his battery reaches 15% capacity. You can also send him to his charging station at any time by pressing CHARGE on his cover or remote. AUTO SPOT WALL FOLLOW DOCK DIRT MIN. -
Page 27: Syncing Bob's Charging Station
Syncing Bob’s Charging Station You will need to sync the charging station if Bob has trouble finding it. To sync the charging station: Flip Bob's power switch OFF. Plug the charging adapter into the charging station. - Page 28 While holding down the Adjust/Select Bob will chirp twice to let you know the button on the charging station, flip Bob’s sync was successful. power switch ON. SET Su Tu We Th Fr Sa...
-
Page 29: Manual Charging
Manual Charging To charge Bob manually, place him on his charging station with the metal plates on his underside sitting on top of the nodes on his station. Alternatively, unplug the adapter from the charging station and plug it directly into the inlet above Bob's power switch. -
Page 30: Charging Time
Charging Time When Bob is charging, the battery bars and the word CHARGING flash. AUTO SPOT WALL FOLLOW DOCK DIRT MIN. CLEANING TROUBLE NR. CAPACITY CHARGING READY As soon as his battery is full, Bob will display the word READY only. AUTO SPOT WALL FOLLOW... - Page 31 Conserving Bob’s Battery Bob should not sit on his charging station for more than 5 days with his power switch ON. If you will not be using him at least once every 5 days, flip his power switch OFF and remove him from his station. days To conserve Bob’s battery, flip his power switch OFF and...
-
Page 32: Cleaning Modes
Cleaning Modes... - Page 33 Cleaning Modes Auto Settings Bob is equipped with three automatic cleaning modes: • Auto 1: Robot (~60 min) • Auto 2: Quick Clean (30 min) • Auto 3: Touch Up (15 min) Bob will return to his charging station after every cleaning mode. Choose the setting that best suits your needs.
- Page 34 Auto 1: Robot This is Bob's default cleaning mode. Bob will thoroughly cover a large area for about an hour. To select this setting: Press START on Bob's cover. Press AUTO on Bob's remote. AUTO SPOT WALL FOLLOW DOCK DIRT MIN.
- Page 35 Auto 2: Quick Clean (30 min) Bob will quickly and efficiently clean a medium-sized area for 30 minutes. To select this setting: Press START to confirm Press MODE on Bob’s Press PROGRAM until Bob your selection. cover until you see the displays the number 02.
- Page 36 Auto 3: Touch Up (15 min) Bob will dash across a small area for 15 minutes. To select this setting: Press MODE on Bob’s Press PROGRAM until Bob Press START to confirm cover until you see the displays the number 03. your selection.
- Page 37 Spot Cleaning: Select Bob’s targeted cleaning pattern Press MODE on Bob's Press PROGRAM once, Press START to confirm cover until you see the twice, or three times to your selection. word SPOT appear on choose Bob’s movement his screen. pattern. AUTO SPOT WALL FOLLOW...
- Page 38 Waffle Track (~4 min) Wall Track (~10 min) ™ ™ Bob will target a 6 x 5 in Bob will travel along the (2 x 1.5 m) spill zone by perimeter of your home. tracing a grid pattern. UV Light The UV feature is enabled by default.
-
Page 39: Cleaning Schedule
Cleaning Schedule... - Page 40 Set Schedule on Charging Station Bob can be programmed to start cleaning on the time and days of your choosing through his charging station. Bob's cleaning schedule is permanently recorded in his memory. Removing and replacing Bob's battery will require reprogramming Bob's cleaning schedule. There are 5 buttons on Bob’s charging station: On/Off OK/Cycle...
-
Page 41: Set Current Time & Day
Set Current Time & Day Bob uses a 24-hour clock. If you want Bob to start cleaning at 8:00 am, set his scheduled time to 08:00. If you want him to start at 8:00 pm, set it to 20:00. The charging station’s default time is 8:00 am, Sunday. - Page 42 To set the current time and day on Bob’s charging station: Make sure Bob's power switch is ON. Set the minutes: To set the minutes, press The first minute digit will start Press the button button once. The flashing. Use the Adjust/ move on to the next minute words SET and CLK will Select button to select the...
- Page 43 Set the hour: After setting the minutes, The first hour digit will start Press the button press the button again flashing. Use the Adjust/ move on to the next hour to set the hours. Select button to select the digit. Use the Adjust/ hour's first digit.
- Page 44 Set the day: Press the button Use the Adjust/Select button Press OK/Cycle to save. again and the icon of the to select the current day. Bob will chirp to let you first weekday (Su) blinks. know the time setup was successful.
- Page 45 Set Bob’s Cleaning Schedule After setting the current time and day on Bob’s station, you can program Bob’s cleaning schedule. To set Bob’s cleaning schedule: • Make sure Bob's power switch is ON. Set the minutes: To set the minutes, press The first minute digit will Press the button to...
- Page 46 Set the hours: After setting the minutes, The first hour digit will start Press the button press the button again flashing. Use the Adjust/ move on to the next hour to set the hours. Select button to select the digit. Use the Adjust/ hour's first digit.
- Page 47 You can choose any and all weekdays for cleaning. Bob starts his cleaning at the selected time (e.g. 14:30) on all programmed days (e.g. Mo, Tu, Th). Set the weekday(s) you want Bob to clean: Press the button until Adjust/Select When all desired days are the icon for the first button to move on to the...
-
Page 48: Auto-Resume
Auto-Resume Among the unique features that set Bob apart from other robotic vacuum cleaners is auto-resume mode. Auto-resume enables Bob to get back to work as soon as his battery is fully recharged. To activate auto-resume mode: • Press OK/Cycle on Bob’s charging station. A broom icon and the word GO ( ) will light up at the bottom right corner of the station’s screen. -
Page 49: Maintenance
Parts & Maintenance... - Page 50 Bob’s microfiber mopping cloth can pick up dirt while both wet and dry. To install Bob’s mop attachment: Hold the mop with the prongs near the Press down on the mop attachment top. Align the two prongs of the mop until both sides are secured.
- Page 51 Remove the mop attachment when Bob is cleaning carpets or rugs. To do so, gently press the prongs inward and lift the attachment up. Bob’s microfiber mopping cloth can be washed manually or in the washing machine. A spare cloth is provided in Bob’s package.
- Page 52 Dustbin To empty the dustbin: Push the center button on Bob’s back to Hold the dusbtin in one hand and release the dustbin, then slide the dust- using the other hand carefully open bin out. the plastic gate upto a 90 degree angle to empty the bin.
- Page 53 To clean the dustbin: Open the plastic gate Wipe the dustbin with a When done, close the plastic (see page 60, step 2). dry cloth, or brush it with gate (line the prongs on the Bob's cleaning tool. sides of the plastic gate and shut it slowly to avoid break- age).
- Page 54 Filters Three filters are located inside the dustbin’s ceiling. To remove the filters: First, eject the dustbin and open the Then, pull the filter frame out. plastic gate (See page 60, step 2). 90°...
- Page 55 You will see three filter layers: High efficiency filter for fine particles Electrostatic filter for smaller particles Mesh filter for larger particles Use the cleaning tool to brush dust off the filters. If you are using Bob regularly, it is recommended that you change his filters about once every 6 months.
-
Page 56: Main Brush
Main Brush It is recommended that you remove and clean Bob’s main brush on a weekly basis. To do so: Remove the screw securing Use the cleaning tool to re- You may use a pair of Bob’s main brush using a move debris from the ends scissors to cut away hair flat head screwdriver. - Page 57 To reinstall the main brush: Replace the brush cap and insert the Lower the brush into place and re-tight- square end of the brush into the square en the screw. notch inside the brush compartment.
-
Page 58: Side Brush
Side Brush Bob’s side brush extends his reach and allows him to sweep along corners and walls. When Bob is first delivered to you, his side brush is not installed. To do so: Use the flat head screwdriver and short screw included in Bob’s box to secure the side brush into the empty socket on Bob’s underside. - Page 59 It is recommended that you remove and clean Bob’s side brush on a weekly basis. To do so: Remove the side brush Use the cleaning tool to Replace the side brush using a flat head screw- remove debris on the and re-tighten the screw.
- Page 60 Battery To replace Bob's battery: Remove the battery cover on Bob’s Lift the battery out of its compartment, underside using a Phillips head screw- and unplug the connecting wires. driver. Reminder: After replacing the battery Bob 's cleaning schedule should be reprogrammed (see page 47).
- Page 61 Plug the new battery in, and slide it into Re-tighten the screws on the battery the empty compartment. cover. Storing Bob If you are not using Bob for an extended period of time, unplug his charging sta- tion, remove his battery, and store everything in a dry place at room temperature. Do not let Bob sit idly with his power switch ON for more than 5 days;...
- Page 62 Sensors...
- Page 63 Cleaning Bob’s Sensors Edge and wall sensors Dust on Bob’s wall and edge sensors can reduce his performance. Bob's wall sensors are located along his bumper, and his edge sensors are located on his underside. Regularly cleaning these sensors ensures that Bob keeps working at his best.
- Page 64 Dirt sensors For a more efficient clean, Bob is equipped with dirt sensors. If Bob reaches a par- ticularly dirty spot while cleaning, his dirt sensors will activate, the word DIRT will appear on his screen, and Bob will focus his attention on the spot. Bob's dirt sensors are located on the back wall of his interior, where the dustbin attaches.
- Page 65 Caution: When the edge sensors have been deactivated, Bob will be Deactivate Edge Sensors unable to detect stairs or edges. Dark-colored carpet and certain floor patterns may seem like edges to Bob’s edge sensors. If Bob displays TROUBLE NR. 04 while working on your carpet, then you may need to temporarily deactivate his sensors.
- Page 66 Reactivate Edge Sensors To reactivate Bob’s edge sensors: Hold down the UV button on Bob’s After the 5 bars flash 7 times and dis- cover. The 5 bars on top of the screen appear, release the UV button. Bob’s will begin to flash. edge sensors have been reactivated.
- Page 67 To deactivate Bob's edge sensors with blindfold stickers: Flip Bob over and use the blindfold stickers that came in his box to cover his sen- sors. Peel off the backs of each blindfold sticker and place one onto each of Bob's four sensors.
-
Page 68: Troubleshooting
Troubleshooting... - Page 69 CHARGING READY If after attempting the suggested solutions Bob’s problem persists, you may want to perform a home checkup test (see page 94). You may also contact our customer care center at support@bobsweep.com. Visit bobsweep.com/pethair-support or download the bObsweep App...
- Page 70 Trouble Number 00: Left Wheel What to do: Start by checking the wheel for jamming. Use the cleaning tool or com- pressed air to remove any debris that may be jamming the wheel. If this does not solve the problem and Bob still displays Trouble Number 00, run a checkup test and see how the wheel performs (see page 94).
- Page 71 Trouble Number 01: Right Wheel What to do: Start by checking the wheel for jamming. Use the cleaning tool or com- pressed air to remove any debris that may be jamming the wheel. If this does not solve the problem and Bob still displays Trouble Number 01, run a checkup test and see how the wheel performs (see page 94).
- Page 72 Trouble Number 02: Main Brush What to do: Remove the main brush using a flat head screwdriver, and clean it thor- oughly from end to end (see page 66). You may use a pair of scissors to cut hair or thread wrapped around the brush, or a pair of tweezers to remove congestion from the notches where the main brush is held.
- Page 73 If the congestion is not removable from the outside, detach the front wheel and remove the obstruction. For a comprehensive how-to video, visit bobsweep.com/pethair-support. If Bob’s front wheel is clean and spinning freely, his front wheel sensor may need to be replaced.
- Page 74 Trouble Number 04: Edge Sensors Bob’s four, oval-shaped edge sensors are located on his underside, near his bumper. What to do: Wipe the sensors using a clean cloth, or dust them using compressed air. If Bob displays Trouble Number 04 while working on dark-colored carpet or patterned flooring, you may need to deactivate his edge sensors (see page 76).
- Page 75 Trouble Number 05: Wall Sensors What to do: Use a clean, damp cloth to wipe away any debris from the strip on Bob's bumper. Gently tap the bumper or use compressed air to clear it of debris. If the issue persists, try running a checkup test (see page 94). AUTO SPOT WALL FOLLOW...
- Page 76 Trouble Number 06: Touch Sensors What to do: Gently tap on Bob’s bumper to clear out any obstructions. Use compressed air to clear it of debris. Press on both ends of the bumper until you hear a tiny "click." If the bumper is not clicking on its ends, Bob's touch sensors may need to be replaced.
- Page 77 Trouble Number 07: Main Brush Installation What to do: Use a flat head screwdriver to remove the main brush and clean the ends. You may use a pair of tweezers to remove congestion from the notches where the main brush is held. Make sure the brush’s square end fits securely in the corre- sponding square notch in the main brush compartment.
- Page 78 Trouble Number 08: Dustbin What to do: Remove Bob’s dustbin and empty it. Turn the dustbin around and gently wipe the two metal connectors on its bottom with a dry cloth. If the two metal connectors seem damaged, they may need to be replaced. Lastly, clean the metal contact points inside Bob where the dustbin is inserted.
- Page 79 Allow Bob to charge for 2 hours before asking him to clean again. If Bob is still displaying Error Code 09, send a short explanation to support@bobsweep. com, and leave the rest to us! AUTO...
- Page 80 Plug the charging adapter directly into the inlet above his power switch. Let him charge with his adapter overnight. If Bob is still displaying Error Code 10, he may need a replacement part. Contact support@bobsweep.com for further assistance. AUTO SPOT...
- Page 81 1-888-549-8847 for toll-free sup- port in the US and Canada, or email us at support@bobsweep.com. Put Bob in checkup mode: Flip Bob's power switch OFF and place While holding down the UV button on him on a light-colored surface.
- Page 82 Step One: Edge Sensors You should see DIRT, MIN. CLEANING, CAPACITY, and CHARGING lit on Bob's screen. If all four lights do not turn on, flip Bob over and clean his edge sensors. See if all four lights turn on now. Lift Bob about 6 inches (15 cm) off the ground.
- Page 83 Step Two: Wall Sensors Use a thick, flat, and white surface to imitate a wall in front of Bob. Drag the imi- tation wall from the left side of Bob's bumper around to the right side. UV, AUTO, SPOT, WALL FOLLOW, and DOCK will light up one-by-one as you do this.
- Page 84 Step Three: Charging System Press Bob’s UV button once. The screen will go blank. Place Bob about 5 inches (18 cm) away from his charging station with the mid- dle of his bumper directly facing the sensor on top of his station. Bob’s screen should display the number 77.
- Page 85 Step Four: Touch Sensors Press the UV button once more. Bob’s screen remains blank. Press the left side of Bob's bumper and DIRT should light up on his screen; release the left side and DIRT should disappear. Press the right side and MIN. CLEAN- ING should light up;...
- Page 86 Step Five: Display Screen Press the UV button one more time. Each icon on the screen should light up in a repeating rotation. Press the UV button again and every light on Bob's screen should light up and remain solid. AUTO SPOT WALL FOLLOW...
- Page 87 Ignore the icons and numbers on the dis- play screen during test mode. Step Six: Brush and Vacuum Suction Press the PROGRAM button. Both the main and side brushes should spin, and air should flow out of the back of Bob's dustbin. If you do not feel air flowing out of the dustbin, then Bob's vacuum motor may need to be replaced.
- Page 88 This is the end of checkup test. If Bob completes the checkup test without any issues, then his internal parts are working properly! Contact support@bobsweep.com if you have any questions, as our doctors at the bObsweep hospital are always ready to help!
-
Page 89: Warranty Information
Warranty Information... - Page 90 After Bob's 1-year warranty expires, all his replacement parts and visits to the bObsweep hospital are subsidized between 25% – 50% for the next 5 years. To activate Bob’s warranty, keep your original purchase receipt and register him at bobsweep.com/warranties.
- Page 91 Bob’s Cleaning Behavior Bob’s cleaning pattern may look quite different from the way a human would clean: he may spin in a gradually widening circle, follow along walls, or zigzag across a small area. Sometimes he may seem to be ignoring some spaces or spending too much time on others —...
- Page 92 Bob’s Challenges Unique Furniture Bob is designed to maneuver around furniture of most shapes and sizes, but certain configurations may confuse him temporarily. Bob may sometimes find it difficult to clean under chairs with narrow legs, or furniture that is too low for his bumper sensors to detect.
- Page 93 Bob’s mop, which attaches to his underside, is designed to sit flat against the floor and leave behind a clean trail. Because of this, Bob may have a tough time climbing over elevated surfaces while mopping. Make sure to remove Bob’s mop when he is not cleaning smooth surfaces such as tile or hardwood.
- Page 94 1. Where can I find Bob’s how-to videos? Bob’s how-to videos can be found at Bob’s owners’ corner, owners.bobsweep.com. 2. How long should Bob’s battery last? The exact time depends on the age of the battery and the type of surface Bob is cleaning.
- Page 95 5. How often should I clean Bob’s brushes? Bob’s brushes do a lot of the work picking up hair and larger debris, so it is recommended that you clean the main and side brushes once a week. If you notice a thick covering of hair and debris on his brushes, remove and clean them.
- Page 96 9. I am having problems removing Bob’s brush. If the main or side brushes are difficult to remove, it is likely because hair, thread, or other debris are clogging the areas where they attach to Bob. It is best to clean Bob’s brushes about once a week to prevent buildup. You may use scissors to cut away hair wrapped around the brushes, until you are able to remove them.
- Page 97 A broom icon and the word GO on the station's screen means Bob is on auto-resume mode. On auto-resume, Bob will automatically begin clean- ing after he has fully charged. To disable auto-resume, press the OK/Cycle button on the station. The broom icon and GO will disappear. 12.
- Page 98 Call us for toll-free support in the US and Canada at 1-888-549-8847, or e-mail us at support@bobsweep.com. To watch Bob's how-to videos, order parts, and connect with your extended bObsweep family members, visit bobsweep.com/pethair-support or download the bObsweep App on your iOS or Android device.
- Page 99 By using the Bobsweep, you agree to the terms of this End User License Agreement (“EULA”) and any amendment or addenda accompanying this Agreement. If you do not agree to the terms of this EULA, you may not use the Bobsweep. The Bobsweep contains an electronic and software interface that allows you to control or modify its behavior, and remotely monitor its sensors.
- Page 100 NO ORAL OR WRITTEN INFORMATION OR ADVICE GIVEN BY BOBSWEEP OR ITS AGENTS SHALL CREATE A WARRANTY. If the Bobsweep Software or the Bobsweep is found to be defective in material or workmanship under normal use for a period of one (1) year from the date of receipt, Bobsweep’s entire liability and your exclusive remedy shall be the replacement of the Bobsweep Software or the Bobsweep.
- Page 101 Agreement. You may terminate this Agreement voluntarily at any time. Bobsweep may terminate this Agree- ment at any time if you are in breach of any of its terms and conditions, and may refuse to license the Bobsweep Software or the Bobsweep to you after termination.
- Page 102 ® and © bObsweep Inc. All rights reserved.
Need help?
Do you have a question about the Bob PetHair and is the answer not in the manual?
Questions and answers