Table of Contents
Advertisement
Quick Links
Advertisement
Table of Contents

Subscribe to Our Youtube Channel
Related Manuals for bObsweep bObi Classic


Summary of Contents for bObsweep bObi Classic
- Page 2 Classic OW N E R’ S MA N UA L Model SW603002 Manual Version 2020.1...
- Page 3 To see bObi at her best, please read the Quick Start Guide and this manual thoroughly. Welcome to the bObsweep family and Happy Sweeping! If you have any questions or concerns, feel free to contact our helpful support team at support@bobsweep.com or 1-888-549-8847.
- Page 4 — may also occur. If bObi, her remote control, or her charging station has been damaged in any way, do not operate them. Contact our helpful support team at support@bobsweep.com or or 1-888-549-8847.
- Page 5 This device complies with Part 15 of the FCC rules. Operation is subject to the following two conditions: Every bObi Classic purchased from an authorized seller includes a 1-year limited warranty, 5-year (1) this device may not cause harmful interference, and (2) this device must accept any interference subsidized repair plan, and lifetime of customer support.
-
Page 6: Table Of Contents
Getting Started Charging FullCommand™ Remote 5. Box Contents 23. Charging bObi Table of 7. bObi’s Anatomy 25. Charging Station 31. Remote Buttons 9. Get to Know bObi 27. Syncing the Charging 33. Syncing the Remote 14. Get bObi Started Station 35. -
Page 7: Box Contents
Getting Started Let’s start at the very beginning. We’ll walk you through the basics and help you get bObi started for the very first time. 5 Box Contents 7 bObi’s Anatomy 9 Get to Know bObi 14 Get bObi Started... -
Page 8: Filter
Charging Adapter Blindfold Stickers (4) Charging Station Cleaning Tool Microfiber Mopping Cloths (2) Main Brush Mop Attachment Side Brush Battery Main Brush Holders (2) Filter Owner’s Manual, Quick Start Guide, and Warranty Card Phillips Head Screwdriver bObi Classic™ Syncing Tool... -
Page 9: Edge Sensors
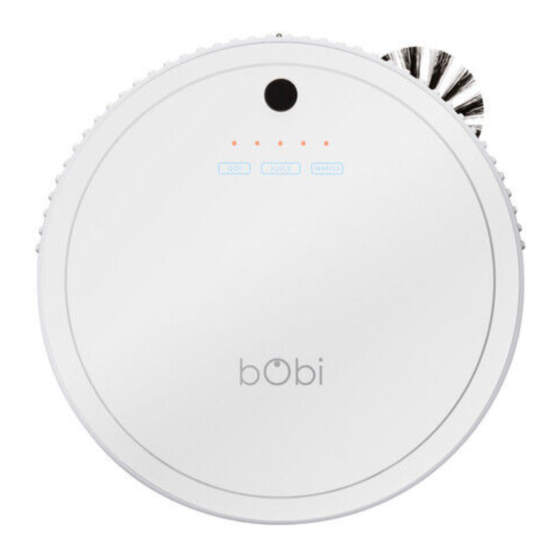
Getting Started Quick Start bObi’s Anatomy Top View Bottom View Touch Sensors Wall Sensors Edge Sensors Front Wheel Transmitter UV Lamp Battery Charging Indicator Side Brush Right Wheel Charging Inlet Left Wheel Rubber Brush Main Brush Cover Buttons Dustbin GO! - Sends bObi to clean. JUICE - Sends bObi to her charging station. - Page 10 Getting Started Quick Start Get to Know bObi Who is bObi? FullCommand™ Remote bObi is an autonomous robotic vacuum cleaner, at your service! She can vacuum, sweep, and mop all the same time — and at the end of her cleaning session, she automatically returns to her If you wish to control bObi’s movements manually, you may use the charging station for a power nap.
- Page 11 Getting Started Quick Start Get to Know bObi Navigating Difficult Obstacles Easy Fix Unique Furniture Dark-Colored Shag Carpet Inclines Carpet bObi is designed to maneuver If bObi repeatedly backs up bObi’s main and side brushes Sometimes bObi will attempt Use blOck*, bObi’s add-on around furniture of most or displays an error message are not designed to clean shag...
- Page 12 Getting Started Quick Start Get bObi Started: bObi will be ready to clean in just 3 easy steps. Step 1: Install bObi’s Battery Parts You’ll Need: Battery Phillips Head Screwdriver Remove the 2 screws on the battery cover Plug the battery into its socket, then slide using a Phillips head screwdriver.
- Page 13 Getting Started Quick Start Get bObi Started: bObi will be ready to clean in just 3 easy steps. Step 2: Charge bObi Parts You’ll Need: Allow bObi to fully charge before using her for the first time. Charging Charging Adapter Station When bObi Is Charging: The charging indicator’s center...
- Page 14 Getting Started Quick Start Get bObi Started: bObi will be ready to clean in just 3 easy steps. Step 3: Prepare bObi’s Remote Parts You’ll Need: Setup bObi’s remote so that she can respond to its commands. FullCommand™ AAA Batteries x2 Remote (not included) Quick Tip:...
- Page 15 Getting Started Quick Start Get bObi Started: bObi will be ready to clean in just 3 easy steps. bObi is now ready to clean! Flip bObi power switch ON. Press the GO! button on bObi’s cover or FullCommand™ remote, and she will clean on her default Deep Clean Quick Tip: mode.
- Page 16 Charging bObi automatically returns to her charging station when low on battery. To maximize bObi’s chance of finding her station, it’s best to place it in an easily accessible location with plenty of space around it. If bObi continues to have trouble finding her station, you may need to sync it.
- Page 17 Charging Quick Start Charging bObi Charging bObi Charging bObi Using the Charging Station Place bObi on her charging station with the metal nodes on her front resting against the plates on her station. Make sure the station is plugged in and the station’s power light is on. Charging bObi Using the Adapter When bObi Is Charging: Plug the charging adapter directly into the inlet on bObi’s side.
- Page 18 Charging Quick Start Charging Station Charging Station Position the charging station against a wall on a hard, flat surface. Make sure there is at least 10 feet (3 m) of open space to the front and 2 feet (0.6 m) of open space to the sides of the station. Conserving bObi’s Battery Standby Mode To conserve bObi’s battery, turn her...
- Page 19 Charging Quick Start Syncing the Charging Station Syncing the Charging Station Parts You’ll Need: bObi is smart and will automatically search for her charging station when her battery power reaches 15%. Charging Charging You will need to sync the station if bObi is having trouble finding it. Adapter Station Plug the charging adapter into the side of...
- Page 20 FullCommand ™ Remote You can set bObi’s cleaning schedule, select her cleaning modes, and control her movements all from her FullCommand™ remote. 31 Remote Buttons 33 Syncing the Remote 35 Navigating bObi...
- Page 21 FullCommand™ Remote Quick Start Remote Buttons Remote Buttons CUR Time Sends bObi to clean. Sets the current time and day. Juice SCH Time Sends bObi to her charging station. Sets bObi’s cleaning schedule. Waffle All/None Sends bObi to clean a localized mess. Shortcut to select/deselect all weeksdays.
- Page 22 FullCommand™ Remote Quick Start Syncing the Remote Syncing the Remote Parts You’ll Need: bObi must be synced to her FullCommand™ remote before she is able to obey its commands. FullCommand™ AAA Batteries x2 Remote (not included) Hold down the OK button on While still holding down the OK bObi’s remote.
- Page 23 FullCommand™ Remote Quick Start Navigating bObi Navigating bObi Hold down a navigational button on the remote to keep bObi moving in the desired direction. Release the button when you are done manually driving bObi. Quick Tip: bObi’s edge sensors are located along her front, not along her back. Do not reverse bObi towards edges, as she will fall.
- Page 24 Cleaning Schedule bObi can be programmed to clean at the same time on multiple days of the week through her FullCommand™ remote. The remote works on a 24- hour clock, so adjust accordingly. 39 Setting the Current Time and Day 41 Setting the Cleaning Schedule 43 Auto-Resume Mode...
- Page 25 Cleaning Schedule Quick Start Setting the Current Time and Day Setting the Current Time and Day Parts You’ll Need: bObi can be programmed to clean at the same time on multiple days of the week through her FullCommand™ AAA Batteries x2 FullCommand™...
- Page 26 Cleaning Schedule Quick Start Setting the Cleaning Schedule Setting the Cleaning Schedule Parts You’ll Need: bObi can be programmed to clean at the same time on multiple days of the week through her FullCommand™ AAA Batteries x2 FullCommand™ remote. After setting the current time and day on bObi’s remote, you may set her Remote (not included) cleaning schedule.
- Page 27 Cleaning Schedule Quick Start Auto-Resume Mode Auto-Resume Mode On auto-resume mode, bObi leaves her charging station after every recharge to perform “back- Parts You’ll Need: FullCommand™ AAA Batteries x2 to-back” cleaning cycles. To enable auto-resume, make sure bObi is turned ON and synced to her Remote (not included) FullCommand™...
- Page 28 Maintenance To maximize bObi’s efficiency, it is best to clean her dustbin, filters, brushes, and sensors about once a week. 47 Dustbin 49 Filter 51 Main Brushes 53 Side Brush 55 Sensors 57 Front Wheel...
- Page 29 Maintenance Quick Start Dustbin Dustbin Parts You’ll Need: To maximize bObi’s efficiency, it is best to empty her dustbin about once a week, or about once Cleaning Tool every 6 cleaning cycles. Emptying bObi’s Dustbin Quick Tips: Never fill the dustbin with Hold down the eject button on the back of Pull up the two color clips on either side of water or any other liquid with...
- Page 30 Maintenance Quick Start Filter Filter Parts You’ll Need: To maximize bObi’s efficiency, it is best to clean her filter about once a week and replace it about once Cleaning Tool every 6 months. The filter is located inside the dustbin. These filter captures fine particles and prevents them from escaping the dustbin.
- Page 31 Maintenance Quick Start Main Brush Main Brush Parts You’ll Need: bObi uses a dual brush cleaning system. It is recommended that you open and clean bObi’s main Cleaning Tool brushes once a week. Cleaning bObi’s Main Brushes Quick Tip: You may use scissors to cut away entanglements of hair, or tweezers to unclog the notches inside bObi.
- Page 32 Maintenance Quick Start Side Brush Side Brush Parts You’ll Need: To maximize bObi’s efficiency, it is best to clean her side brush about once a week. Philips Head Cleaning Tool Screwdriver Cleaning bObi’s Side Brush Quick Tip: You may use scissors to cut away entanglements of hair, or tweezers to unclog the notches inside bObi.
- Page 33 Maintenance Quick Start Sensors Sensors Parts You’ll Need: To maximize bObi’s efficiency, it is best to clean her sensors about once a week. bObi’s obstacle/wall Cloth sensors are located along her bumper; her edge sensors are located along the front of her underside. (not included) Cleaning bObi’s Sensors Wipe the obstacle/wall and edge sensors with a soft cloth slightly dampened with cold water...
- Page 34 Maintenance Quick Start Front Wheel Front Wheel Parts You’ll Need: To maximize bObi’s efficiency, it is best to clean her front wheel about once a week. Flat Head Screwdriver (not included) Cleaning bObi’s Front Wheel Pop the front wheel out of its socket using Clean the wheel and the socket then replace a flat head screwdriver.
- Page 35 Parts and Accessories bObi’s additional features include a mop attachment, edge sensors, and a lithium-ion battery. 61 Mop 63 Edge Sensors 65 Battery...
- Page 36 Parts and Accessories Quick Start bObi’s mop attachment allows her to mop as she vacuums and sweeps. Quick Tip: Installing bObi’s Mop Attachment Do not let bObi climb onto carpet or rugs when she Dampen bObi’s mopping cloth with water or is mopping.
- Page 37 Parts and Accessories Quick Start Edge Sensors Edge Sensors Parts You’ll Need: If bObi repeatedly backs up or displays an error message (Er 01) while cleaning dark-colored carpet, Blindfold Stickers then you’ll need to deactivate the edge sensors. Make sure bObi’s is turned ON before proceeding. Deactivating bObi’s Edge Sensors Quick Tip: When the edge sensors...
- Page 38 Parts You’ll Need: On her default Deep Clean mode, bObi’s battery lasts about 45 – 90 minutes per charge. bObi’s battery Phillips Head has a 2-year warranty. Replacement batteries can be purchased at www.bobsweep.com/shop. Screwdriver Quick Tips: To conserve bObi’s battery,...
- Page 39 If the problems persist, please contact our helpful support team at support@bobsweep.com or 1-888-549-8847. Our business hours are Monday – Friday, 9 a.m. – 5 p.m. Pacific Time. Troubleshooting If bObi is having a problem with one of her parts, an error message will light up on her remote screen.
- Page 40 Troubleshooting Quick Start Troubleshooting: Edge Sensors Edge Sensors: Er 01 Parts You’ll Need: Cloth (not included) What to do: Wipe the edge sensors with a soft cloth slightly dampened with cold water or alcohol. If problems persist, deactivate the edge sensors using bObi’s blindfold stickers.
- Page 41 Troubleshooting Quick Start Troubleshooting: Brushes Brushes: Er 02 Parts You’ll Need: Compressed Air Cleaning Tool (not included) What to do: Remove and clean bObi’s brushes and brush holders. Clean the brush compartment from end to end using bObi’s cleaning tool and compressed air.
- Page 42 Troubleshooting Quick Start Troubleshooting: Power System Power System: Er 03 Parts You’ll Need: Charging Charging Phillips Head Adapter Station Screwdriver What to do: Place bObi on her charging station and allow her to fully charge. If bObi is unable to charge on her station, charge her directly by plugging the charging adapter into the inlet above her power switch.
- Page 43 Troubleshooting Quick Start Troubleshooting: Wheels Wheels: Er 04 Parts You’ll Need: Cleaning Tool Compressed Air (not included) What to do: Use the cleaning tool to remove debris jamming bObi’s wheels. Remove the two screws around each wheel and use compressed air to remove debris inside the wheel compartments.
- Page 44 Troubleshooting Quick Start Troubleshooting: Dustbin Dustbin: Er 05 Parts You’ll Need: Cleaning Tool Compressed Air (not included) What to do: Remove bObi’s dustbin and empty it. Gently wipe the two metal connectors on the bottom of the dustbin with a dry cloth.
- Page 45 Home Checkup Test If bObi is not performing as well as she should, you can diagnose the problem with a simple home checkup test. 81 Putting bObi in Checkup Mode 83 Home Checkup Test Steps...
- Page 46 Home Checkup Test Quick Start Putting bObi in Checkup Mode Putting bObi in Checkup Mode When In Checkup Mode: Value Indicator Checkup Indicator Current and scheduled times disappear During the test, GO!, JUICE, and from the remote’s screen and new WAFFLE all remain lit on bObi’s indicators appear as the test progresses: cover, and charging indicators cycle...
- Page 47 Home Checkup Test Quick Start Home Checkup Test Step 4: 0100 Step 3: 0002 Step 2: 0001 Step 1: 0000 Wall Sensors Battery Firmware Version Edge and Wheel Sensors With bObi on the ground look at the remote’s Press LEFT on the remote. The Checkup Press LEFT on the remote and Checkup Press RGHT on the remote and the Checkup screen.
- Page 48 Home Checkup Test Quick Start Home Checkup Test Step 5: (0100 continued) Step 6: 0200 Step 7: 0300 Step 8: 0400 Touch Sensors Battery Life, (and blOck) Wheels, Brushes, and Vacuum Charging Station 80 touch sensors surround bObi’s bumper. Press RGHT on the remote and the Checkup With an emptied dustbin attached to bObi, flip Plug the charging station.
- Page 49 FAQs Still have questions that we haven’t answered? Contact our helpful support team at support@bobsweep.com or 1-888-549-8847. Our business hours are Monday – Friday, 9 a.m. – 5 p.m. Pacific Time.
- Page 50 App on your iOS or it. Make sure the station is against a wall on a Android device. flat, level surface.
- Page 51 Troubleshooting section of this manual for Press SCH TIME again to save your settings. the checkup test. For a more thorough clean, you solutions. may remove the wheels completely. See bObi’s wheel repair guide on www.bobsweep.com/ bobi-classic-support for detailed instructions. * Available to purchase separately.
- Page 52 End User Agreement...
- Page 53 Software or the Bobsweep is found to be defective in material or workmanship under normal use for a period of one (1) year the Bobsweep software contained on the Bobsweep (“Bobsweep Software”), including the protocol for communicating with from the date of receipt, Bobsweep’s entire liability and your exclusive remedy shall be the replacement of the Bobsweep...
- Page 54 Agreement. You may terminate this Agreement voluntarily at any time. Bobsweep may terminate this Agreement at any time if you are in breach of any of its terms and conditions, and may refuse to license the Bobsweep Software or the Bobsweep to you after termination.
Need help?
Do you have a question about the bObi Classic and is the answer not in the manual?
Questions and answers