Mitsubishi MELSEC System Q Installation Manual
Mes interface module
Hide thumbs
Also See for MELSEC System Q:
- Manual (170 pages) ,
- Programming manual (298 pages) ,
- User manual (9 pages)
Advertisement
Available languages
Available languages
Quick Links
MITSUBISHI ELECTRIC
MELSEC System Q
Programmable Controllers
Installation Manual for MES Interface
Module QJ71MES96
Art-no.: UK, Version A, 19032010
Safety Information
For qualified staff only
This manual is only intended for use by properly trained and qualified electrical
technicians who are fully acquainted with automation technology safety stan-
dards. All work with the hardware described, including system design, installa-
tion, setup, maintenance, service and testing, may only be performed by
trained electrical technicians with approved qualifications who are fully
acquainted with the applicable automation technology safety standards and
regulations.
Proper use of equipment
The programmable controllers (PLC) of the MELSEC System Q are only
intended for the specific applications explicitly described in this manual or the
manuals listed below. Please take care to observe all the installation and oper-
ating parameters specified in the manual. All products are designed, manufac-
tured, tested and documented in agreement with the safety regulations. Any
modification of the hardware or software or disregarding of the safety warn-
ings given in this manual or printed on the product can cause injury to persons
or damage to equipment or other property. Only accessories and peripherals
specifically approved by MITSUBISHI ELECTRIC may be used. Any other use or
application of the products is deemed to be improper.
Relevant safety regulations
All safety and accident prevention regulations relevant to your specific applica-
tion must be observed in the system design, installation, setup, maintenance,
servicing and testing of these products.
In this manual special warnings that are important for the proper and safe use
of the products are clearly identified as follows:
P
E
Further Information
The following manuals contain further information about the module:
b QJ71MES96 MES Interface Module User´s Manual
b MELSEC System Q User´s Manual (Hardware)
b MELSEC System Q Programming Manual, art. no 87431
These manuals are available free of charge through the internet
(www.mitsubishi-automation.com).
If you have any questions concerning the installation, configuration or opera-
tion of the equipment described in this manual, please contact your relevant
sales office or department.
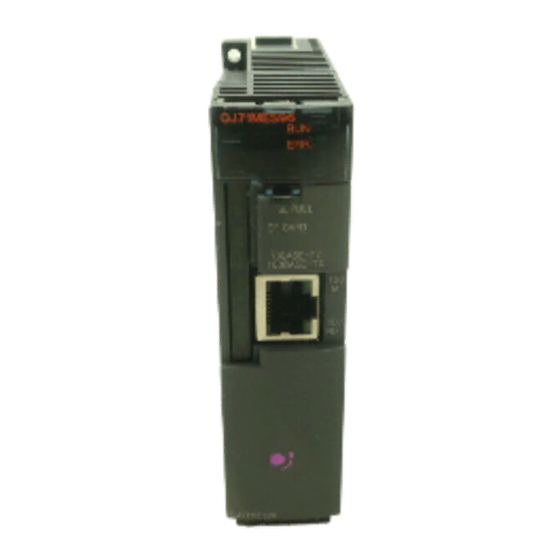
Names and Functions of Parts
With the LED cover open
Opened battery compartment
No.
Description
b
Normal operation
RUN
Watch dog timer error (Hardware error)
Error (Operation of the module is
b
continued)
ERR.
v Error (Operation of the module is stopped)
Status
LED
No error
b
Transmission speed 100 Mbps
100M
Transmission speed 10 Mbps
b
Data being send or received
SD/RD
Data not being send or received
·
10BASE-T/100BASE-TX connector (RJ45 type modular jack)
»
CompactFlash€ memory card eject button
¿
CompactFlash€ memory card slot
´
Memory card slot cover
²
Battery
Battery connector
b: LED ON, v: LED flashing,
: LED OFF
Installation and Wiring
P
DANGER
b Turn off all phases of the power supply for the PLC and other external
sources before starting the installation or wiring work.
E
CAUTION
b Use the product in the environment within the general specifications
described in the Hardware Manual for the MELSEC System Q. Never
use the product in areas with dust, oily smoke, conductive dusts, cor-
rosive or flammable gas, vibrations or impacts, or expose it to high
temperature, condensation, or wind and rain.
b When drilling screw holes or wiring, cutting chips or wire chips should
not enter ventilation slits. Such an accident may cause a short circuit.
Use the provided dust proof sheet to cover the ventilation port. Be
sure to remove this sheet from the PLC's ventilation port when the
installation work is completed to prevent overheating.
b Fix the cable connected to the module so that the connector is not
directly stressed
.
Connecting the backup battery
The QJ71MES96 is shipped with the battery connector disconnected. Before
using the module, connect the battery connector.
Open the cover on the bottom of the MES
A
interface module.
Make sure that the battery is installed cor-
rectly.
Battery
B
Connect the battery connector ("A" in the
left figure) to the matching connector in
the battery compartment. Make sure that
the connector is inserted in the retaining
clip in the battery compartment (left fig.
"B").
QJ71MES96
Mounting a module to a base unit
E
CAUTION
b Do not open or modify a module. Doing so can cause a failure, mal-
function, injury or fire.
b Always insert the module fixing latch of the module into the module
fixing hole of the base unit. Forcing the hook into the hole will dam-
age the module connector and module.
b Do not touch the conductive or electronic parts of a module directly.
Doing so can cause a unit malfunction or failure.
After switching off the power supply,
insert the module fixing latch into the
module fixing hole of the base unit.
Push the module in the direction of arrow
to load it into the base unit.
Secure the module with an additional screw (M3 x 12) to the base unit if
large vibration is expected. This screw is not supplied with the module.
Installation of the CompactFlash€ card
The CompactFlash€ card can be installed with the power of the PLC switched
on.
Open the LED cover on the front of the MES interface module.
Remove the CompactFlash€ card slot cover.
Install the CompactFlash€ card. Pay attention to the orientation of the
card. Push the CompactFlash€ card securely into the slot until it is flush
with the EJECT button.
Notch
Orientation of
memory card
CompactFlash€ card
Notch
Close the LED cover.
When a CompactFlash€ card is installed, the card slot cover cannot be attached
to the MES interface module. Save the removed CompactFlash€ card slot cover
carefully.
Formatting the CompactFlash€ card
For the CompactFlash€ card format, use the formatting function of the configu-
ration tool MX MESInterface.
Do not format the CompactFlash€ card with Windows XP/2000.
MITSUBISHI
Mitsubishi Electric Europe B.V. /// FA - European Business Group ///
ELECTRIC
Germany /// Tel.: +49(0)2102-4860 /// Fax: +49(0)2102-4861120 ///
FACTORY AUTOMATION
www.mitsubishi-automation.com
Pawl
Advertisement

Related Manuals for Mitsubishi MELSEC System Q


Summary of Contents for Mitsubishi MELSEC System Q
- Page 1 Programmable Controllers b Use the product in the environment within the general specifications described in the Hardware Manual for the MELSEC System Q. Never Installation Manual for MES Interface use the product in areas with dust, oily smoke, conductive dusts, cor-...
- Page 2 (www.mitsubishi-automation.de). Batterieanschluss Sollten sich Fragen zur Installation, Programmierung und Betrieb der Steuerungen des MELSEC System Q ergeben, zögern Sie nicht, Ihr zuständiges b: LED leuchtet, v: LED blinkt, : LED leuchtet nicht MITSUBISHI Mitsubishi Electric Europe B.V. /// FA - European Business Group /// Verkaufsbüro oder einen Ihrer Vertriebspartner zu kontaktieren.
-
Page 3: Eléments De Commande
Utilisation correcte face MES. Fermez le capot des DEL. Les automates programmables (API) de MELSEC System Q sont conçus Vérifiez que la batterie est correctement uniquement pour les applications spécifiques explicitement décrites dans ce Lorsqu’une carte CompactFlash® est installée, il n’est pas possible de fixer le installée. - Page 4 System Configuration Systemkonfiguration Configuration du système Connection to the Network Performance Specification Netzwerkanschluss Leistungsdaten Oracle€ Connexion au réseau Données de puissance Microsoft€ SQL Server Microsoft€ Access Description / Beschreibung / De- Item / Merkmal / Caractéristiques scription DB Connection Service QJ71WES96 Transmission rate 100 Mbps / 10 Mbps...
-
Page 5: Avvertenze Di Sicurezza
Impiego conforme alla destinazione d'uso modulo interfaccia MES. Tacca Accertarsi che il connettore batteria sia I controllori programmabili (PLC) MELSEC System Q sono previsti solo per i set- inserito correttamente. tori di impiego descritti nel presente manuale di installazione o nei manuali Batteria indicati nel seguito. - Page 6 Para cualquier pregunta relativa a la instalación, configuración o funcionamiento b: LED ON, v: LED parpadea, : LED OFF de los terminales de operador de la serie MELSEC System Q descritos en el presente manual, póngase en contacto con la delegación comercial o departamento com- MITSUBISHI Mitsubishi Electric Europe B.V.
- Page 7 При возникновении вопросов по установке, программированию и эксплу- MITSUBISHI Mitsubishi Electric Europe B.V. /// FA - European Business Group /// в месте, где может быть вибрация. Крепежные винты в комплект моду- атации контроллеров System Q, обратитесь в ваше региональное торговое...
- Page 8 Collegamento alla rete Dati tecnici Configurazione del sistema Configuración de sistema Конфигурация системы Conexión de red de comunicación Specificación de rendimiento Oracle€ Подключение к сети Данные мощности Microsoft€ SQL Server Microsoft€ Access Caratteristica / Característica / Descrizione / Descripción / Особенность...
- Page 9 Jeśli pojawią się jakiekolwiek pytania związane z instalowaniem, programowa- b: LED świeci, v: LED miga, : LED wyłączony niem i działaniem sterowników z serii MELSEC System Q, prosimy o bezzwłoczne W przypadku usytuowania instalacji w takich miejscach, gdzie spodzie- skontaktowanie się z lokalnym biurem sprzedaży lub dystrybutorem.
- Page 10 Bemetszés A berendezés helyes használata Bizonyosodjon meg róla, hogy az elem megfelelően van beszerelve. A MELSEC System Q sorozat programozható vezérlői (PLC) kizárólag az ebben Elem a kézikönyvben vagy az alábbiakban felsorolt kézikönyvekben leírt Csatlakoztassa az elem csatlakozóját (a bal alkalmazásokhoz készültek.
- Page 11 Otevřete přihrádku baterie na spodní Vybrání Správné používání zařízení straně modulu rozhraní MES. Programovatelné automaty (PLC) řady MELSEC System Q jsou určeny pouze Zkontrolujte, zda je baterie správně nain- pro konkrétní aplikace výslovně popsané v tomto návodu nebo v návodech stalována.
- Page 12 Połączenie do sieci Parametry eksploatacyjne Konfiguracja systemu Rendszerkonfiguráció Konfigurace systému Csatlakoztatás a hálózathoz Teljesítmény-adatok Oracle€ Připojení k datové síti Systémové údaje Microsoft€ SQL Server Microsoft€ Access Pozycja / Tulajdonság / Parametr Opis / Leírás / Popis DB Connection Service Prędkość komunikacji 100 Mbit/s / 10 Mbit/s QJ71MES96 Metody transmisji danych...
Need help?
Do you have a question about the MELSEC System Q and is the answer not in the manual?
Questions and answers