
Related Manuals for Lionelo Sven Plus


Summary of Contents for Lionelo Sven Plus
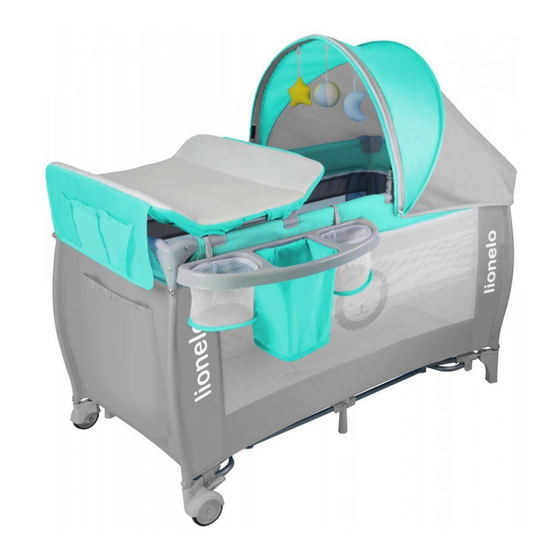
- Page 1 User manual Instrukcja obsługi Warranty card Karta gwarancyjna Sven Plus Travel bed Łóżeczko turystyczne WWW.LIONELO.COM www.lionelo.com...
- Page 2 Wstęp. Drogi Kliencie! Dziękujemy za obdarzenie nas zaufaniem i wybranie marki Lionelo. Nasze produkty wykonywane są z największą starannością, by zapewnić Twojemu dziecku komfort korzystania, równo- cześnie dbając o jego bezpieczeństwo. Dzięki wykorzysta- niu wysokiej jakości materiałów i nowoczesnych rozwiązań...
-
Page 3: Instrukcja Użytkowania
OSTRZEŻENIE • Przed zmianą położenia podstawy na najniższe, konieczne jest usunięcie szyn podtrzymujących. WAŻNE, ZACHOWAJ NA • Grubość materaca musi być taka, aby wysokość wewnętrz- na (powierzchnia materaca do górnej krawędzi ramy łóżecz- PRZYSZŁOŚĆ: ka) wynosiła co najmniej 500 mm w najniższym położeniu podstawy łóżeczka i co najmniej 200 mm w najwyższym PRZECZYTAJ UWAŻNIE położeniu podstawy łóżeczka. -
Page 4: Instrukcja Montażu
Instrukcja montażu 2. Ustaw łóżeczko na podłodze i oddziel poszczególne nogi pociągając je w przeciwległe strony. Utrzymuj środkową blokadę w górze – inaczej poręcze nie wpasują się we właściwe miejsce. 1. Wyjmij łóżeczko turystyczne z torby i rozepnij pasy z przylepcami. Połóż łóżeczko na podłodze i odłóż torbę na bok. - Page 5 4. Wciśnij środkową blokadę, aż powierzchnia będzie całko- 6. Podwyższenie musi być przymocowane za pomo- wicie płaska (usłyszysz kliknięcie). cą zamka błyskawicznego. Jest tylko jeden sposób na poprawny montaż podwyższenia, w innym wypadku połą- czenie zamka błyskawicznego będzie niemożliwe. Po przy- mocowaniu, osłonić...
- Page 6 Montaż mechanizmu bujaczka 9. Połącz mechanizm bujaczka z dolną ramą łóżeczka. Aby używać łóżeczka bez mechanizmu bujaczka, należy złożyć mechanizm, nie ma potrzeby jego demontażu. Instrukcja składania przebieraka 8 . W ł ó ż w y g i ę t e r u r y w m a t e r i a ł o w e p r o w a d - nice przebieraka, połącz je ze sobą...
- Page 7 Instrukcja składania łóżeczka 11. Wyjmij wszystkie akcesoria z łóżeczka. Wyjmij materac i zdejmij daszek, organizer oraz wszystkie akcesoria. Chwyć za środkowy uchwyt znajdujący się po środku podłogi i pociągnij do góry. 14. Owiń złożone łóżeczko materacem i zapnij je pasami za pomocą...
-
Page 8: Dear Customer
Operations WARNING Dear Customer! IMPORTANT, RETAIN FOR Thank you for placing your trust in us and choosing Lionelo. FUTURE REFERENCE: Our products are made with the utmost care to ensure READ CAREFULL Y comfort and above all, maximum safety of your child. Imple-... -
Page 9: Assembly Instruction
• If you leave the child unattended in the cot, always make sure WARNING — Only use the mattress sold with this cot, that the movable side is closed. do not add a second mattress on this one, suffocation • Before changing the base position to the lowest one, it is hazards necessary to remove the support rails. -
Page 10: Base Installation
2. Separate the legs pulling them apart. Keep the central lock up. Otherwise handrails will not fi t in the right place. 5. Place the mattress in the baby bed. Note! so that the sides of the cot / handrails are prop- erly blocked, the central blockade of the fl... -
Page 11: Canopy Installation
6. The base must be attached using the zipper. There is only one way to install the base correctly. Otherwise it is impos- sible to fasten the zipper. Once the base is attached, cover the zipper with a Velcro pad. Slide the reinforcement tubes into the sewn handles and connect them. - Page 12 How to use rocking system Baby bed folding instruction 9. Connecting the left plastic hook on rocking system to the 11. Remove all the bed accessories. Remove the mattress, frame of bottom playpen at fi rst, and then repeat the same canopy, organizer and all the other accessories.
- Page 13 BrandLine Group Sp. z o. o. ul. A. Kręglewskiego 1 61-248 Poznań www.lionelo.com WARRANTY CARD KARTA GWARANCYJNA 14. Wrap the folded bed with the mattress and fasten it with Model: ………………………….. SN: …………………………..Velcro straps. Put the folded baby bed into the bag.
-
Page 14: Warunki Gwarancji
1. Marka Lionelo z siedzibą w Poznaniu (61-248) przy ul. A. Kręglewskiego 1 13. Gwarancją nie są objęte: naturalne zużycie związane z eksploatacją, gwarantuje sprawne działanie produktu zgodnie z warunkami techniczno-ek- uszkodzenia powstałe w wyniku niewłaściwego i niezgodnego z instrukcją... -
Page 15: Warranty Conditions
Customer, fading of fabric resulting from prolonged exposure to sunlight or washing the product or its parts in the wrong temperature, mechanical, 1. The Lionelo brand with its registered office at A. Kręglewskiego 1, 61-248 electrical, thermal and intentional damages and defects caused by them, Poznań, Poland guarantees that the equipment is operational in accordance... - Page 16 Lionelo Service – Support Product details For the following List of Authorized Service Centers: Product : TRAVEL BED Lista autoryzowanych centrów serwisowych: Model(s) : SVEN-PLUS lionelo.com/en/service Declara on & Applicable standards We, BrandLine Group Sp. z o. o., hereby declare under our sole responsibility that...
Need help?
Do you have a question about the Sven Plus and is the answer not in the manual?
Questions and answers