Table of Contents
Advertisement
Quick Links
Advertisement
Table of Contents

Related Manuals for PRESIDIUM Gold Karat Tester


Summary of Contents for PRESIDIUM Gold Karat Tester
-
Page 3: Table Of Contents
Contents English Version I. About this Book pg. 08 II. About the Presidium Gold Karat Tester pg. 09 1. GETTING STARTED with your pg. 13 Gold Karat Tester i. Connecting the Probe pen to your pg. 13 Gold Karat Tester Unit ii. - Page 5 Pressing dispenser button but pg. 32 unable to purge E. Errors when PURGING pg. 33 i. Pressing the dispenser button but pg. 33 unable to purge 7. TAKING CARE of your Gold Karat Tester pg. 34...
- Page 6 The tester or Presidium Gold Karat Tester (“PKT”) referred to in this handbook is provided and/or sold on an “as is” basis. Except as required by applicable law, no warranties...
- Page 7 Disclaimers, Exclusions and Limitations of Liability sample is tested, are controlled as these interferences could impact the testing results. It is important to always clean the probe tip, probe pen and testing area before testing and in between tests, to ensure no residue testing liquid is left.
- Page 8 Warning about Testing Liquids Provided The testing liquid is provided in a sealed vial and its contents should be used entirely to fill or refill the probe pen. Testing liquid that is not used should not be retained in the vial and must be disposed. The testing liquid is safe to use in the amounts prepared and prescribed for the PKT.
-
Page 9: About This Book
I. About this book Thank you for purchasing the Presidium Gold Karat Tester. This handbook is designed to help you set up your device and describes all you need to know about how to use your gold testing device accurately and take care of it, in line with its requirements. -
Page 10: About The Presidium Gold Karat Tester
II. About the Presidium Gold Karat Tester The Presidium Gold Karat Tester (PKT) is an instrument that estimates the different purity of gold alloys in the unit of Karat, using an electrochemical effect. Based on this methodology, gold alloys of different gold purity can be ascertained upon its reaction with a prescribed electrolyte, at pre-set electrical conditions. -
Page 11: Gold Karat Tester Unit
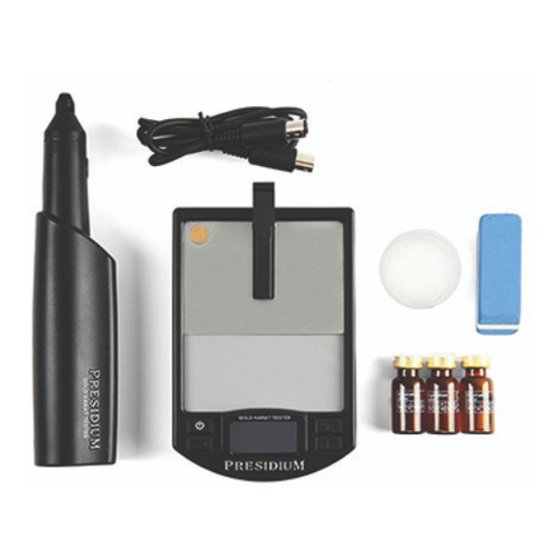
Fig. 1 Probe pen (requires filling for first-time use) Dispenser button Removable probe tip Nozzle (on probe pen) Gold Karat Tester unit Testing Platform with conductive (a) and non-conductive (b) plates In-built Calibration Disc (14K) Testing clip to secure and ensure connectivity to jewelry on platform... - Page 12 • Batteries do not have to be removed when the electrical power via a power adaptor is used. Electrical Power Presidium Universal USB Source Adaptor and USB cable wire (not included in your package and sold separately) Power Indicator...
- Page 13 Functions and Settings on the Menu of the PKT Your Presidium Gold Karat Tester has 5 functional options on the display screen’s main menu as follows: Test Settings Calibrate Refill Purge You may toggle between these options using the “Up” and “Down”...
-
Page 14: Getting Started With Your
Ensure the testing platform and testing clip are clean and free of liquids, body oil, dirt or debris i. Connecting the Probe pen to your Gold Karat Tester Unit Plug the provided connector wire into the back of the probe pen (Fig 1.1a), following the guidance arrows on the probe... -
Page 15: Powering Up The Device
Powering up the device You may choose to power the device on 4 AAA batteries (alkaline batteries are recommended) or by electrical power via the Presidium Universal USB Adaptor (not included in your package). For more information, refer to Battery Information in the previous section. -
Page 16: Filling The Probe Pen With Testing Liquid
To prepare, ensure you open 1 sealed vial of the provided testing liquid and have the provided petri dish prepared. You should always only use the Presidium Gold Karat testing liquid provided to you in sealed vials to fill or refill your tester. - Page 17 Fig 1.3.2 Fill/Refill – Step 2 Prepare the testing liquid by pouring it from the vial into the provided petri dish. To allow the testing liquid to flow easily from the vial, tilt the vial at an angle. Ensure to use all of the testing liquid and do not pour the liquid back into the vial at any time. Fig 1.3.3a Fill/Refill – Step 3 Hold the probe pen with the nozzle halfway into the petri dish (Fig 1.3.3b).
- Page 18 Fig 1.3.4 Fill/Refill – Step 4 The next screen will prompt you to select <<Refill>> for the probe pen motor to automatically collect the liquid in the petri dish. Press “Enter” to begin and you will see the refill process on screen and observe the liquid being collected into the probe pen. Fig 1.3.5a Fill/Refill – Step 5 Once done at 100%, there will be a prompt to purge any existing air bubbles inside the probe pen.
- Page 19 Use a cloth to clean any excess liquid from the nozzle. Fig 1.3.8 Fill/Refill – Step 8 Replace the probe tip back on the device by gently twisting it back on, being careful not to touch the nozzle. You are now ready to use your Presidium Gold Karat Tester.
-
Page 20: Calibrating Your Gold Karat Tester
2. CALIBRATING your Gold Karat Tester Calibration is necessary every time you switch on the tester or when you have just filled the probe pen, to ensure the results given will be accurate. You will be automatically prompted to calibrate when you switch on the tester (Fig 2.1). - Page 21 Calibration will then begin and takes approximately 10-15 seconds. Ensure pressure and contact is held between the probe pen and the Calibration Disc at all times, and do not move the probe pen during this time. Calibration is complete when the display screen shows the completed calibration progress bar and the word “Success”...
-
Page 22: Testing With Your Gold Karat Tester
3. TESTING with your Gold Karat Tester When you have the gold sample cleaned and placed on the conductive (aluminium) plate of the Testing Platform, you may begin to test. On the Main Menu, toggle the navigation and press “Enter”... -
Page 23: Using The Testing Clip
To progress onto the next test, ensure first that any excess liquids left on the testing platform or on the probe pen is wiped away. Then, either press the dispenser button or press “Enter” and the screen will go into Ready mode, with the last test result still displayed at the bottom right corner (Fig 3.1d). - Page 24 Hold the probe pen with the probe tip against the area of gold on the item, ensuring full contact before pressing the dispenser button (Fig 3.2b). Fig 3.2b Testing with the item secured by the testing clip...
-
Page 25: Using Of Non-Conductive And Conductive Plates Of Testing Platform
ii. Using of Non-conductive and Conductive plates of Testing Platform The Testing Platform is made up of two types of surfaces – an aluminium conductive plate, and a non-conductive plate. Using both the non-conductive and conductive plates at the same time is recommended when testing on a gold item that is very small or thin, with thickness of less than 2.5mm. -
Page 26: Refilling Your Gold Karat Tester
<<Refill>> and follow the instructions as they appear on screen. There are a total of 8 steps to complete the refill. You may also refer to the Getting Started with your Gold Karat Tester section found earlier in this handbook. When refilling, be careful not to press the nozzle tip onto the petri dish. Ensure the nozzle is always submerged in the testing liquid so that minimal air collects into the probe pen. -
Page 27: Purging Your Gold Karat Tester
5. PURGING your Gold Karat Tester As the probe pen consists of a mechanical motor that helps it to take in testing liquid during a refill and dispense testing liquid during a test, it is likely that sometimes air bubbles can be trapped in the probe pen, especially when refilling. The <<Purge>> option, fifth in the main menu, will help... -
Page 28: Errors When Using Your
PKT and to better understand the device. Good practical common sense should always be exercised when using the Gold Karat Tester, to avoid unnecessary errors. This includes following the Getting Started procedure closely, ensuring the tester, including the probe pen and testing platform are clean and free of other liquids, body oil, dirt and debris. -
Page 29: Types Of Error Messages When Testing
A. Types of Error Messages when TESTING During testing, you may encounter the following messages appearing on screen to inform you of a possible error. i. ‘Connection lost’ Fig 6.1.1 This (Fig 6.1.1) indicates a loss of contact between the probe pen and the gold sample. -
Page 30: Dispense Again
ii. ‘Dispense Again’ Fig 6.1.2 This (Fig 6.1.2) indicates the need to press the dispenser button again onto the gold sample. If this message keeps appearing, below are the possible causes and suggested solutions. Possible causes: • Insufficient liquid is present due to air bubbles inside the probe pen • Testing liquid was not dispensed onto the gold sample on the conductive plate... -
Page 31: Human Errors When Testing
B. Human Errors when TESTING i. Testing on calibration disc and result does not show “14K” Sometimes, to ensure your device is working accurately, you may wish to test on the provided Calibration Disc which is of 14K gold. If you do not get “14K” as your result when testing on the calibration disc, these could be the possible cause and suggested solutions. -
Page 32: Types Of Error Messages When
C. Types of Error Messages when CALIBRATING During or after calibration, you may encounter the following messages appearing on screen to inform you of a possible error. i. ‘Calibration disc error’ Fig 6.3.1 Possible causes: • Calibrating using wrong disc/material • Calibration disc is not clean • Probe tip has been worn out Suggested solutions: • Re-calibrate again using provided Calibration Disc • Ensure calibration disc is clean by cleaning it with... -
Page 33: Errors When Refilling
Possible causes: • The inner workings of the probe pen may have detached or is faulty Suggested solutions • Contact Presidium Instruments iii. Pressing dispenser button but unable to purge Possible causes: • Dispenser button on probe pen is faulty or damaged • Motor inside the probe pen is not functioning well Suggested solutions: • Make sure probe pen and tester unit are connected... -
Page 34: Errors When Purging
E. Errors when PURGING i. Pressing the dispenser button but unable to purge Possible causes: • Dispenser button on probe pen is faulty or damaged • Motor inside the probe pen is not functioning well Suggested solutions: • Make sure probe pen and tester unit are connected properly • Ensure the connector wire is plugged in the correct direction, following the guidance arrows on both the tester unit and the probe pen... -
Page 35: Taking Care Of Your Gold Karat Tester
Always exercise good practical common sense and ensure to read this User Handbook for caution and tips on how best to use this device. The Gold Karat Tester device is a product of extensive design and craftsmanship. Please treat it with care. GENERAL CARE NOTICE • Keep the tester dry. Precipitation, humidity, and all...
Need help?
Do you have a question about the Gold Karat Tester and is the answer not in the manual?
Questions and answers