
Related Manuals for M2TECH JOPLIN MKIII


Summary of Contents for M2TECH JOPLIN MKIII
- Page 1 M2TECH JOPLIN M /32BIT ANALOG-TO-DIGITAL CONVERTER USER MANUAL REV. P A – 4/2019...
- Page 3 WARNING: the information contained in this manual are considered to be reliable and accurate. M2Tech reserves the right to change or modify the information any time, without prior advice. It’s up to the customer to ensure that the manual being consulted is the latest version.
- Page 4 JOPLIN MKIII features a comprehensive set of output connections which suit virtually all digital equipment around. JOPLIN MKIII is provided with a very complete set of equalization and filtering options to accommodate all kind of analogue signals. We feel that your expectations will be fulfilled by JOPLIN MKIII: you’ll hear your analogue...
-
Page 5: Table Of Contents
S output auxiliary pins mode ................35 8.3.13. Remote sensing....................35 9. Notes on equalization ....................37 9.1. Why is equalization needed for records? ..............37 9.2. List of phono equalization curves available on the JOPLIN MKIII and notes on their usage ..........................40 9.2.1. RIAA .........................40 9.2.2. AES ........................40 9.2.3. - Page 6 9.3.2. NAB for 9.5cm/s (3¾ ips) and NAB for 19cm/s (7½ ips)........44 9.4. Acquiring with equalization..................44 9.5. Interfacing a cartridge or a tape head..............45 9.6. Recording programs....................45 10. Using a power supply different from the standard one..........47 11. Cleaning the unit......................47 12. Technical Specifications ....................49 Copyright © 2019, M2Tech Srl...
-
Page 7: Unpacking And Placing The Unit
Should one or more item be missing, please contact your retail dealer. Remove the JOPLIN MKIII from the foam enclosure and place it onto a stable base, far from heat sources. Avoid full sunlight on the unit. Allow for ample room around the unit for venting. - Page 8 M2Tech JOPLIN MKIII /32bit ANALOG-TO-DIGITAL CONVERTER REVISION P A – APRIL 2019 www.m2tech.biz Copyright © 2019, M2Tech Srl...
-
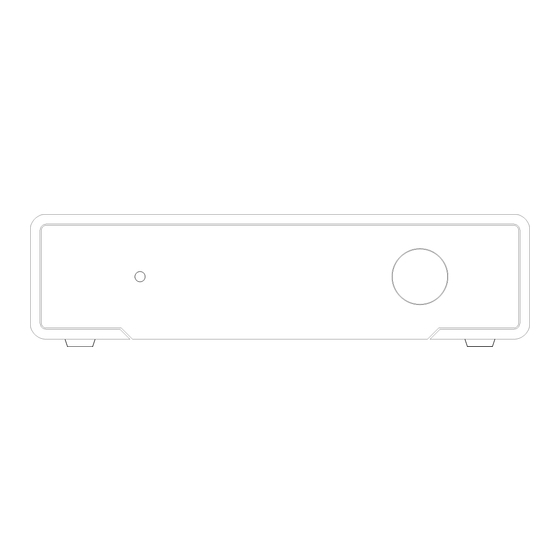
Page 9: Front Panel
2) IR receiver. Aim the remote control to this point to send commands to the JOPLIN MKIII. 3) Standby LED. When the JOPLIN MKIII is in standby mode, this LED is on to indicate to the user that the device can be switched on by the included remote control. - Page 10 M2Tech JOPLIN MKIII /32bit ANALOG-TO-DIGITAL CONVERTER REVISION P A – APRIL 2019 www.m2tech.biz Copyright © 2019, M2Tech Srl...
-
Page 11: Back Panel
Optical output for Toslink cables. Toslink connector. 13) USB 2.0 output. Connect to a PC with Windows or Linux or MacIntosh with an USB 2.0 compliant A-B cable. USB 2.0 B female connector. Copyright © 2019, M2Tech Srl... - Page 12 S output. Connect to a DAC provided with PS Audio I S input. HDMI female connector. 15) Power supply input. Connect the wall adaptor provided with the unit or any other power supply capable of 15V/500mA. 5.5mm/2.1mm supply jack (female, tip is positive). Copyright © 2019, M2Tech Srl...
-
Page 13: Remote Control
OK. When accessing the menu, push this button to update the current item with the displayed value. Vol+/Vol-. Use these buttons to set the gain for the analogue input. In+/In-. Use these buttons to select the input. Copyright © 2019, M2Tech Srl... - Page 14 M2Tech JOPLIN MKIII /32bit ANALOG-TO-DIGITAL CONVERTER REVISION P A – APRIL 2019 www.m2tech.biz Copyright © 2019, M2Tech Srl...
-
Page 15: Connecting And Powering The Unit
JOPLIN MKIII using an RCA digital interconnect (Figure 2, 11). Connect the wall adaptor provided with the JOPLIN MKIII or one output of the Van Der Graaf MkII to the supply connector (Figure 2, 15) of the JOPLIN MKIII. - Page 16 M2Tech JOPLIN MKIII /32bit ANALOG-TO-DIGITAL CONVERTER REVISION P A – APRIL 2019 www.m2tech.biz Copyright © 2019, M2Tech Srl...
-
Page 17: Driver Installation
A – APRIL 2019 www.m2tech.biz 6. Driver installation The JOPLIN MKIII is USB 2.0 Audio compliant. This means that no driver is needed with Apple computers, nor with Linux-based PC’s. The latter will need ALSA to operate the JOPLIN MKIII. - Page 18 In Windows 7, the installation wizard will ask for authorization to start installation. Accept. Then, the wizard will check for system features. At a certain point, it will ask you to connect the JOPLIN MKIII in one of the USB ports (Figure 6). Figure 6...
- Page 19 Follow the indications and plug the device in one port, then click on “Next”. You’ll be asked to choose the installation directory (Figure 7). After choosing it, click on “Install”. Figure 7 The installation process continues showing the progress (Figure 8). Copyright © 2019, M2Tech Srl...
- Page 20 “Finish” to complete the installation. Figure 9 To ensure that installation has correctly completed, the Device Manager should be checked. The JOPLIN MKIII will be listed under “Audio, Video and Games Controllers” (Figure 10 on next page). Copyright © 2019, M2Tech Srl...
-
Page 21: Usb Control Panel
6.3. USB Control Panel A control panel is installed together with the driver, which can be used to optimize JOPLIN MKIII’s USB port performance (Figure 11). More details on the Control Panel’s features in the application note App002. Copyright © 2019, M2Tech Srl... -
Page 22: Uninstalling The Driver
Sometimes it is necessary to uninstall the driver to roll back to a previous version. Uninstall is a quite simple procedure. Go to the control panel and launch the “Application Installation” utility (Figure 12). Look for the JOPLIN MKIII driver item in the list. Double-click on it to launch uninstalling. Copyright © 2019, M2Tech Srl... - Page 23 The installation wizard, which also handles uninstalling, will show up (Figure 13 on next page). Click on “Uninstall” to start uninstalling. Figure 13 At this point, the wizard will show up the installation progress (Figure 14), up to the end. Copyright © 2019, M2Tech Srl...
- Page 24 After the uninstalling of all files related to the driver is complete, the “Next” button will be enabled. Click on it. The final message will appear (Figure 15). Click on “Finish” to complete uninstalling. Figure 15 Copyright © 2019, M2Tech Srl...
-
Page 25: True Plug'n'play Operation With Mac
ALSA. This means that the driver is already included in the operating system and the user needs not to install anything: just connect the JOPLIN MKIII to your PC with Linux and it will be immediately recognized by the OS and ready to use. ALSA version needs to be 1.0.24 or later. - Page 26 M2Tech JOPLIN MKIII /32bit ANALOG-TO-DIGITAL CONVERTER REVISION P A – APRIL 2019 www.m2tech.biz Copyright © 2019, M2Tech Srl...
-
Page 27: Configuring The Computer To Use The Joplin Mkiii
7. Configuring the computer to use the JOPLIN MKIII 7.1. Configuring a PC with or Windows 7 A PC with Windows 7 can use the JOPLIN MKIII in four different ways: Direct Sound (DS), Kernel Streaming (KS), ASIO and WASAPI. DS is suitable for recorders which can’t operate in Kernel Streaming mode nor with WASAPI;... -
Page 28: Configuring For Kernel Streaming With Windows 7
7.3. Configuring a Mac Go to System Preferences and select Sounds. The following windows will appear. Select “M2Tech USB 2.0 Audio In” for input as indicated in Figure 19. Figure 19 Copyright © 2019, M2Tech Srl... -
Page 29: Configuring The
8. Configuring the JOPLIN MKIII The JOPLIN MKIII is a very versatile unit, with plenty of features to tailor its behaviour to the source being used and the music program being played back. To configure all the features and parameters, a menu can be accessed from both the front panel controls and the remote control. -
Page 30: Navigating The Menu By The Ir Remote
8.3. Parameters meaning and choices 8.3.1. Input gain The JOPLIN MKIII is provided with an analogue front-end which gain can be set to 0dB or to any value between 10dB and 65dB in 1dB steps. 0dB means that an input voltage of 2.55Vrms produces and output of 0dBFS (that is the full dynamic of the ADC). -
Page 31: Sampling Frequency
Thus, the choice of the sampling frequency is a trade-off between disk usage and quality. On the other hand, when using the JOPLIN MKIII to drive a digital amplifier, a DAC or a streaming player for real-time playback, the best choice is always the highest sampling frequency possible. -
Page 32: Clipping Warning Activation Level
-3/-4dB prevents such clipping to be recorded without advice. 8.3.6. Equalization curve The JOPLIN MKIII has been conceived to be used with a wide variety of different sources: tuners, recorders, turntables. Some of these sources require an equalization to enjoy their sound. -
Page 33: Low Pass (Anti-Hiss) Filter
38kHz carrier, while the sum information (L+R, that is the mono sound) is placed in the channel’s baseband. Tuner are aware of receiving a stereo broadcast because of a pilot tone of 19kHz which is also used to recreate the 38kHz frequency necessary to Copyright © 2019, M2Tech Srl... -
Page 34: I 2 S Output Format
Figure 21 8.3.11. I S output format S output of the Joplin MKIII can deliver both PCM and DSD, at different sampling The I frequencies thanks you to a high-performance sample rate converter. The user can choose between different options:... -
Page 35: I 2 S Output Auxiliary Pins Mode
LKS; Singxer; Note. The option labelled “M2Tech” is not really used in any M2Tech product with I2S input (M2Tech uses PS Audio standard): this is actually a guess of what SMSL is supposed to use. 8.3.13. Remote sensing The JOPLIN MKIII uses the same remote control as the discontinued Young DSD. - Page 36 M2Tech JOPLIN MKIII /32bit ANALOG-TO-DIGITAL CONVERTER REVISION P A – APRIL 2019 www.m2tech.biz Copyright © 2019, M2Tech Srl...
-
Page 37: Notes On Equalization
Presently, all records are cut using the RIAA curve (Figure 22), which has been proposed as a standard back in 1954. Both low frequencies amplification and high frequencies attenuation for playback are clearly visible. RIAA playback curve Figure 22 Copyright © 2019, M2Tech Srl... - Page 38 Older curves were thought for playback systems in which the low frequency limit was relatively high (50- 80Hz) and for recordings with poor low frequency content, setups in which the turntable rumble was not a problem. Copyright © 2019, M2Tech Srl...
- Page 39 Figure 24 shows the relative level versus frequency of the music when playing a Decca FFRR record through a RIAA phono input of a modern amplifier. Equalization of the signal of a Decca FFRR record being amplified by a RIAA phono stage Figure 24 Copyright © 2019, M2Tech Srl...
-
Page 40: List Of Phono Equalization Curves Available On The Joplin Mkiii And Notes On Their Usage
9.2. List of phono equalization curves available on the JOPLIN MKIII and notes on their usage The JOPLIN MKIII is provided with 16 curves for microgroove LP’s and 7 curves for 78rpm’s. A quick search on the Internet will allow you to find that the old record labels were more than the figures above and that sometimes the same record label used different curves during the years. -
Page 41: Angel (Ang)
The English Decca developed her FFRR LP curve based on the 78rpm eq curve with the same name. Most of the great recordings of the stereo era (after 1954) were also produced in mono and used to make the mono LP’s cut using the FFRR curve. Copyright © 2019, M2Tech Srl... -
Page 42: Mgm
LP’s after losing the format war against Columbia, so it’s difficult to say which curve was used for a certain record. The JOPLIN MKIII offers three choices, based on record’s year of cutting. RCA1 is the oldest. The newest, RCA Orthophonic, is the one on which the “New Orthopohonic”... -
Page 43: Brunswick
9.2.16. Brunswick Brunswick is a very old record company who mainly produced 78rpm’s. The curve offered with the JOPLIN MKIII is the one used for the 78rpm’s. 9.2.17. Columbia 1925, Columbia 1938 and Columbia England (CO25, CO38 and COLE) Columbia was very active cutting 78rpm’s before introducing the microgroove LP. -
Page 44: Ccir/Iec For 9.5Cm/S And 19Cm/S (3¾ Ips And 7½ Ips) And Ccir/Iec For 38Cm/S (15 Ips) (Iec1 And Iec3)
The signal is acquired, equalized in digital domain and sent to a computer for recording or to a DAC or digital amplifier for real-time listening. The ample bandwidth of the JOPLIN MKIII set to 96, 192 or 384kHz, and its high resolution are more than adequate to accommodate the tape recorder performance. -
Page 45: Interfacing A Cartridge Or A Tape Head
9.5. Interfacing a cartridge or a tape head The JOPLIN MKIII allows for setting its analogue input impedance between 10 Ohms and 50 kOhms thanks to a small knob on the rear panel (Fig. 2, 8) The broad setting range allows for accommodating all different cartridges in the market. - Page 46 M2Tech JOPLIN MKIII /32bit ANALOG-TO-DIGITAL CONVERTER REVISION P A – APRIL 2019 www.m2tech.biz Copyright © 2019, M2Tech Srl...
-
Page 47: Using A Power Supply Different From The Standard One
Should the user decide to use another power supply, the specifications listed in section 12 must be observed. 11. Cleaning the unit The JOPLIN MKIII should be cleaned with a soft, damp cloth. Do not use alcohol or other cleaning liquids to avoid damaging the unit. Copyright © 2019, M2Tech Srl... - Page 48 M2Tech JOPLIN MKIII /32bit ANALOG-TO-DIGITAL CONVERTER REVISION P A – APRIL 2019 www.m2tech.biz Copyright © 2019, M2Tech Srl...
-
Page 49: Technical Specifications
360x120x260mm (w x h x d, box) Weight:..........1.7kg (ADC only) 2.5kg (box) * USB and I S only. ** I S only. *** 32 bits are provided on USB and I S outputs only. Copyright © 2019, M2Tech Srl...
Need help?
Do you have a question about the JOPLIN MKIII and is the answer not in the manual?
Questions and answers