
Related Manuals for M2TECH YOUNG 384KHZ/32BIT


Summary of Contents for M2TECH YOUNG 384KHZ/32BIT
- Page 1 M2TECH YOUNG /32BIT DIGITAL-TO-ANALOG CONVERTER USER MANUAL REV. 1.1 – 2/2012...
- Page 2 WARNING: the information contained in this manual are considered to be reliable and accurate. M2Tech reserves the right to change or modify the information any time, without prior advice. It’s up to the customer to ensure that the manual being consulted is the latest version.
- Page 3 Even if getting music out of a PC or a Mac is nowadays quite simple, much harder is to obtain the best sonic performance from it, due to intrinsic limits in USB 1.1 audio standard and the implementation of digital audio interfaces in computers. Please visit M2Tech website (www.m2tech.biz) to find extensive literature about this topic.
-
Page 4: Table Of Contents
8. Configuring the player for WASAPI: an example ............22 8.1. FooBar ........................22 9. Using a power supply different from the standard one...........23 10. Cleaning the unit ......................23 11. Tips on using the USB input ..................23 12. Technical Specifications ....................24 Copyright © 2010, M2Tech Srl... -
Page 5: Unpacking And Placing The Unit
Avoid smoke, humidity, moisture and water from reaching the unit. Do not place the unit on thick carpets or inside a box or piece of furniture, or in close contact with curtains. Copyright © 2010, M2Tech Srl... -
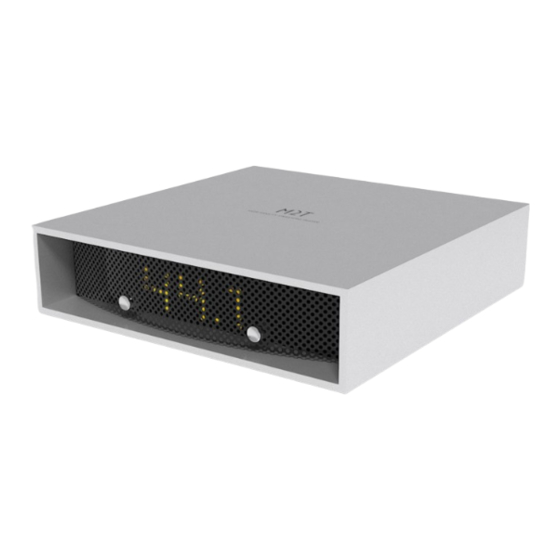
Page 6: Front Panel
3) Display. Multifunction three digits led matrix display. When selecting the input, it shows the selected input. During normal operation, it indicated the sampling frequency of the music program being decoded. A dash indicates the loss of lock. Copyright © 2010, M2Tech Srl... -
Page 7: Back Panel
10) USB 2.0 input. Connect to a PC or MacIntosh with an USB 2.0 compliant A-B cable. USB 2.0 B female connector. 11) Power supply input. Connect the wall adaptor provided with the unit or any other power supply capable of 15-18V/500mA. 5.5mm/2.1mm supply jack (female, tip is positive). Copyright © 2010, M2Tech Srl... -
Page 8: Connecting And Powering The Unit
If a driver hasn’t been installed on your computer, an automatic driver installation wizard may appear. Note: If you want to avoid the automatic driver installation, please connect the Young to the computer after manually installing the driver (see section 5). Copyright © 2010, M2Tech Srl... -
Page 9: Driver Installation
5. Driver installation 5.1. Obtaining the driver The drivers for the Young are available on the M2Tech website, in the download page (www.m2tech.biz/download.asp). Download the driver you need for your computer and operating system. Windows drivers are contained in zip files, Mac drivers are contained in dmg files encapsulated in zip files. - Page 10 Figure 4 Choose automatic installation (as recommended) and proceed to next step. Indicate the folder where you have previously unzipped the driver and proceed to installation. The window shown in figure 5 will appear: Figure 5 Copyright © 2010, M2Tech Srl...
-
Page 11: Manual Installation
32 bits operating systems, while the latter is for 64 bits operating systems. Without connecting the Young to the PC, double-click on either “setup64.exe” or “setup32.exe”, depending on your operating system: the driver will be installed in your PC. Copyright © 2010, M2Tech Srl... -
Page 12: Installing The Driver On A Mac
It only contains a pkg file. Double click on it to start driver installation. The window shown in figure 7 will appear. Figure 7 Click on the Continue button. The installation process will go on and the window in figure 8 will appear. Figure 8 Copyright © 2010, M2Tech Srl... - Page 13 The installation will continue until the final window will appear, announcing the successful installation of the driver. Figure 9 Click on Restart button to complete the installation process as indicated in figure 10. Figure 10 Copyright © 2010, M2Tech Srl...
-
Page 14: Unistalling The Driver
Connect the Young to the PC. Go to the control panel and launch the “System” utility, then select Hardware tab. Open the Peripehral Management window (see figure 11). You’ll find Young listed under Audio, Video and Game controllers. Figure 11 Copyright © 2010, M2Tech Srl... -
Page 15: Uninstalling The Driver On A Mac
Right-click to access the available actions. Select “Uninstall”. 5.4.3. Uninstalling the driver on a Mac Open a console, then type the following commands: sudo mv /System/Library/Extensions/Young.kext /tmp sudo touch /System/Library/Extensions sudo pkgutil --forget com.m2tech.driver Then, restart the Mac. Copyright © 2010, M2Tech Srl... -
Page 16: Configuring The Computer To Use The Young
Audio Peripherals utility. Select the Audio tab. In the Predefined Peripheral drop-down menu of the Playback area, select “KS M2Tech 384/32 DAC” (see figure 12). Figure 12 Then, select the “Voice” Tab. Again, select “Young Kernel Streaming” in the drop-down menu of the Playback area. -
Page 17: Configuring For Kernel Streaming With Windows Xp
For example, when using FooBar, with Young connected to the PC, go to the File/Preferences/Playback /Output tab and select “KS: M2Tech 384/32 DAC” as output device. Other players will require different settings (see section 7). -
Page 18: Configuring A Pc With Windows Vista Or Windows 7
Open control Panel and select Hardware and Sounds. Under Audio, click on Manage Audio Devices. The following windows will appear, in which Young is listed. Set Young as predefined device. Then, click on OK. Figure 13 Copyright © 2010, M2Tech Srl... -
Page 19: Configuring For Kernel Streaming With Windows Vista Or Windows 7
Windows 7. KS must be selected in the specific player you choose to use. For example, when using FooBar, with the Young connected to the PC, go to the File/Preferences/Playback /Output tab and select “KS: M2Tech 384/32 DAC” as output device. Other players will require different settings (see section 7). -
Page 20: Foobar
Download the zip file, extract the dll file and copy it into the Plugins folder inside Winamp main folder. With the Young connected, right-click on Winamp and select Display/Select Plug-ins. The Preferences window of Winamp will open (see figure 16). Copyright © 2010, M2Tech Srl... - Page 21 /32bit digital-TO-ANALOG CONVERTER REVISION 1.1 – FEBRUARY 2012 www.m2tech.biz Figure 16 Go to Plug-in/Output and select “Kernel Streaming Output”. Then click on Configure button. Choose YOUNG Kernel Streaming in the output device list (Figure 17). Figure 17 Copyright © 2010, M2Tech Srl...
-
Page 22: Configuring The Player For Wasapi: An Example
(click on Download). It is a zip folder which contains the DLL. Extract it from the zip and copy to the Components folder. Then, restart FooBar, go to the File/Preferences/Playback/Output window and set parameters as in figure 18. Figure 18 Copyright © 2010, M2Tech Srl... -
Page 23: Using A Power Supply Different From The Standard One
M2Tech for the Young. Should the user decide to use another power supply, the specifications listed in section 11 must be observed. -
Page 24: Technical Specifications
* all inputs except Toslink™. Depending on the fiber used and the transmitter’s power, 176kHz and 192kHz may be achieved with Toslink™, too, but this feature is not guaranteed. ** USB input only. *** 32 bits are accepted on USB input only. Copyright © 2010, M2Tech Srl...
Need help?
Do you have a question about the YOUNG 384KHZ/32BIT and is the answer not in the manual?
Questions and answers