Toa AM-1 Installation Manual
Mounting bracket
Hide thumbs
Also See for AM-1:
- Operating instructions manual (12 pages) ,
- Quick setup manual (10 pages) ,
- Installation manual (2 pages)
Advertisement
AM-1 MOUNTING BRACKET
with HEIGHT / ANGLE ADJUSTMENT
1. GENERAL DESCRIPTION
The AM-1 mounting bracket with height and angle adjustment is an optional kit for mounting
the AM-1 Real-time Steering Array Microphone on the ceiling. The mount is available in
Black (HY-AM1B-Q) or White (HY-AM1W-Q).
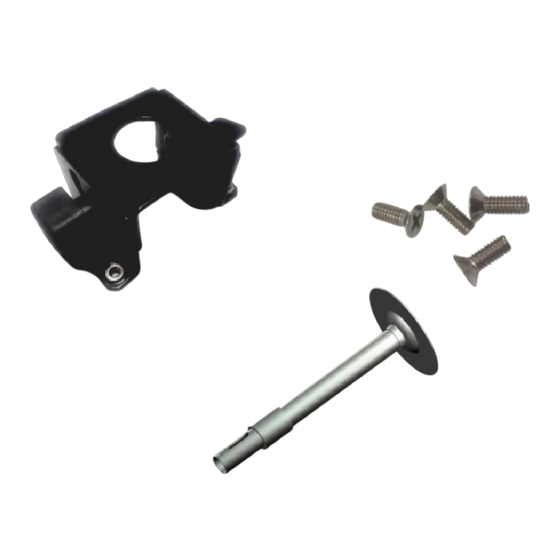
The HY-AM1x-Q includes:
ADJUSTABLE BRACKET
Installation Notes:
*
Installation of the AM-1 with this product requires the use of MB-AM1B-Q (black) or MB-AM1W-Q
(white) Microphone Bracket (sold separately).
**
The mounting screws and wall anchors are provided with the MB-AM1 Microphone Bracket.
Suspended from Hard Ceiling:
Step 1: Line up the bottom of adjustable pole to surface, mark hole locations and drill holes
(1/4 inch (approx. 6mm) diameter) for plastic wall anchors.
Step 2: Insert anchors from AM-1 Mounting Bracket into holes until flush.
Step 3: Align pole flange on surface, use #10 flat head screws to secure in place by tightening screws.
Step 4: Align AM-1 Microphone Bracket (not shown) to the angle adjusting bracket, use the
M4 screws to secure the microphone bracket to the adjustable bracket.
M4 SCREWS (X4)
TOA Electronics, Inc.
INSTALLATION MANUAL
HY-AM1W-Q
ADJUSTABLE POLE
HY-AM1B-Q
Advertisement
Table of Contents

Related Manuals for Toa AM-1


Summary of Contents for Toa AM-1
-
Page 1: Installation Manual
HEIGHT / ANGLE ADJUSTMENT HY-AM1W-Q 1. GENERAL DESCRIPTION The AM-1 mounting bracket with height and angle adjustment is an optional kit for mounting the AM-1 Real-time Steering Array Microphone on the ceiling. The mount is available in Black (HY-AM1B-Q) or White (HY-AM1W-Q). - Page 2 Step 5: Turn the knurled fastener on pole to adjust height and rotate bracket to proper orientation. After Microphone is installed use the thumb screw fasteners to adjust the angle. Step 6: With the Microphone Bracket secured, follow instructions from the AM-1 Microphone Bracket to install the Microphone to the mounting bracket (see step 8).
Need help?
Do you have a question about the AM-1 and is the answer not in the manual?
Questions and answers