
Related Manuals for Brecknell C3236


Summary of Contents for Brecknell C3236
- Page 1 User Manual Model: C3236 Checkweigher AWT35-501815 Issue AB C3236_u_en_501815.docx Page 1...
-
Page 2: Table Of Contents
Table of Contents 1. General information and Warnings page 5 FCC Declaration of Compliance - Déclaration de conformité..……...…………..…... Training - Formation……………………..………………………………...……………... Battery Safe Disposal - Élimination sécurisée des batteries……...………………….. Routine Maintenance - Entretien de routine……………………………………..…….. Cleaning the Machine - Nettoyage de la machine………………………….…………. Sharp Objects - Objets tranchants………………………….………………...…….. - Page 3 4. Menus page 12 User Menu……………………..……………………………………….………….………. User Menu Levels………………….……………………….………………………… User Functions Descriptions [UF].………………….……….……………………… Supervisor Menu..………………………….……………..…………………..…………. 13 Supervisor Menu Levels……..……….……………………………………………… Supervisor Functions Descriptions [LF].…………..….……………………….…… Quick Calibration Menu……..………………………..……………………….…………. Quick Calibration Menu Levels…...…………….…………………………………… 15 Quick Calibration Functions Descriptions [ECF]…..………………….…………… 15 5. Scale Configuration [LF 2] page 16 6.
- Page 4 Manual revision history Current Issue Date Created Details of Changes Draft Jan. 2019 AWT35-501815 Issue AB C3236_u_en_501815.docx Page 4...
-
Page 5: General Information And Warnings
1. General Information and Warnings 1.1. FCC Declarations of Compliance - FCC Déclaration de conformité United States This equipment has been tested and found to comply with the limits for a Class A digital device, pursuant to Part 15 of the FCC Rules. These limits are designed to provide reasonable protection against harmful interference when the equipment is operated in a commercial environment. -
Page 6: Training - Formation
1.4. Training - Formation Do not attempt to operate or complete any procedure on a machine unless you have received the appropriate training or read the instruction books. Ne pas tenter d’utiliser la machine ou lui appliquer une quelconque procédure sans avoir reçu une formation adaptée ou lu les manuels d’instruction. -
Page 7: Introduction
2. Adaptor plus plug adaptors 3. Weight Platter 2.2. General Installation Guidelines To get the best performance from the scale try to place the C3236 in a location that will not degrade its accuracy. • Avoid extremes of temperature. Try to avoid placing the scale in direct sunlight or near air vents. -
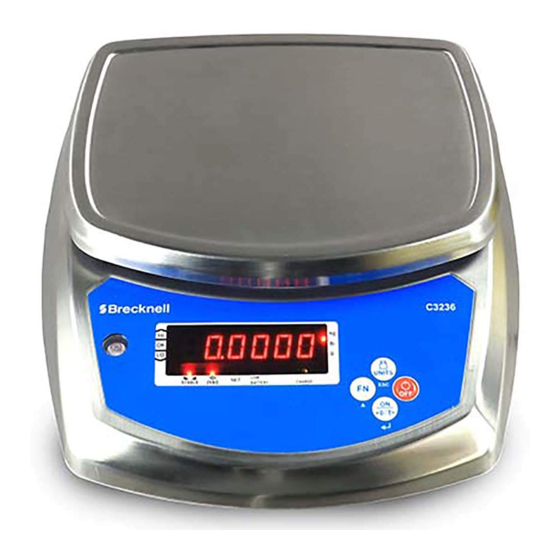
Page 8: Front Panel
Figure 1 - C3236 underside view. 2.5. Front Panel Figure 2 shows the front panel of the unit. It includes the display window, the annunciators arrayed around the display, the four keys, and the bubble level. -
Page 9: Operation Keys
2.5.2. Operation Keys Keys are shown below along with their functions. Some keys have secondary functions. - Press the UNITS key to scroll through the active units of measure. - In Menu mode: It aborts a numeric entry and acts as an ESCAPE key for menu navigation ( Press and hold the OFF key to turn off the scale. -
Page 10: Scale Operation
4. Remove item from the scale platform and repeat steps 3 and 4 for each item to be checkweighed. Figure 3 - C3236 limits annunciators: LO, OK, HI. Checkweighing limits use the unit of measure the limits were set in. -
Page 11: Setting The Checkweighing Limits
3.3.1. Setting the Checkweighing Limits When the scale is ON, press FN (▲) key; UF-1 will be displayed. Press FN (▲) key; UF-2 will be displayed. iii. Press ON/ZERO/TARE (↵) key; To enter or edit the LO limit value, scroll through the displayed digits by using the ON/ZERO/TARE (↵) key. -
Page 12: Menus
4. Menus There are three menus that allow to configure, enable or execute specific functions or options. page • User Menu UF – 1 ~ 11 • Supervisor Menu LF 1 ~ 8 • Quick Calibration Menu ECF – 1 ~ 3 4.1. -
Page 13: Supervisor Menu
UF-3 Auto Power-Off: use this to set the length of time before the scale automatically turns off if not being used. Values can be set between 01 and 99 minutes. Factory default: AoFF 10 (10min). Auto Power-OFF disabled when AoFF 00 UF-4 Stand by: a battery power saving function to turn off the display power but not turn off the scale. -
Page 14: Supervisor Functions Descriptions [Lf]
4.2.2. Supervisor Functions Descriptions [LF] There are 8 functions. LF 1 Calibration: see chapter 6. Calibration on page 17 for a detailed procedure. LF 2 Configuration: use this item to configure system parameters, specific sections of the operating modes. See chapter 5. Scale Configuration at page 16. LF 3 Linearization: use this to add 1-3 linearization points for the scale equivalent to 0, 1/3, 2/3 and 3/3 of the max capacity. -
Page 15: Quick Calibration Menu
4.3. Quick Calibration Menu See chapter 6. Calibration on page 17 for a detailed procedure. NOTE: Default calibration units are in kg. To change this to lb please refer to Scale configuration LF 2 on page 16. 4.3.1. Quick Calibration Menu Levels [ECF] Navigate the menus and increase a numeric value by pressing FN (▲) key. -
Page 16: Scale Configuration [Lf 2]
5. Scale Configuration [LF 2] Enter the function LF 2 to set the units, range mode, calibration units, decimal position of the separator and division size. Navigate the menus and increase a numeric value by pressing FN (▲) key. Use ON/ZERO/TARE (↵) key to confirm and/or move to the next option or numeric value position. -
Page 17: Calibration
6. Calibration It is recommended to perform only the very first calibration following the function LF 1 in the Supervisor Menu. To prevent any unintentional change of the scale configuration, all the subsequent Calibrations should be performed entering the Quick Calibration Menu [ECF]. Both procedures above, must be conducted following the steps on the 6.1 Scale Calibration Procedure. -
Page 18: Replacement Parts
7. Replacement Parts Part number Description AWT25-502472 Power supply universal with USA-UK & EU plug adaptors (100 to 240VAC 50/60 Hz output: 12V 1000mA with special water proof 2 pin connector) Replacement battery (DJW6-4.0 6V4.0AH lead acid battery) AWT20-509288 Replacement feet Kit (4 feet and lock nuts) AWT35-501815 Issue AB C3236_u_en_501815.docx... - Page 19 AWT35-501815 Issue AB C3236_u_en_501815.docx Page 19...
Need help?
Do you have a question about the C3236 and is the answer not in the manual?
Questions and answers