Samsung MWR-WE11N User Manual
Wired remote controller
Hide thumbs
Also See for MWR-WE11N:
- Scheduling instructions (10 pages) ,
- Installation manual (24 pages) ,
- Installation manual (24 pages)
Table of Contents
Advertisement
Air Conditioner
User manual
Wired remote controller MWR-WE11N
• Thank you for purchasing this Samsung Product.
• Before operating this unit, please read this user manual carefully and retain it for future reference.
DB68-06362A-01
NASA_Wired Remote Control_MWR-WE10N_EN_IB_DB68-06362A-01.indd 1
2016-08-01 오전 9:17:53
Advertisement
Table of Contents

Related Manuals for Samsung MWR-WE11N


Summary of Contents for Samsung MWR-WE11N
- Page 1 Air Conditioner User manual Wired remote controller MWR-WE11N • Thank you for purchasing this Samsung Product. • Before operating this unit, please read this user manual carefully and retain it for future reference. DB68-06362A-01 NASA_Wired Remote Control_MWR-WE10N_EN_IB_DB68-06362A-01.indd 1 2016-08-01 오전 9:17:53...
-
Page 2: Table Of Contents
Contents Preparation Safety Precautions ............................................... 4 Part Names ................................................6 Air Conditioner Basic Operation of Air Conditioner ......................................10 Air Flow .................................................. 12 Indoor Temperature Checking Function ....................................13 Blade Selection ..............................................13 Quiet/Sleep Operation ............................................ 14 Motion Detect Sensor ............................................15 Outdoor Air Intake ............................................. - Page 3 Ventilator(ERV) Basic Operation of Ventilator(ERV) ......................................18 Energy Saving Operation ..........................................20 Clean Up ................................................20 S-Plasma Ion ................................................ 21 External Interconnection Control ......................................21 Range Hood Interconnection Control ..................................... 21 Advanced Instruction Weekly Schedule Setting ..........................................22 Setting Holidays during the Weekly Schedule ..................................25 Canceling a Weekly Schedule ........................................
-
Page 4: Preparation
PREPARATION Safety Precautions This content is intended to protect the user’s safety and prevent property damage. Please read it carefully for correct use of the product. WARNING Hazards or unsafe practices that may result in severe personal injury or death. CAUTION Hazards or unsafe practices that may result in minor personal injury or property damage. - Page 5 FOR OPERATION WARNING If the appliance generates a strange noise, a burning smell or smoke, stop the operation immediately and contact your nearest service center. Failing to do so may result in electric shock or fire. To reinstall the air conditioner, please contact your nearest service center. Failing to do so may result in problems with the product, water leakage, electric shock, or fire.
-
Page 6: Part Names
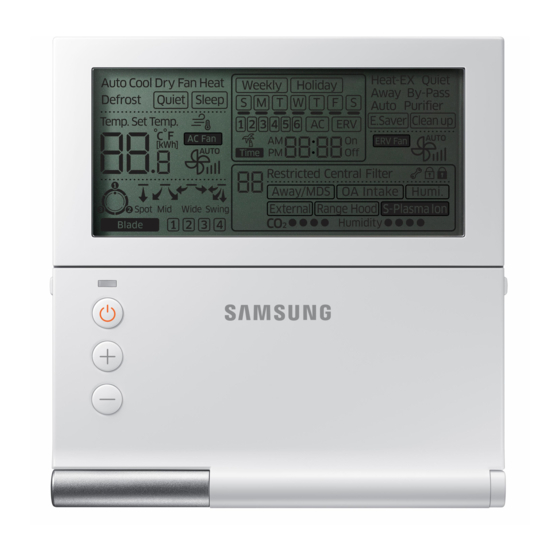
Part Names Display ④ ⑤ ⑧ ⑨ ⑩ ⑪ ⑫ ⑬ ⑭ ① ② ⑮ ③ ⑯ ⑲ ⑳ ⑥ ⑦ ⑰ ⑱ LED Indicator (Green : Normal / Red : Need to be checked) Operation On/Off button Temperature Setting Button •... - Page 7 Classification Indication Function ① Displays air conditioner operation ② Displays Quiet/Sleep operation ③ Displays indoor temperature/set temperature/power consumption Conditioner ④ Displays discharge temperature control Related Information ⑤ Displays AC fan speed ⑥ Displays air flows ⑦ Displays blade selection ⑧ Weekly schedule/Holiday setting displays ⑨...
- Page 8 Part Names Buttons ⑯ ⑫ ⑧ ⑬ ② ① ④ ⑰ ③ ⑲ ⑤ ⑥ ⑦ ⑩ ⑪ ⑨ ⑭ ⑱ ⑳ ⑮ Classifi cation Button Function Operation On/Off ① Turns the air conditioner power On/Off button ②...
- Page 9 Classifi cation Button Function Selects when no one is detected in an indoor area, when the air Away / Motion detect ⑨ conditioner needs to be turned off automatically, when the AWAY sensor button operation is set; conditioner related ⑩ Outdoor air intake Selects the MINI AHU indoor unit Outdoor intake function information...
-
Page 10: Air Conditioner
AIR CONDITIONER Basic Operation of Air Conditioner Basic operations can be selected after pressing the Mode button. Auto This function allows you to automatically adjust the temperature and the fan speed to maximize your comfort. • When the indoor temperature is very high, the device will produce a strong, cold wind. When the temperature cools down, then weaker wind will be produced. - Page 11 Press the button to begin operating the air conditioner. Press the button to select the desired operation. Press the button to select a fan speed. Auto (Auto) Cool (Low) , (Medium), (High), (Auto) (Auto) (Low) , (Medium), (High) Heat (Low) , (Medium), (High), (Auto)
-
Page 12: Air Flow
Air Flow This function allows you to select the desired air fl ow direction. Press the Air Flow button to change the air fl ow direction. For the models that have no function of selecting air fl ow direction. Press the Air Flow button to move the air fl ow up and down. -
Page 13: Indoor Temperature Checking Function
Indoor Temperature Checking Function This function allows you to check the current indoor temperature. Press the Room Temp. button to check the current indoor temperature. The current indoor temperature will be displayed. 3 seconds after displaying the indoor temperature, the set temperature ... -
Page 14: Quiet/Sleep Operation
Quiet / Sleep Operation Quiet operation reduces noise of the operation and with sleeping operation you can have the air conditioner turn off automatically after six hours without stopping the operation in the middle of the night. Press the Quiet/Sleep button to select the desired operation. If the air conditioner has both quiet and sleep operation function. -
Page 15: Motion Detect Sensor
Motion Detect Sensor Automatically turn off the power when there is nobody in the room. Press the Away/MDS button to use the motion detection function. will be displayed and the motion detection function will begin operation. Press the Away/MDS button one more time. Cancel When the wired remote controller is connected with a duct will be displayed and AWAY operation will operate. -
Page 16: Humidifying Operation
Humidifying Operation This function allows you to use the humidifying operation of MINI AHU indoor unit when the Wired Remote Controller is connected to MINI AHU indoor unit. Increase the moisture of dry indoor air and adjust the indoor humidity for a more refreshing indoor environment. -
Page 17: Power Consumption Check
Power Consumption Check Displays the amount of power consumption. When the air conditioner is on Press the [kWh] button once Press the [kWh] button twice The power consumption is displayed. The temperature is displayed. When pressing the [kWh] button once •... -
Page 18: Ventilator(Erv)
VENTILATOR (ERV) Basic Operation of Ventilator(ERV) Basic operations can be selected by pressing the Mode button. Heat-EX Energy loss is minimized by recovering energy exhausted when indoor heating or cooling. Quiet Reduce the noise generated from Ventilator(ERV) operation. Away This function allows you to operate the Ventilator(ERV) while you are away from home. •... - Page 19 Press the button to begin the Ventilator(ERV) operation. Press the button to select the desired operation. • The following operation can only take place if all the options for your Ventilator(ERV) are selected. (When you install the Wired Remote Controller, the setting is available.) Press the button to change the fan speed.
-
Page 20: Energy Saving Operation
Energy Saving Operation Reduce your power consumption and save money on your electric bill. Press the E.Saver button to select Power Saving Operation. When the ventilator (ERV) and the air conditioner is connected together This function compares the outdoor and indoor temperatures, and then ... -
Page 21: S-Plasma Ion
S-Plasma Ion Using the S-Plasma Ion function, you can remove virus, fungi, and even active oxygen. If the S-Plasma Ion function is installed in your ventilator(ERV) or indoor unit, then will be displayed and the S-Plasma Ion function will begin operation. External Interconnection Control When connecting an ventilator(ERV) to the indoor unit of the air conditioner, ... -
Page 22: Advanced Instruction
ADVANCED INSTRUCTION Weekly Schedule Setting You can select a day and time to start and stop operation. 1. Press the Schedule button. (Timer) will be displayed. At that time, press the [∧]/[∨] buttons to select ‘Weekly’ from the option of ‘Weekly’ and ‘Holiday’ . 2. - Page 23 6. After pressing the [>] button, select the 'Hour.' Press the [∧]/[∨] button to select the hour setting for the time. 7. After pressing the [>] button, select the 'Minute.' Press the [∧]/[∨] button to select the minute setting for the time. ...
- Page 24 Weekly Schedule Setting 11. After pressing the [>] button, select a fan speed. You can only use this for air conditioner on-operation scheduling or when the operational mode is in Cool/Fan/Heat. Press the [∧]/[∨] buttons repeatedly to toggle the fan speed in order of ...
-
Page 25: Setting Holidays During The Weekly Schedule
Setting Holidays during the Weekly Schedule You can select holidays during the weekly schedule. If you set the holiday, the set weekly schedule function will not operate. 1. Press schedule button. (Timer) will be displayed, press [∧]/[∨] button to select ‘Holiday’ from the ... -
Page 26: Canceling A Weekly Schedule
Canceling a Weekly Schedule You can cancel your weekly schedule. 1. Press the Schedule button. (Timer) is displayed and (Weekly) will blink. 2. After pressing the [>] button, select 'Day' to cancel. You can press the [∧]/[∨] button to select a scheduled day. ... -
Page 27: Initializing A Weekly Schedule
Initializing a Weekly Schedule You can initialize all the weekly schedules set in your Wired Remote Controller. 1. Press the Delete button for fi ve seconds. All the weekly schedule settings will be erased. • You can’t restore your old settings after deleting the weekly schedule by pressing the Delete button, so be careful when you use this function. -
Page 28: Setting Additional User Functions
SETTING ADDITIONAL USER FUNCTIONS How to Set the Additional User Functions SEG Used Main menu Sub-menu 1 2 3 1. If you want to set the detailed settings, press the User Set button. You will enter the User Set mode, and the [Main Menu] will be displayed. ... - Page 29 Main Functions SEG Used Default Range Unit Menu menu Auto stop time setting/checking 0~12 hours 1 hour 16~30 °C (61~86 °F) * Nordic models (AC Lower Limit 8(47) 1 °C( 1°F) ✴✴✴✴ ✴ °C °C Temp limits [°C(°F)] 18~30 °C (65~86 °F) * Nordic models (AC Upper Limit 30(86)
- Page 30 How to Set the Additional User Functions Current Time Setting (Example) 1. Press the User Set button. (Main Menu) will be displayed, and you can press the [∧]/[∨] buttons to select No. 4, which will set the current time. 2.
- Page 31 7. In the sub-menu, select 'day, AM/PM, hour, minute' . Press the [∧]/[∨] buttons to select no. 2. You can set the 'day, AM/PM, hour, minute' . 8. Press the [>] button to select the 'Day' . Press the [∧]/[∨] buttons to select day (Sun~Sat). ...
- Page 32 NASA_Wired Remote Control_MWR-WE10N_EN_IB_DB68-06362A-01.indd 32 2016-08-01 오전 9:18:27...
Need help?
Do you have a question about the MWR-WE11N and is the answer not in the manual?
Questions and answers