Samsung MWR-WE13N User Manual
Air conditioner wired remote controller
Hide thumbs
Also See for MWR-WE13N:
- Quick reference technical handbook (83 pages) ,
- Installation manual (24 pages) ,
- User manual (40 pages)

Related Manuals for Samsung MWR-WE13N


Summary of Contents for Samsung MWR-WE13N
- Page 1 Air conditioner User manual Wired remote controller MWR-WE13N Thank you for purchasing this Samsung Product. Before operating this unit, please read this user manual carefully and retain it for future reference. DB68-07604A-00...
-
Page 2: Table Of Contents
Contents Safety Information Safety Information At a Glance Remote Controller Overview Display Buttons Power Smart Features Remote Controller Operation Operation modes Controlling temperature Controlling fan speed Controlling air flow direction Cooling Operation Cool mode Wind-Free Cooling function Dehumidifying Operation Dry mode Air Purifying Operation S-Plasma Ion function Heating Operation... - Page 3 Motion Detection Feature Indirect function with Motion detection feature Direct function with the Motion detection feature Ventilator (ERV) Ventilation (ERV) Operation Operation modes Controlling the fan speed Energy-Saving function Clean Up function S-Plasma Ion function External Interconnection Control Range Hood Interconnection Control Advanced Features Schedule Setting Weekly Schedule Setting...
-
Page 4: Safety Information
Safety Information This content is intended to protect the user’s safety and prevent property damage. Please read it carefully for correct use of the product. WARNING Hazards or unsafe practices that may result in severe personal injury or death. CAUTION Hazards or unsafe practices that may result in minor personal injury or property damage. - Page 5 FOR OPERATION WARNING If the appliance generates a strange noise, a burning smell or smoke, unplug the product immediately and contact your nearest service centre. Failing to do so may result in electric shock or fire. To reinstall the air conditioner, please contact your nearest service cetere. Failing to do so may result in problems with the product, water leakage, electric shock, or fire.
-
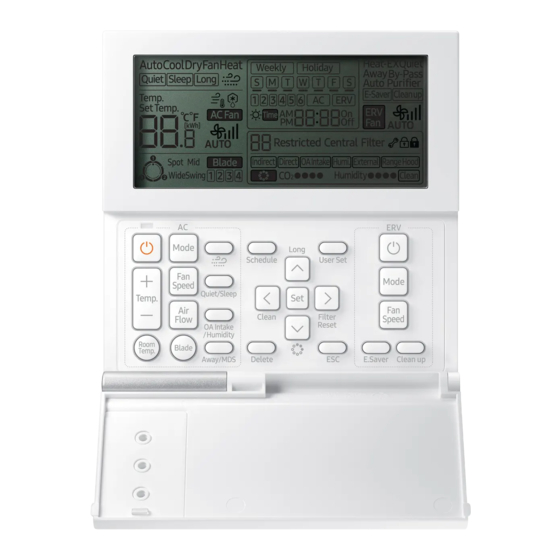
Page 6: At A Glance
Remote Controller Overview Display LED Indicator (Green : Normal / Red : Need to be checked) Operation On/Off button Temperature Setting Button NOTE Without opening the cover of your wired remote controller, you can turn the air-conditioner power on/off or set the desired temperature. 6 English... - Page 7 Classification Indication Function Displays air conditioner operation Displays Quiet/Sleep/Long/Wind-Free Cooling operation Displays indoor temperature/ set temperature Air Conditioner Displays discharge temperature control/defrosting operation Related Information Displays AC fan speed Displays air flow directions Displays blade selection Weekly schedule/Holiday setting displays Displays current day( ) or scheduled day(_) Schedule Displays scheduled number...
-
Page 8: Buttons
Remote Controller Overview Buttons English... - Page 9 Classification Button Function Operation On/Off button Turns the air conditioner power On/Off Mode button Selects the desired air conditioner operation Temperature setting Sets the desired temperature button Fan speed button Changes the air conditioner’s fan speed Air Flow button Changes the air flow direction Air conditioner related Room temperature...
- Page 10 Remote Controller Overview Classification Button Function Common S-Plasma Ion button Selects S-Plasma Ion function function related information Long button Selects Long reach function Operation On/Off button Turns the Ventilator(ERV) On/Off Mode button Selects the desired operation for the Ventilator (ERV) Ventilator (ERV) related Fan Speed button...
-
Page 11: Power Smart Features
Remote Controller Operation You can use the air conditioner easily by selecting a mode and then by controlling the temperature, fan speed, and air flow direction. Operation modes You can change the current mode between Auto, Cool, Dry, Fan, and Heat by pressing the button. -
Page 12: Controlling Air Flow Direction
Remote Controller Operation Controlling air flow direction You can control air flow direction. In operation For the Indoor units that does not support air flow direction control When you press the button, the air flow blades move up and down. When the air flow blade reaches the desired position, press the button again to set the air flow direction. -
Page 13: Cooling Operation
Cooling Operation The smart and powerful cooling functions of the Samsung air conditioner keep an enclosed space cool and comfortable. Cool mode Use the Cool mode to stay cool in hot weather. Select Cool. NOTE For comfort, keep the temperature difference between the indoor and outdoor air within 5 °C (9 °F) in the Cool mode. - Page 14 Cooling Operation If you select the Wind-Free Cooling function in the Fan mode, the compressor stops working so that cool air does not come out. However, mild breeze comes out and starts to clean the air in the room. During the Wind-Free Cooling operation, the cold air may be intermittently weakened depending on the temperature and humidity in the room.
-
Page 15: Dehumidifying Operation
Dehumidifying Operation The dehumidifying function of the Samsung air conditioner keeps an enclosed space dry and comfortable. Dry mode Use the Dry mode in rainy or humid weather. Select Dry. NOTE You cannot change fan speed in the Dry mode. -
Page 16: Air Purifying Operation
Air Purifying Operation The air purification function of the Samsung air conditioner keeps the air in an enclosed space purified. S-Plasma Ion function Use the S-Plasma Ion function to purify your room with negative ions produced by the air conditioner. This function is available in the Auto, Cool, Dry, Fan, and Heat modes. -
Page 17: Heating Operation
Heating Operation The heating functions of the Samsung air conditioner keep an enclosed space warm and comfortable. Heat mode Use the Heat mode to stay warm. Select Heat. NOTE While the air conditioner warms up, the fan may not operate for a while at the beginning to prevent cold wind. -
Page 18: Quick Smart Features
Quick Smart Features There is a variety of useful functionality provided by the Samsung air conditioner. Auto mode Use the Auto mode when you want the air conditioner to automatically control the mode (Heat or Cool). The air conditioner will provide the most comfortable atmosphere that it can. -
Page 19: Indoor Temperature Checking Function
Indoor temperature checking function Use this function to check the current indoor temperature. In operation NOTE 3 seconds after displaying the indoor temperature, the set temperature appears. Indoor unit temperature is displayed by 0.5 °C units. Depending on the installation location of your wired remote controller, the current indoor temperature can be different. -
Page 20: Quiet And Sleep Function
Quick Smart Features Quiet and Sleep function Quiet function reduces noise of the operation and with sleeping operation you can have the air conditioner turn off automatically after six hours without stopping the operation in the middle of the night. In operation For the air conditioner that has both the Quiet and Sleep functions: Auto... -
Page 21: Outdoor Air Intake And Humidity Function
Outdoor air intake and Humidity function When a wired remote controller is connected to the MINI AHU indoor unit, you can use the Outdoor air intake or Humidity function of the MINI AHU indoor unit. In operation For the air conditioner that has both the Outdoor air intake and Humidity functions: repeated. -
Page 22: Clean Function
Quick Smart Features Clean function Use the Clean function to remove moisture from the inside of the air conditioner for preventing propagation of fungi, bacteria, etc. In operation NOTE Depending on the condition of the indoor unit, the Clean operation stops after running for 30 seconds to 20 minutes. -
Page 23: Motion Detection Feature
Motion Detection Feature To use the Motion detection feature, the air conditioner must be equipped with a Motion Detection Kit, which is sold separately. If the Motion Detection Kit is already installed, the motion detection feature must be enabled so that it can operate normally. (For more information, refer to the Motion Detection Kit manual.) When Direct or Indirect is displayed on the remote controller display, the Motion detection feature changes the air conditioner to energy-saving mode if there are no people in the room. -
Page 24: Ventilator (Erv)
Ventilation (ERV) Operation Ventilation (ERV) Operation Operation modes Only when you select all the options of ventilator (ERV), you can use the following operation mode: (Available the wired remote controller is installed) Mode Description Display Energy loss is minimized by Heat-EX recovering energy exhausted when indoor heating or cooling. -
Page 25: Controlling The Fan Speed
Mode Description Display This can simultaneously operate Heat-EX/ the Heat-EX mode with Purifier Purifier mode. This function can clean the air By-Pass/ through an intake of fresh external Purifier air. This function can automatically Auto/ perform Ventilator (ERV) and Purifier cleaning at the same time. -
Page 26: Energy-Saving Function
Ventilation (ERV) Operation Energy-Saving function Reduce your power consumption and save money on your electric bill. In operation When the ventilator (ERV) and the air conditioner is connected together This function compares the outdoor and indoor temperatures, and then automatically selects Heat-EX operation or By-Pass operation. When the ventilator (ERV) is installed individually (Setting On/Off alternating operation) The ventilator (ERV) will turn On and Off in Quiet (Low) mode... -
Page 27: S-Plasma Ion Function
S-Plasma Ion function Use the S-Plasma Ion function to purify your room with negative ions produced by the ventilator(ERV). In operation NOTE If the S-Plasma Ion function is installed in your ventilator(ERV) or indoor unit, then is displayed and the S-Plasma Ion function will begin operation. -
Page 28: Advanced Features
Schedule Setting Weekly Schedule Setting You can select a day and time to start and stop operation. 1 Press the Schedule button. (Timer) is displayed. At that time, press the [ ]/[ ] buttons to select ‘Weekly’ from the option of ‘Weekly’ and ‘Holiday’ . 2 Press the [ ] button and select the 'Day' for your schedule. - Page 29 5 After pressing the [ ] button, select 'AM/PM.’ Press the [ ]/[ ] buttons to select AM or PM for the time. 6 After pressing the [ ] button, select the 'Hour.’ Press the [ ]/[ ] button to select the hour setting for the time. 7 After pressing the [ ] button, select the 'Minute.’...
- Page 30 Schedule Setting 11 After pressing the [ ] button, select a fan speed. You can only use this for air conditioner on-operation scheduling or when the operational mode is in Cool/Fan/Heat. Press the [ ]/[ ] buttons repeatedly to toggle the fan speed in or Dry operation is selected, then you can’t set the fan speed.
-
Page 31: Setting Holidays During The Weekly Schedule
Setting Holidays during the Weekly Schedule You can select holidays during the weekly schedule. If you set the holiday, the set weekly schedule function will not operate. 1 Press the Schedule button. (Timer) is displayed. At that time, press the [ ]/[ ] buttons to select ‘Weekly’... -
Page 32: Canceling A Weekly Schedule
Schedule Setting Canceling a Weekly Schedule You can cancel your weekly schedule. 1 Press the Schedule button. (Timer) is displayed and (Weekly) will blink. 2 After pressing the [ ] button, select 'Day' to cancel. You can press the [ ]/[ ] button to select a scheduled day. 3 After pressing the [ ] button, select a 'schedule number' to cancel. -
Page 33: Initializing A Weekly Schedule
Initializing a Weekly Schedule You can initialize all the weekly schedules set in your wired remote controller. 1 Press the Delete button for five seconds. All the weekly schedule settings is erased. NOTE You can’t restore your old settings after deleting the weekly schedule by pressing the Delete button, so be careful when you use this function. -
Page 34: User Set Function
Setting Additional User Functions How to Set the Additional User Functions SEG Used Main menu Sub menu 1 2 3 4 1 If you want to set the detailed settings, press the User Set button. You will enter the User Set mode, and the [Main Menu] is displayed. 2 Refer to the wired remote controller's User Set list on the next page to select the desired menu. - Page 35 Using the [ ]/[ ] buttons, change the settings and press the [ ] button to move to the next setting. Press the Set button to save the setting and exit to the sub-menu setting screen. Press the ESC button to exit to normal mode. NOTE While setting the data, you can use the [ ]/[ ] buttons to set the range of SEG used.
- Page 36 Setting Additional User Functions Main Function SEG Used Default Range Unit menu menu Backlight Time Setting/ Checking 1, 2 0~30 sec 1 sec Use of LED (Green) (Y/N) 0-No use, 1-Use Use of LED (Red) (Y/N) 0-No use, 1-Use Turning on or off the Air purity level 0-Off, 1-On lighting function of the indoor unit Ventilator...
-
Page 37: Current Time Setting (Example)
Current Time Setting (Example) 1 Press the User Set button. (Main Menu) is displayed, and you can press the [ ]/[ ] buttons to select No. 4, which will set the current time. 2 Press the [ ] button to select 'Year, Month, Date' in the [Sub- menu]. - Page 38 Setting Additional User Functions 8 Press the [ ] button to select the 'Day'. Press the [ ]/[ ] buttons to select day (Sun~Sat). 9 Press the [ ] button to select 'AM or PM'. Press the [ ]/[ ] buttons to toggle between AM and PM. 10 Press the [ ] button to select the 'Hour'.
- Page 39 Memo English...
Need help?
Do you have a question about the MWR-WE13N and is the answer not in the manual?
Questions and answers