
Related Manuals for Check Point 21400 VSX G-50


Summary of Contents for Check Point 21400 VSX G-50
- Page 1 Check Point 21400 VSX R67.10 Getting Started Guide 24 November 2011 P/N 704712 Models: G-50...
- Page 2 Check Point. While every precaution has been taken in the preparation of this book, Check Point assumes no responsibility for errors or omissions. This publication and features described herein are subject to change without notice.
-
Page 3: Important Information
Added Confirming the Build Numbers (on page 14) 9 October 2011 First release of this document Feedback Check Point is engaged in a continuous effort to improve its documentation. Please help us by sending your comments (mailto:cp_techpub_feedback@checkpoint.com?subject=Feedback on Check Point 21400 VSX R67.10 Getting Started... -
Page 4: Health And Safety Information
Welcome Health and Safety Information Note - The Check Point Check Point 21400 VSX correlate with the following model numbers for certification purposes: G50. Read the following warnings before setting up or using the appliance. Warning - Do not block air vents. A minimum 1/2-inch clearance is required. - Page 5 Welcome included in the manual in that alternative form, provided the user can reasonably be expected to have the capability to access information in that form. Product Disposal This symbol on the product or on its packaging indicates that this product must not be disposed of with your other household waste.
-
Page 6: Table Of Contents
Selecting Cluster Options ................13 Completing the Configuration .................14 Confirming the Build Numbers ................14 Check Point 21400 VSX Front and Rear Panel ............ 15 Check Point 21400 VSX Front Panel ..............15 Check Point 21400 VSX Front Panel LEDS ...........16 Managing Check Point 21400 VSX Using the LCD Panel ......17 Line Cards .....................18... -
Page 7: Introduction
Shipping Carton Contents Welcome Thank you for choosing Check Point 21400 VSX. We hope that you will be satisfied with this system and our support services. Check Point products provide your business with the most up to date and secure solutions available today. -
Page 8: Important Solutions
VSX incorporates the same patented Stateful Inspection and Application Intelligence technologies used in the Check Point Security Gateway product line. It runs on high speed platforms (known as VSX Gateways) to deliver superior performance in high-bandwidth environments. Administrators manage VSX via a Security Management server or a Multi-Domain Security Management, delivering a unified management architecture that supports enterprises and service providers. - Page 9 Shipping Carton Contents Item Description Cables 2 power cords Getting Started Guide Documentation User License Agreement Introduction Page 9...
-
Page 10: Mounting The Appliance In A Rack
Chapter 2 Mounting the Appliance in a Rack To learn how to mount the Check Point 21400 VSX in the rack, see the 21000 Appliances Rack Mounting Guide (http://supportcenter.checkpoint.com/file_download?id=12318). Page 10... -
Page 11: Configuring Check Point 21400 Vsx
3. Use the First Time Wizard to configure the appliance. 4. Configure VSX in SmartDashboard and install a policy. Note - Check Point 21400 VSX must be managed by a Security Management Server or Multi-Domain Security Management as described in the VSX NGX R67 Administration Guide (http://supportcontent.checkpoint.com/documentation_download?ID=10165). -
Page 12: Initial Configuration
Initial Configuration Initial Configuration Logging in for the First Time Check Point 21400 VSX includes a First Time Wizard to help you configure the initial settings for the appliance. To log in and start the First Time Wizard: 1. Connect to the appliance’s Serial console using the RJ45/D subminiature cable. -
Page 13: Setting Network And Time/Date Properties
1. In the Time and Date Configuration window, set the time zone, date, and local time. 2. Enter n to continue. 3. Enter n again and continue with the Check Point Configuration Program. 4. Read the license agreement. 5. Enter y. -
Page 14: Completing The Configuration
SecurePlatform NGX R67.10 Build 012. gated_ver 650000001 Dynamic Routing fw ver -k This is Check Point VPN-1 VSX NGX R67.10 - build 006. kernel: NGX R67.10 - Build 006. sim ver -k This is Check Point Performance Pack Performance Pack version: NGX R67.10 - build 003. -
Page 15: Check Point 21400 Vsx Front And Rear Panel
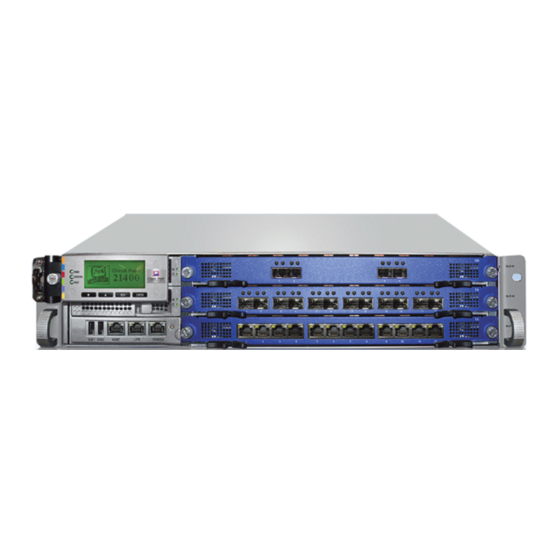
Chapter 4 Check Point 21400 VSX Front and Rear Panel This chapter describes the Check Point 21400 VSX front and rear panel In This Chapter Check Point 21400 VSX Front Panel Check Point 21400 VSX Rear Panel Check Point 21400 VSX Front Panel... -
Page 16: Check Point 21400 Vsx Front Panel Leds
ON (Green) – HDD Power on Link OFF - No Link ON (Green) - Link Activity OFF - No Activity Slow Blink (Amber) - Activity Check Point 21400 VSX Front and Rear Panel Page 16... -
Page 17: Managing Check Point 21400 Vsx Using The Lcd Panel
Check Point 21400 VSX Front Panel Managing Check Point 21400 VSX Using the LCD Panel The appliance has an LCD panel that you can use to do basic management operations. You can enable DHCP. You can configure the management IP address, netmask, and default gateway of the appliance. You can reboot the appliance. -
Page 18: Line Cards
Check Point 21400 VSX Front Panel Line Cards The Check Point 21400 VSX front panel has three slots for cold-swappable Line Cards (also known as Network interface Cards (NICs)). Supported Line Cards These Line Cards are available: Item Line Card... -
Page 19: Check Point 21400 Vsx Rear Panel
(for an ADP Service module). There are also extraction handles and retaining screws on the right. Accelerated Data Path (ADP) service module tray, behind the grille. Check Point 21400 VSX Front and Rear Panel Page 19... -
Page 20: Customer Replaceable Parts
Important - customers are prohibited by warranty and support agreements from changing any parts or altering the hardware in any way except as noted below, or as directed by Check Point technical support. In This Chapter Installing and Removing Line Cards... -
Page 21: Installing And Removing Transceivers
None None Line Card, 12 line card port Note - Check Point supports only transceivers sold by Check Point. Laser Safety Warnings Caution - When laser products (such as fiber optic devices or transmitters) are installed, note the following: ... -
Page 22: Installing And Removing Power Supplies
Installing and Removing Power Supplies CLASS 1 LASER PRODUCT. A TOTALLY ENCLOSED LASER SYSTEM CONTAINING A CLASS 1 LASER. Note - Laser radiation when open. Do not stare into the beam, do not view directly with optical instruments, and avoid direct exposure to the beam. To install a transceiver: 1. -
Page 23: Installing And Removing Hard Disks
Installing and Removing Hard Disks The power supply LEDs at the rear of the appliance show the status of the power supplies. To remove a power supply unit: 1. Loosen the retaining screw located at the top left of the power supply. 2. -
Page 24: Hard Disk Drives Raid Monitoring
5. Move the LCD panel to its usual position. Hard Disk Drives RAID Monitoring The Check Point 21400 VSX performs RAID1 mirroring across two hard disk drives using software RAID. This lets the Check Point 21400 VSX continues working in the event of a disk failure. -
Page 25: Installing And Removing Memory
The DIMM sockets are in two groups of four sockets. The sockets are located on the left font and right rear of the Check Point 21400 VSX system board, as you look at the appliance from the front. Before You Begin To upgrade or replace your appliance memory, you need: ... - Page 26 2. Find the DIMM memory slots on the system board. The basic memory configuration of the Check Point 21400 VSX ship with six DIMMs installed. The optional memory configuration of the appliance ships with 12 DIMMs installed. Each DIMM is 2 Gbyte.
- Page 27 Installing and Removing Memory When performing a memory upgrade to the basic memory configuration: Install more DIMMS in all the remaining slots. The DIMMs slots must always be populated as shown in the diagram. 3. To remove a DIMM: a) Press the two retaining clips outward b) Carefully pull the DIMM up.
-
Page 28: Installing And Removing Cooling Fans
To replace a fan unit: 1. Find the fan grille at the rear of the appliance and the retaining screw that secures it ("Check Point 21400 VSX Rear Panel" on page 19). -
Page 29: Installing And Removing The System Board Battery
7. Tighten the retaining thumb screw of the fan grille. Installing and Removing the System Board Battery This section describes how to change the CMOS battery on the system board of the Check Point 21400 VSX. Warning- Risk of explosion if battery is replaced by an incorrect type. -
Page 30: Installing And Removing A Lom Card
Installing and Removing a LOM Card The Check Point 21400 VSX Lights Out Management card provides out-of-band remote access to the appliance, even when it is turned off. - Page 31 Installing and Removing a LOM Card a) Move the system board tray into the appliance until it clicks into position. b) Refasten the two retaining screws for the lower tray. c) Connect the power cords to the appliance. d) Press the power switch at the rear of the appliance, to turn on the power to the appliance. Customer Replaceable Parts Page 31...
-
Page 32: Vsx Appliance Recovery
Chapter 6 VSX Appliance Recovery VSX comes preloaded on your Check Point 21400 VSX appliance. If, for any reason, you need to reinstall VSX on the appliance, follow this procedure. To reinstall VSX software on the appliance: 1. Connect to the appliance console using the designated cord received in your shipping carton (RJ45/D- subminiature cable) and connect to the console using Terminal Emulation software, such as HyperTerminal or PuTTY. -
Page 33: Registration And Support
Where To From Here? Registration Check Point 21400 VSX requires a specific Check Point license. Obtain a license and register at the Check Point Appliance Registration site (http://register.checkpoint.com/cpapp). Note - The MAC address of the management interface is required to obtain a license. -
Page 34: Compliance Information
This appendix contains declaration of conformity, compliance, and related regulatory information. In This Appendix Declaration of Conformity Declaration of Conformity Manufacturer’s Name: Check Point Software Technologies Ltd. Manufacturer’s Address: 5 Ha'Solelim Street, Tel Aviv 67897, Israel Declare that under our sole responsibility the products... - Page 35 Declaration of Conformity EN 55024 Information Technology Equipment - Immunity Characteristics EN61000-4-2 Information Technology Equipment - Electrostatic Discharge Immunity EN61000-4-3 Information Technology Equipment - Radiated RF Immunity EN61000-4-4 Information Technology Equipment - Fast Transient Immunity EN61000-4-5 Information Technology Equipment - Surge Immunity EN61000-4-6 Information Technology Equipment - Conducted RF Immunity...
Need help?
Do you have a question about the 21400 VSX G-50 and is the answer not in the manual?
Questions and answers