
Subscribe to Our Youtube Channel
Related Manuals for Vytronix MFW1600


Summary of Contents for Vytronix MFW1600
- Page 1 MF W1 6 0 0 4 - I N - 1 WE T & D R Y V A C U U M, C A R P E T WA S H E R & B L O WE R I N S T R U C T I O N MA N U A L w w w .
- Page 2 BLANK PAGE -...
-
Page 3: Table Of Contents
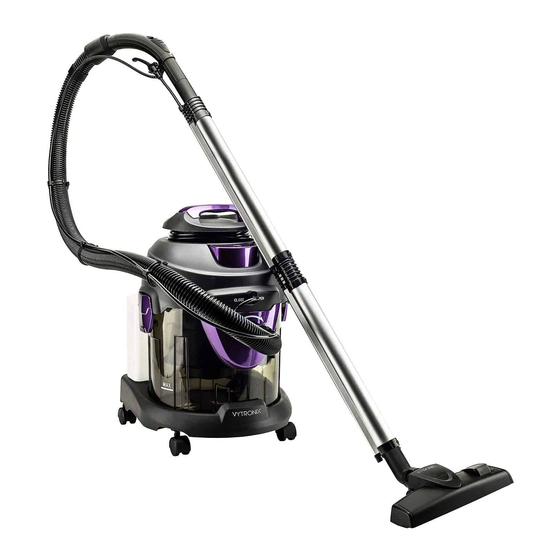
Contents 1.Hose inlet 14.Solution tank cover 2.Solution pump on/off switch 15.Hose main connector 3.Power cord 16.Hose 4.Top cover 17.Front solution tube adapter 5.Tank locking clip 18.Rear solution tube adapter 6.Top handle 19.Solution tube 7.Vacuum power on/off switch 20.Aluminum extension tubes 8.Tank 21.Solution/water floor brush 9.Base/wheel assembly... - Page 4 Product introduction The product is for domestic use only, its functions include wet vacuum, dry vacuum, carpet washer/cleaner and a rear blower function. It can be operated easily and safely. The product has a float chamber to avoid water/solution. The detachable solution tank is fully detachable for ease of emptying/cleaning. Safety advice •...
-
Page 5: Top Cover
Operation 1. Release tank clip, take out the top cover and remove the dust bag. 2. Hold the top handle, take off the float chamber frame as per direction instruction, check the float chamber frame, filter, float assembly, HEPA filter and check whether all are in the correct position. -
Page 6: Tank
3. Assemble the floater frame according to direction instruction. Put the top onto the water tank, fix the tank clip. 4. Insert the main hose adapter, rotate according to direction instruction and fix firmly. Then fix the front solution nozzle in anticlockwise. - Page 7 5. Connect the two parts of the aluminum tube together with the solution nozzles. 6. Connect the solution/water floor brush/solution nozzle with the aluminum tube/solution nozzle. 7. Release solution tank clip and remove the tank. Fill with clean, cold or warm but not hot water and solution of desired –...
- Page 8 8. Park the solution tank onto the vacuum bottom.
- Page 9 9. Plug in and power on the vacuum first, then switch on solution pump. 10. When vacuuming, check if solution pump working, solution speed, floater protection, water/solution bubble level (no exceeding the MAX line)
- Page 10 11. Full solution tank can last 20-25 minutes working. Check often the solution level as per the tank scale. Power off the pump for 30 seconds before switching off the vacuum. 12. After vacuuming, take out the solution nozzles and solution tank for cleaning.
- Page 11 13. Take out the top vacuum part, hold the handle and take off the floater frame. 14. Take out the HEPA filter and float chamber, wash the sponge filter and HEPA, then allow to air dry before next use. Wash the float assembly and water tank.
-
Page 12: Float Frame
15. Once float is sucked to the top of the float chamber, power off the appliance and clean the float frame, assembly and water tank before next use. - Page 13 16. Airflow/suction adjustment on hose handle. 17. Clean away the balance solution after cleaning is finished. 18. Take off the rear blow window and clean the exhaust sponge filter. exhaust f i l t er 19.. Disassemble all the accessories from the machine after use. Clean and dry for next use.
- Page 14 Rear blow function Caution: Don’t switch on solution pump to avoid pump overheating. 1. Remove solution tank and take off exhaust filter cover. 2. Fix the hose in.
- Page 15 3. Plug and switch on the machine for blowing. 4. Take out the hose and fix the exhaust filter cover after use.
-
Page 16: Floater Bottom
Wet & Dry Vacuum • Don’t switch on solution pump. • Remove the solution tank. • Use on flat surface. • Stop the appliance immediately if any water or solution bubbles spray out. Check the levels in the collection tank. Clean the water tank and float assembly if required. •... - Page 17 3. Assemble the floater frame according to direction instruction. Put the top onto the water tank, fix the tank clip.
-
Page 18: Hose
4. Connect the hose onto the vacuum main suction hole. 5. Connect the two parts of the aluminum tube with the hose. -
Page 19: Floor Brush
5. Connect the floor brush with the tube. 6. Plug and switch on the machine. 7. Take out the bag and clean the dust tank. 8. Clean and wash the tank. 9. Take out the HEPA filter and float chamber, wash the sponge filter and HEPA, then allow to air dry before next use. - Page 20 24hr Warranty Registration To register you free one year Vytronix warranty visit www.vytronix.com using product code: brandnew-vytronix-mfw1600 Safe Disposal This marking indicates that this product should not be disposed with other household waste throughout the EU. To prevent possible harm to the environment or human health from uncontrolled waste disposal, recycle it responsibly to promote the sustainable reuse of material resources.
- Page 21 BLANK PAGE -...
- Page 22 R e g i s t e r y o u r w a r r a n t y a t w w w . v y t r o n i x . c o m...
Need help?
Do you have a question about the MFW1600 and is the answer not in the manual?
Questions and answers