Roland V-combo VR-09 Reference Manual
Hide thumbs
Also See for V-combo VR-09:
- Workshop manual (15 pages) ,
- Owner's manual (68 pages) ,
- Workshop manual (17 pages)
Table of Contents
Advertisement
Quick Links
Advertisement
Table of Contents

Related Manuals for Roland V-combo VR-09


Summary of Contents for Roland V-combo VR-09
- Page 1 Reference Manual VR-09 VR-730 Copyright © 2017 ROLAND CORPORATION...
-
Page 3: An Overview Of This Unit
An Overview of This Unit Sound Sections This unit has three sound sections—organ, piano, and synthesizer—and each section occupies a separate area of the panel. You can also play two sounds simultaneously, or divide the keyboard into two regions and play different sounds in the left and right regions. Organ section Piano section Synthesizer section... -
Page 4: Table Of Contents
Contents An Overview of This Unit . . . . . . . . . . . . . . . . . . . . . . . . . . . . . . . . . . . . . . . . . 3 Combining Two Sounds . - Page 5 Contents Adjusting the Audio Recording Volume (Audio Rec Gain) . .51 Detailed Settings for All Functions (Menu) . . . . . . . . . . . . . . . . . . . . . . . .45 Specifying the Metronome Setting (Switch) .
-
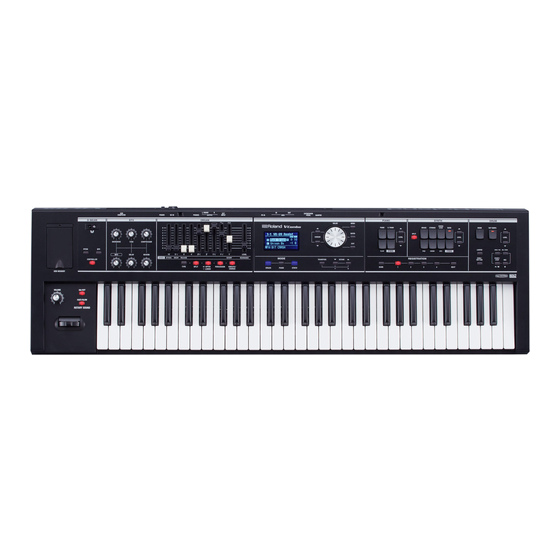
Page 6: Panel Descriptions
Panel Descriptions Front Panel * The illustration shows the VR-09. Number Name Explanation Page Connect a USB flash drive (sold separately) here. You can save or play back songs you’ve recorded, and save or load registration sets. If you connect a wireless USB adapter (sold separately: WNA1100-RL or equivalent), you’ll be p. - Page 7 Panel Descriptions Number Name Explanation Page Use these to select parameters. — CURSOR [ ] buttons [VALUE] dial Use this to modify a value. — [MENU] button Accesses the menu screen. p. 45 [ENTER] button Confirms a value or executes an operation. —...
-
Page 8: Rear Panel (Connecting Devices)
Panel Descriptions Rear Panel (Connecting Devices) DAMPER jack EXPRESSION PEDAL jack PK IN connector You can connect a pedal switch or a damper Connect an expression pedal (EV series; sold Connect a pedalboard (PK-9; sold separately) pedal (DP series; sold separately) here. separately) to this jack. -
Page 9: Getting Ready
Getting Ready When to Replace the Batteries Installing Batteries When the batteries run low, the display will indicate “Charge Battery. ” If eight commercially available rechargeable Ni-MH batteries Stop use, and recharge the batteries. (AA, HR6) are installed, you’ll be able to play this unit without connecting the AC adaptor. -
Page 10: Placing This Unit On A Stand
Getting Ready Placing This Unit on a Stand Be careful not to pinch your fingers when setting up the stand. If you place this unit on a stand, you must use the KS-18Z or the KS-12. Place the instrument on the stand as follows. * If using a pedalboard (PK-9;... -
Page 11: Turning The Power On/Off
Getting Ready Turning the Power On/Off Listening to the Demo Songs Here’s how to listen to the demo songs. Turning the Power On Turn the power on. Press the [ ] (START/STOP) button. Before turning on this unit’s power, consider these two The demo screen is shown in the display. -
Page 12: Using The Included Usb Memory Protector
Getting Ready Using the Included USB Memory Protector VR-09 only You can use the included USB memory protector to prevent theft of the USB flash drive connected to the VR-09. NOTE • You must use the included screws. • You must use the included Allen wrench to tighten or remove the screws. -
Page 13: Selecting Sounds
REFERENCE For details about the sounds, refer to “Sound List” in the “Data List” (PDF). You can download the “Data List” (PDF) from the Roland website. http://www.roland.com/manuals/ MEMO • You can play the keyboard to audition the sound at which the Selecting Organ Sounds cursor is located. -
Page 14: Selecting Piano Sounds
Selecting Sounds Selecting Piano Sounds Selecting Synthesizer Sounds Press the MODE [PIANO] button. Press the MODE [SYNTH] button. The MODE [PIANO] button will light. The MODE [SYNTH] button will light. Sound Sound variation Sound Sound variation Volume Volume (PIANO LEVEL [ ] [ ] button) (SYNTH LEVEL [ ] [ ] button) Octave (p. -
Page 15: Selecting Your Favorite Sounds (Registration)
Selecting Sounds Selecting Your Favorite Sounds Switching Registration Banks (Registration) Switching banks (Banks 1–4) You can assign a name to your favorite organ, piano, and synthesizer sounds (or combination of sounds), and store it as a Press the [BANK] button. “registration. -
Page 16: Storing A Registration
Refer to “Drum Kit List” in the “Data List” (PDF) for details on the percussion instrument sounds that are assigned to each key. You can download the “Data List” (PDF) from the Roland website. http://www.roland.com/manuals/ Press the [DRUM] button to make it light. -
Page 17: Modifying The Organ Sound
Modifying the Organ Sound Using the Harmonic Bars The harmonic bars are assigned to sounds of different footage Harmonic bars and the pitch of the sound (pitch). You can create a wide variety of organ sounds by layering these sounds. When the middle C (C4) note is pressed, each harmonic bar will sound the following notes. - Page 18 Modifying the Organ Sound When you’ve selected “Transistor Organ” as the organ sound The footage structure will be different for Transistor organ. You’ll be able to operate the following harmonic bars. The other harmonic bars will be unavailable. Part (p. 29) Harmonic bars that can be operated Upper part 16’...
-
Page 19: Setting Example Of Harmonic Bars
Modifying the Organ Sound Setting Example of Harmonic Bars Hard rock Rock Here’s a typical setting for hard rock of the ‘70s. Here’s a typical setting for rock of the ‘70s. As desired, you can add a bit of 2’ (the 2-foot bar). Add the overdrive (p. -
Page 20: Using The Rotary Effect
Modifying the Organ Sound Using the Rotary Effect Using Twin Rotary By using the multi-effect “TWIN ROTARY” in conjunction with This effect adds modulation to the sound as if you were using a the rotary effect, you can obtain a more powerful and three- rotary speaker. -
Page 21: Using Percussion
Modifying the Organ Sound Using Percussion Parameter Value Explanation The percussion sound will decay immedi- ately, producing a sharper attack. This adds an attack to the beginning of each note, making the Volume sound more crisp and percussive. Short decay time Press the [PERCUSSION] button to make it light. -
Page 22: Using Vibrato/Chorus
Modifying the Organ Sound Using Vibrato/Chorus Here’s how to apply vibrato (cyclic modulation of the pitch). You can also apply chorus, which mixes vibrato sound with unprocessed sound to produce greater depth and spaciousness. Press the [VIBRATO/CHORUS] button to make it light. The VIBRATO/CHORUS screen appears. -
Page 23: Modifying The Synthesizer Sound
Modifying the Synthesizer Sound This unit lets you use the top panel harmonic bars to modify the When you operate a bar, the current value is shown in the screen. character of the synthesizer sound. MEMO • If you’re playing two sounds (split or dual) (p. 28), the settings will determine which sound is affected. -
Page 24: Adding Effects To The Sound
Adding Effects to the Sound Applying Effects (EFX) You can apply effects to the sounds you play. This unit contains 7 effect processors; each can be set independently. For the six effects other than rotary, you can use “global control” to conveniently apply each effect in an appropriate way. MEMO •... -
Page 25: Modifying The Sound / Producing Sound Effects
For details about the sound effects, refer to “Sound Effect List” in the * Pitch will not apply to organ sounds and drum “Data List” (PDF). sounds. You can download the “Data List” (PDF) from the Roland website. [SFX] button A sound effect will be produced. http://www.roland.com/manuals/... -
Page 26: Changing The Pitch/Applying Vibrato
Adding Effects to the Sound Changing the Pitch/Applying Vibrato Making the Pitch Change Smoothly (Pitch Bend/Modulation Lever) (Portamento) While playing the keyboard, move the lever toward the left to lower Portamento is an effect that produces a smooth change in pitch the pitch, or toward the right to raise the pitch. -
Page 27: Changing The Key Range
Changing the Key Range Raising or Lowering the Range in Transposing the Key (Transpose) Octaves (Octave) You can transpose the pitch of the keyboard. This setting specifies the pitch sounded by the middle C (C4) key. You can change the pitch of the keyboard in steps of one octave. Hold down the [TRANSPOSE] button and press the [–] or Press the OCTAVE [ ] or [ ] button. -
Page 28: Combining Two Sounds
Combining Two Sounds Layering Two Sounds (Dual) Combining an Organ Sound with a Piano Sound or Synthesizer Sound “Dual” refers to settings in which two sounds are layered. * You can’t layer two organ sounds. Organ sound Part 1 Piano sound/Synthesizer sound Part 2 Simultaneously press the MODE [ORGAN] button and a sound button in the piano section or the synthesizer... -
Page 29: Playing Different Sounds In The Left And Right Hands (Split)
Combining Two Sounds Playing Different Sounds in the Left and Combining Two Organ Sounds Right Hands (Split) “Split” refers to settings that let you play different sounds with your left and right hand. Organ sound Organ sound The keyboard will be divided into two regions; the right is called the “upper part, ”... - Page 30 Combining Two Sounds Playing the pedal sound with your left hand MEMO • The [PERCUSSION] button is valid only for the organ sound of (manual bass) the upper part. • When the organ type is Rock Organ or Jazz Organ, you can “Manual bass”...
-
Page 31: Combining A Piano Sound And Synthesizer Sound
Combining Two Sounds Combining a Piano Sound and Synthesizer Combining an Organ Sound with a Piano Sound Sound or Synthesizer Sound Piano sound/ Piano sound/ Piano sound/ Organ sound Synthesizer sound Synthesizer sound Synthesizer sound Select a piano sound or a synthesizer sound (p. 14). Press the SYNTH [SPLIT] button to make it light. -
Page 32: Playing Drum Sounds In The Lower Part
Combining Two Sounds Playing Drum Sounds in the Lower Part Cancelling Split You can play drum sounds in the lower part while playing a Press the [EXIT] button or the lit [SPLIT] button to make it different sound in the upper part. go dark. -
Page 33: Performing With Rhythm Pattern
You can adjust the volume of the rhythm pattern. in the “Data List” (PDF). This setting specifies the volume of the following functions. You can download the “Data List” (PDF) from the Roland website. • The volume of drum sounds and sound effects http://www.roland.com/manuals/ •... -
Page 34: Recording Your Performance
* In order to use recording, you must connect a USB flash drive (sold separately) to the USB MEMORY port (p. 6). * Use USB Flash Memory sold by Roland. We cannot guarantee operation if other products are used. SMF and audio recording... -
Page 35: Playing A Song
Recording Your Performance Press the [ENTER] button or the MODE [SYNTH] (Save) Press the [ ] (START/STOP) button. button. The song will stop playing. The song will be saved. MEMO * If you recorded in audio format and an identically-named song •... -
Page 36: Renaming A Song
Recording Your Performance Renaming a Song Deleting a Song Here’s how to rename a song. Here’s how to delete a song that you’ve saved on a USB flash drive. Connect a USB flash drive (sold separately) to the USB Connect a USB flash drive (sold separately) to the USB MEMORY port (p. - Page 37 Recording Your Performance Data saved on a USB flash drive The following data can be saved on a USB flash drive. • Songs recorded on this unit (p. 34) • Phrases recorded by the looper (p. 38) • Registration sets (p. 41) Root folder (top level) Song files Songs recorded on this unit and phrases recorded by the looper are saved in the root folder...
-
Page 38: Using The Looper
Using the Looper The looper is a function that lets you overdub while recording and playing back in real time. You can take advantage of various performance possibilities, such as performing or adjusting the effects while playing back recorded phrases as a backing. -
Page 39: Recording While A Rhythm Pattern Plays
Using the Looper Recording While a Rhythm Pattern Plays Deleting the Phrase Here’s how to delete the phrase that’s recorded in the looper. Press the [SONG/RHYTHM] button several times to access the RHYTHM screen. In the LOOPER screen, press the [SONG/RHYTHM]. A confirmation message appears. -
Page 40: Saving A Phrase
Using the Looper Saving a Phrase A phrase you record using the looper can be saved as audio data on your USB flash drive. * To save a phrase recorded using the looper, you must first connect your USB flash drive to the USB MEMORY port. Stop loop playback (p. -
Page 41: Convenient Functions
Convenient Functions Making the Power Automatically Turn Saving Registrations to a USB Flash Off After a Time (Auto Off) Drive (Save Registration) With the factory settings, the unit’s power will automatically be All registrations stored in this unit can be saved to your USB flash switched off a certain amount of time after you stop playing or drive as a set (registration set). -
Page 42: Loading Saved Registrations From A Usb Flash Drive
You can download registrations Press the [EXIT] button several times to finish the procedure. A wide variety of registrations can be downloaded from the Axial sound library site and used on this unit. For details, refer to the Axial site. http://axial.roland.com/... -
Page 43: Deleting Saved Registrations From A Usb Flash Drive
Convenient Functions Deleting Saved Registrations from a Formatting a USB Flash Drive (Format USB Flash Drive (Delete Registration) USB) Here’s how a registration set saved on a USB flash drive can be “Formatting” is the operation of preparing a USB flash drive for use deleted into this unit. -
Page 44: Initializing A Synthesizer Sound
Press the [MENU] button. • Synthesizer sounds can be initialized one at a time. Turn the [VALUE] dial to select “System.” • For details on Axial or the iPad editor, refer to the Roland website. Press the [ENTER] button. http://www.roland.com/ Use the CURSOR [ ] [ ] buttons to select “Factory Reset.”... -
Page 45: Specifying The Amount Of Leakage Noise (Leakage Level)
Detailed Settings for All Functions (Menu) Basic Menu Operations The menu allows you to edit the performance and sound settings. Press the [MENU] button. The menu screen appears. Turn the [VALUE] dial to select a category. Press the [ENTER] button. Use the CURSOR [ ] [ ] buttons to select the parameter that you want to edit. -
Page 46: Specifying The Low-Frequency Boost/Cut (Organ Low Gain)
For details about how to make menu Detailed Settings for All Functions (Menu) settings, see p. 45. Category Parameter Value Explanation Specifying the Low-frequency Boost/Cut (Organ Low Gain) Organ Low Gain This specifies the amount of boost/cut for the low-frequency region. -12–12 Organ Specifying the High-frequency Boost/Cut (Organ High Gain) -
Page 47: Selecting The Multi-Effect Type (Mfx Type)
This is a virtual tape echo that produces a realistic tape delay sound. It simulates the tape echo TAPE ECHO section of a Roland RE-201 Space Echo. REVERSE DELAY This is a reverse delay that reverses the input sound and adds it after a delay. -
Page 48: Selecting The Type Of Reverb (Reverb Type)
For details about how to make menu Detailed Settings for All Functions (Menu) settings, see p. 45. Category Parameter Value Explanation Selecting the Type of Reverb (Reverb Type) Here you can select the type of reverb. By changing the reverb type you can experience the sensation of performing in a variety of locations. ROOM The reverberation of a room Reverb Type... -
Page 49: Specifying The Pitch Bend Range (Pitch Bend Range)
For details about how to make menu Detailed Settings for All Functions (Menu) settings, see p. 45. Category Parameter Value Explanation Selecting the Part(s) Affected by the Damper Pedal (Damper Part) You can select the part(s) to which the damper pedal will apply. However, this does not apply to a drum kit. Damper Part to ALL The effect will be applied to the upper part and the lower part. -
Page 50: Adjusting The D-Beam Sensitivity (D-Beam Sensitivity)
For details about how to make menu Detailed Settings for All Functions (Menu) settings, see p. 45. Category Parameter Value Explanation Adjusting the D-BEAM Sensitivity (D-BEAM Sensitivity) D-BEAM Sensitivity This adjusts the sensitivity of the D-BEAM controller. Higher values make the D-BEAM controller more responsive. 1–10 Using the Modulation Lever to Switch the Rotary Effect (Modulation Lever) -
Page 51: Automatically (Auto Std Tempo)
For details about how to make menu Detailed Settings for All Functions (Menu) settings, see p. 45. Category Parameter Value Explanation Preventing the Rhythm Pattern Tempo from Changing Automatically (Auto Std Tempo) Auto Std Tempo This lets you prevent the tempo setting from changing automatically when you switch rhythm patterns. When the rhythm pattern is stopped, the tempo settings are not changed automatically when the rhythm patterns are changed. -
Page 52: Specifying Pc Numbers (Pc Number)
Control can be connected to electronic musical instruments via MIDI in order to control video equipment in tandem with a performance. What is V-LINK? V-LINK is Roland’s proprietary specification that allows visual expression to be linked with musical performance. Video equipment that is compatible with V-LINK can be connected to electronic musical instruments via their MIDI ports, making it easy to enjoy a variety of visual effects that are linked with the performance. -
Page 53: Performing In Atelier Mode (Atelier Mode)
Performing in Atelier Mode (ATELIER Mode) System This setting makes this unit behave similarly to the Roland Music Atelier (Atelier Mode). ATELIER Mode For example, this lets you apply an effect only to the organ sound, or to play the rhythm simply by pressing the (START/ STOP) button. -
Page 54: Connections With Other Equipment
Connect the external MIDI device to the MIDI IN connector with an optional MIDI cable. The notes played on the keyboard, movements For details on operating requirements, refer to the Roland website. of the Damper pedal, Expression data, data http://www.roland.com/ indicating that a REGISTRATION button, etc.,... -
Page 55: About The Wireless Lan Function
About the Wireless LAN Function Use the CURSOR [ ] [ ] buttons to select “WPS.” What is Wireless LAN Function? The WPS screen appears. By connecting a wireless USB adaptor (sold separately: WNA1100- RL or equivalent) to the USB MEMORY port of tis unit, you can use wireless-compatible applications. -
Page 56: Wireless Lan Function Settings
About the Wireless LAN Function Wireless LAN Function Settings Other Settings (Options) Make settings for Wireless ID or Ad-Hoc mode (Ad-Hoc Mode). You can view or edit the wireless settings. Select the “Options” from the wireless menu, and press the [ENTER] button (p. 56). Wireless Menu (Wireless) The Options screen appears. - Page 57 About the Wireless LAN Function Connecting in Ad-Hoc mode (Ad-Hoc Mode) On the iPad or other wireless device that you want to connect, select the Ad-Hoc SSID shown in the above screen to make the connection. (For example, on an iPad, Here’s how to connect in Ad-Hoc mode.
-
Page 58: Troubleshooting
Troubleshooting If you suspect a malfunction, please read this section first. Power does not turn on Problem Cause Action Page AC adaptor is not connected correctly. Connect the AC adaptor is correctly. p. 8 When you press the [POWER] switch, the power doesn’t come on The batteries are exhausted. - Page 59 Troubleshooting Problem Cause Action Page Modulation is applied even when the rotary Either turn the [MFX] knob to minimize the effect, “TWIN ROTARY” is selected as the multi-effect type. p. 24 effect is off or change the multi-effect type. Hold down the [TRANSPOSE] button and press the Transpose is in effect.
- Page 60 Other problems Problem Cause Action Page Are you using Roland USB Flash Memory (sold We cannot guarantee operation if any other USB Can’t read/write USB flash drive — separately)? flash drive is used. Problems when connecting to a wireless LAN * For problems related to communication, refer also to the owner’s manual of your wireless LAN access point.
- Page 61 Make sure that the USB flash drive is inserted correctly (p. 6). Failed to load data from USB flash drive. Also make sure that you’re using a USB Flash Memory sold by Roland. It may be that the file is damaged.
-
Page 62: Settings That Are Stored After The Power Is Turned Off
Stored Settings Settings That Are Stored After the Power Is Turned Off Setting Explanation Page Setting Explanation Page Registration Shift Registration shift p. 50 MIDI IN Mode MIDI IN mode p. 51 Damper Assign Send PC Switch Damper pedal function p. -
Page 63: Main Specifications
* Use a commercially available USB flash drive or a USB flash drive sold by Roland. However, we cannot guarantee that all commercially available USB flash drives will work with this unit. * This document explains the specifications of the product at the time that the document was issued. For the latest information, refer to the Roland website. - Page 64 Index [PIANO] button ..... . . 7 Symbols PIANO LEVEL [ ] [ ] buttons ..7 Factory Reset .
Need help?
Do you have a question about the V-combo VR-09 and is the answer not in the manual?
Questions and answers
HOW TO SET THE EG