Table of Contents
Advertisement
Advertisement
Table of Contents

Subscribe to Our Youtube Channel
Related Manuals for Lippert Components OneControl ConnectAnywhere


Summary of Contents for Lippert Components OneControl ConnectAnywhere
- Page 1 ConnectAnywhere OWNER'S MANUAL ™...
-
Page 2: Table Of Contents
TABLE OF CONTENTS Introduction Product Features Safety Preparation System Components System Requirements Summary of Account Set-Up and Registration Procedures Pre-Activation Check Acquire SIM Card and Data Package Product Activation Cellular Gateway Activation OneControl Mobile App Download to Mobile Device LCI Customer Community Account Create User Account In LCI Customer Community (New Users Only) Activate the Product Through the LCI Customer Community Enable Web Page Controls... -
Page 3: Introduction
Introduction The LCI OneControl® ConnectAnywhere™ system (Fig. 1A) is an upgrade from a myRV Wi-Fi OneControl® system and adds on-line access and remote control functionality to any RV equipped with a mobile Internet connection†. The system connects LCI OneControl branded electronic controls to the OneControl Cloud™, enabling remote access, management and control over various features of the RV, including: •... -
Page 4: Preparation
Preparation System Components Fig. 1 Callout Part # Description 714393 LCI ConnectAnywhere Kit - 10-foot 711151 LCI Cloud Gateway 714787 Cellular Gateway 722251 Wi-Fi Antenna, 2.4 GHz (part of "C") 722256 NANO SIM Card Adapter (part of "C") 766122 2.1mm DC Plug-to-2.1mm DC Plug Power Harness (part of "C") 767657 Ethernet Patch Cable (part of "C") 716727... -
Page 5: System Requirements
System Requirements Data Package Required ConnectAnywhere is compatible with AT&T and Rogers (CAN) cellular service using 3G bands II, IV, ® ® V & 4G LTE bands 2,4 & 12. • Purchase of a nano SIM card and data package is required. The AT&T and Rogers (CAN) trade names and logos are registered trademarks of AT&T... -
Page 6: Pre-Activation Check
Optional OneControl Voice features activation instructions are as follows: If necessary, create an end user account with Amazon.com through Amazon's website. Enable Amazon Alexa on the Amazon.com account. Install an Alexa voice-device-compatible OneControl Voice system, i.e. Amazon Echo Dot. Add the OneControl Voice skill to the Alexa account and give Alexa permission to access the ConnectAnywhere system. -
Page 7: Acquire Sim Card And Data Package
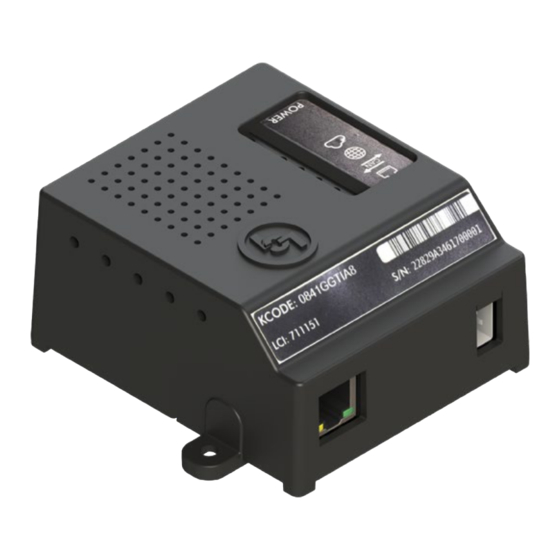
System hardware checks are now complete. Activate the product through the LCI Customer Community web portal as a test of the installed system's functionality. Acquire SIM Card and Data Package Locate the OneControl ConnectAnywhere cellular gateway. Locate the identification label on the gateway (Fig. 3) and record the information. Fig. 3 Go to an AT&T or Rogers (CAN) wireless service store. -
Page 8: Product Activation
Product Activation Cellular Gateway Activation NOTE: Figures 4-6 shown without additional cabling for clarity. Unplug the barrel connector power harness (Fig. 4A). Remove the plastic SIM card adapter from the SIM card slot (Fig. 5A). Do NOT discard. If using a standard size SIM card, insert the card into the card slot on the cellular gateway. Make sure the SIM card's circuit is facing up and the card's notch is positioned in the upper right corner (Fig. -
Page 9: Onecontrol Mobile App Download To Mobile Device
Insert the assembled SIM card adapter into the gateway's SIM card slot (Fig. 6). Reinsert the barrel connector power harness (Fig. 8A). Fig. 8 OneControl Mobile App Download to Mobile Device ConnectAnywhere systems can be accessed remotely from a mobile device using the OneControl mobile app. -
Page 10: Lci Customer Community Account
Search for the LCI OneControl application and install (Fig. 10A). Fig. 10 At this point, the application is loaded and can now be setup. LCI Customer Community Account The ConnectAnywhere system is managed through the LCI Customer Community web portal. New users must register and create an account in the portal before accessing ConnectAnywhere features. -
Page 11: Create User Account In Lci Customer Community (New Users Only)
Create User Account In LCI Customer Community (New Users Only) This section is intended for new users to the ConnectAnywhere system. Users who already have an account in the LCI Customer Community can skip this section and go directly to the Activate the Product Through the LCI Customer Community section. - Page 12 After clicking the "Register" button, a screen will display (Fig. 12) indicating that a verification email has been sent to the provided email address. Check the provided email account for the verification message (Fig. 13) from Lippert Components, Inc. Fig. 12 Click the "here"...
- Page 13 Click the "login" button to be redirected to the LCI Customer Community Login web page (Fig. 15). Enter the user credentials created earlier (step 2), then click the "login" button (Fig. 15A). Fig. 15 After successful login, the LCI Customer Community landing page will display (Fig. 16). Fig.
-
Page 14: Activate The Product Through The Lci Customer Community
Activate the Product Through the LCI Customer Community This process requires access to the Internet and a standard Internet web browser. † If not already logged in, login to the LCI Customer Community. A. Use a web browser to navigate to the login portal at http://lippert.force.com/IoTCommunity/login B. - Page 15 The main ConnectAnywhere dashboard (Fig. 19) will display. Fig. 19 Scroll down to the "Add Gateway" section (Fig. 20). Click on "Add Gateway" button (Fig. 20A). Fig. 20 Prompts to add gateway information (Fig. 21) will appear. Fig. 21 Page 15 Rev: 03.25.19 CCD-0001447...
- Page 16 Enter the KCODE (Fig. 22A) found on the OneControl Cloud Gateway product label (Fig. 2), then give the system a friendly name (Fig. 22B). Click the "Add Gateway" button (Fig. 22C) to activate the selected product and associate it with the established LCI Customer Community account.
-
Page 17: Enable Web Page Controls
Enable Web Page Controls The system can be controlled remotely over the Internet from a standard web browser. † Follow these steps to enable the unit's web page controls. Login to the LCI Customer Community and click on the OneControl tab in the navigation bar (Fig. 18). The ConnectAnywhere landing page (Fig. - Page 18 After access is granted, the system will activate and return to the ConnectAnywhere landing page (Fig. 26). Click the "Finish Web Control Setup" button (Fig. 26A) to continue. Fig. 26 If the system is on-line, and a connection, the display will automatically show the control dashboard (Fig.
-
Page 19: Activate Onecontrol Mobile App Connectanywhere Remote Control Features
If the system is off-line or cannot reach the Internet, the "GATEWAY OFFLINE" (Fig. 28A) web page will display. NOTE: Make sure the system is powered-up and that the unit's Internet connection is working properly. † See the Troubleshooting section for more information. Fig. - Page 20 Return to the main OneControl application screen (Fig. 30). From the main application screen, press the settings icon (Fig. 30A) in the top-right corner to return to the Settings screen (Fig. 31). Fig. 30 From Settings screen (Fig. 31), click the "Login" button (Fig. 31A) to return to the Login screen (Fig. 32). NOTE: The presence of the "Login"...
- Page 21 From the Login screen (Fig. 32), enter LCI Customer Community user credentials; EMAIL (Fig. 32A) and PASSWORD (Fig. 32B), then click the "Submit" button (Fig. 32C). NOTE: The OneControl mobile app can only access OneControl Cloud Gateways that have been associated with the specified user account.
-
Page 22: Using The World-Wide-Web Interface
10. If a successful connection was made, the program will return to the Settings screen (Fig. 34). NOTE: The presence of the "Logout" button (Fig. 34A) indicates the user is presently logged into the LCI Customer Community. 11. Click the back button ( 〈 OneControl) (Fig. 34B) to return to the main application screen. Fig. - Page 23 The ConnectAnywhere landing page (Fig. 36) will display. Click the "Turn on browser controls ... for all gateways" button (Fig. 36A). Fig. 36 A pop-up window (Fig. 37) asking for permission for the OneControl Cloud to access your ConnectAnywhere system will appear. NOTE: Make sure the browser's Pop-Up Blocker is not turned on.
- Page 24 If the system is on-line, and has a connection to the unit, the app will automatically display the unit's control dashboard (Fig. 39A) at the bottom of the page. NOTE: If the ConnectAnywhere landing page does not appear, make sure the unit is powered up and the Internet connection is active.
- Page 25 11. By clicking the Lights link (Fig. 41C) in the navigation bar, all light controls in the unit will be shown (Fig. 41D). A. Selecting one of the light controls opens up it's advanced properties. B. In the example shown in figure 41, the Living Room Ceiling Light is selected (Fig. 41E). Within it's properties listed is its capability to be dimmed (Fig.
- Page 26 Fig. 44 There are many other capabilities of the OneControl ConnectAnywhere-connected unit that can be accessed via the website. Explore the dashboard (Fig. 40) and become familiar with the unit's remote control capabilities.
-
Page 27: Control Connected Devices
Control Connected Devices Learn the basics of, and how to interact with, connected devices. Locally-Enabled Devices with a Wi-Fi Connection LCI OneControl-enabled functions controllable from within 100 feet of the RV (Fig. 45): Fig. 45 Generator Slides Leveling Tank Vent Multiple HVAC Monitor... - Page 28 If necessary, create an account on Amazon.com. A. Using a standard web browser (Fig. 47), go to http://www.amazon.com. B. Locate the menu tab marked "Account and Lists" (Fig. 47A). Fig. 47 C. Hover over the menu item to bring up a drop-down menu (Fig. 48A). D.
- Page 29 After clicking the "Start here" link, the Amazon "Create account" page (Fig. 49) will appear. Enter the required information into the "Create account" form and choose a password. G. After filling in the necessary information, click on the "Create your Amazon account" button (Fig. 49A). H.
- Page 30 Fig. 51 D. Talk to Alexa to test the connection. NOTE: By default, the Echo is set to respond to the wake word "Alexa." However, the Alexa app can be used to change the wake word at any time. In the app, go to Settings, select your Echo device, and then select Wake Word.
- Page 31 C. In the Home web page (Fig. 53), locate the Skills feature (Fig. 53A) in the navigation panel. Fig. 53 D. Click on the link to go to the All Skills web page (Fig. 54). Using the search bar (Fig. 54A), search for the "The OneControl Voice" skill. Fig.
- Page 32 Fig. 56 H. The web site will be re-directed to the LCI Customer Community site. If not already logged in, login here (Fig. 57). Fig. 57 After logging in, Amazon Alexa Voice will ask for access to the LCI Customer Community account information (Fig.
- Page 33 After granting permission, when prompted, enter a friendly name for the Amazon Alexa Voice account (Fig. 59A). This will identify Alexa within the LCI Customer Community. NOTE: Choose a friendly name e.g., my voice account, Mom's Alexa account. K. Click the "Continue" button (Fig. 59B) to begin the linking process. Fig.
- Page 34 N. After the linking process has been completed, the program will automatically return to the Amazon site, displaying the "successfully linked" page (Fig. 62). O. Click on "Close this window..." (Fig. 62A) to return to the Alexa account skills page (Fig. 54). Fig.
-
Page 35: Using Onecontrol Voice-Optional
Using OneControl Voice—Optional With OneControl's Voice command system, the Echo Dot, powered by Amazon Alexa voice assistant, can not only control the unit via voice, but maintain the convenience of a smart home while on the road. A registered ConnectAnywhere system, comprised of one or more LCI OneControl-compatible Controller Area Network (CAN) controllers, the Alexa app, a paired ConnectAnywhere system to the Alexa app and Internet access are all required. -
Page 36: Voice Controled Devices
Controlling CAN devices by voice with the Alexa assistant through the Amazon Echo Dot MUST be done by issuing an invocation phrase followed by a request phrase. Sample Alexa Voice Commands The following are some examples of invocation and request phrases. Example invocation phrases: •... -
Page 37: Troubleshooting
Troubleshooting OneControl Cloud Gateway Most concerns with the OneControl Cloud Gateway can be diagnosed by checking its indicator lights (Fig. 66) located on the top of the assembly. Refer to the following troubleshooting chart. The color of each LED indicates the status of that feature. The highlighted row indicates the "healthy/ default"... - Page 38 ConnectAnywhere Cloud Gateway Troubleshooting Chart Description Color What Is Happening? Why? What Should Be Done? Check CAN to Ethernet Gateway cable for proper connection to the LAN and router. Check power connector for good electrical CAN to Ethernet Bad or no Ethernet connection.
- Page 39 ConnectAnywhere Cloud Gateway Troubleshooting Chart Description Color What Is Happening? Why? What Should Be Done? Reserved A remote user is Caution! Remote users actively accessing Yellow are actively controlling No problems. the unit remotely devices on the unit! through the cloud. OneControl Cloud Cloud Status...
-
Page 40: System Wiring Diagram
System Wiring Diagram Figure 67 shows key system interconnections of the ConnectAnywhere system. Fig. 67 Two 2.4GHz Wi-Fi Antennae Existing CAN bus Harnesses Connect to 2.4GHz Ports Located from a System Controllers on Both Sides of the Router. Connects to Cellular Gateway 12V DC Battery 4G Externally Mounted... -
Page 41: Onecontrol® Connectanywhere ™ Assembly
CONNECTANYWHERE ™ ASSEMBLY ONECONTROL ® ELECTRONICS 4G Cellular External Antenna with Coaxial Cable Pigtails Cloud 4G Cellular Antennae Gateway Coaxial Cables 12V DC Power Connector Cellular 2.4GHz Gateway Wi-Fi Antennae Two CAN bus Data Harnesses LAN Ethernet Router Cable LAN Ethernet 12V DC 2.1mm 12V DC Nano SIM... -
Page 42: Onecontrol® Connectanywhere™ Components
ONECONTROL CONNECTANYWHERE ™ COMPONENTS ® ELECTRONICS NOTE: Part numbers are shown for identification purposes only. Not all parts are available for individual sale. All parts with a link to the Lippert Store can be purchased. Callout Part # Description 711151 LCI Cloud Gateway 714787 Cellular Gateway... - Page 43 ONECONTROL CONNECTANYWHERE ™ COMPONENTS ® ELECTRONICS Callout Part # Description 716727 Router Ethernet Cable 715645 SMA M/M Cellular Coaxial Cable,10 ft 329080 CAN bus Power Connector 331111 CAN bus Data Harness, 2 ft 331113 CAN bus Data Harness, 5 ft 331114 CAN bus Data Harness, 10 ft 331116...
- Page 44 ONECONTROL CONNECTANYWHERE ™ COMPONENTS ® ELECTRONICS Cellular Gateway 4G External Cellular Antenna Cloud Gateway Assembly Router Ethernet Cable SMA M/M Cellular Coaxial Cables (10 ft) (x2) CAN bus Power Connector Callout Part # Description 714393 LCI ConnectAnywhere Kit - 10 ft. Page 44 Rev: 03.25.19 CCD-0001447...
-
Page 45: Notes
Notes Page 45 Rev: 03.25.19 CCD-0001447... - Page 46 The contents of this manual are proprietary and copyright protected by Lippert Components, Inc. (“LCI”). LCI prohibits the copying or dissemination of portions of this manual unless prior written consent from an authorized LCI representative has been provided. Any unauthorized use shall void any applicable warranty. ...
Need help?
Do you have a question about the OneControl ConnectAnywhere and is the answer not in the manual?
Questions and answers