Advertisement
Advertisement

Related Manuals for Hadeco Smartdop XT6


Summary of Contents for Hadeco Smartdop XT6
- Page 1 Smartdop XT6 Quick-Start Guide...
- Page 2 Thank you for purchasing the Hadeco Smartdop XT6 Fully Automatic Vascular Testing System. This guide has been created as a quick reference guide in relation to operating your Smartdop XT6 and Smart-XT-Link software on your Windows based PC or Tablet.
-
Page 3: Table Of Contents
INDEX MAIN FEATURES & CONTROLS SMART-XT-LINK SOFTWARE INSTALLATION OBTAINING STANDARD ABI/TBI STANDARD DOPPLER VELOCITY WAVEFORMS DOPPLER WAVEFORMS -INTERPRETATION PRINTING & SAVING REPORTS FOOT TEMPERATURE PROBE... -
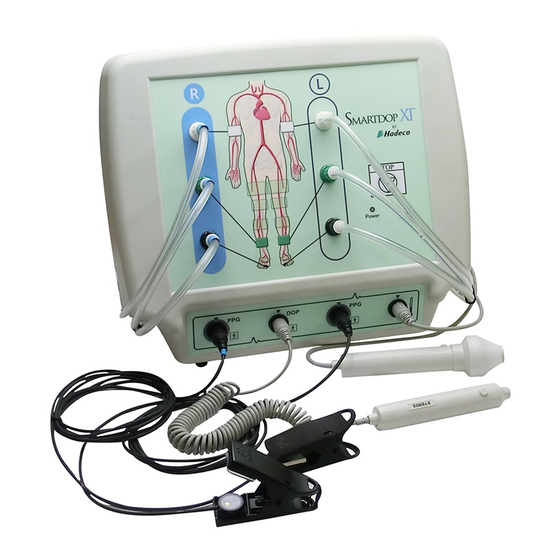
Page 4: Main Features & Controls
Indicates Power Status and Battery Level Probe Holders To hold Probes when not in use For a more detailed explanation on the Features and Controls for the Smartdop XT6, please refer to the Manufacturers Operating Manual supplied with the device. -
Page 5: Smart-Xt-Link Software Installation
To be be connected to Mains Power supply Serial USB Port To connect to Windows based PC For a more detailed explanation on the Features and Controls for the Smartdop XT6, please refer to the Manufacturers Operating Manual supplied with the device. SMART-XT-LINK SOFTWARE INSTALLATION... -
Page 6: Obtaining Standard Abi/Tbi
OBTAINING STANDARD ABI/TBI (1) Open the Smart-XT-Link software and enter “Automatic Arterial Testing” from the Main Menu. (2) Wrap cuffs snugly, positioning bilaterally for arm, ankle and hallux. - Page 7 “Right” tube, while a blue strip on the device identifies all “Right” inflation ports (see pictured at end of manual). (4) Connect 2 PPG probes to the Smartdop XT6 and secure each PPG transducer with the clear side against the pad of each great toe.
-
Page 8: Standard Doppler Velocity Waveforms
Initial Set Up process. (Refer to Initial Set-Up Manual) (2) Connect 8Mhz probe to Smartdop XT6 and have doppler gel ready. (3) Click on any individual site and a Monitoring Screen will appear, ready to detect a waveform. -
Page 9: Doppler Waveforms -Interpretation
DOPPLER WAVEFORMS - INTERPRETATION TRIPHASIC (Normal) • Triphasic sounds indicate bi-directionality and a compliant artery at the point of probe contact. • The first long sound is the systolic forward component. • The second short sound is the reversal component and is seen below the baseline of the waveform print out. -
Page 10: Printing & Saving Reports
PRINTING & SAVING REPORTS (1) Once all waveforms are taken, click “Print”. (2) Select pages you wish to include in patient report (Automatic Arterial Testing & Doppler Arterial Testing). (3) Click “Preview” to ensure the report includes pages you require. (4) If you wish to print your patient report, select printer you wish to use and click “Print”. -
Page 11: Foot Temperature Probe
FOOT TEMPERATURE PROBE - SOLD SEPARATELY The Smartdop XT also has the ability to conduct Foot Temperature studies via the optional Themometer Probe. For instructions on the procedure, please refer to page 21 of the pdf manual supplied on the software USB Flash Drive. For pricing on the device, please contact Briggate Medical. - Page 12 * Tablet not included 23-25 Lakewood Blvd Braeside Vic 3195 Australia Ph: (03) 8586 7800 Fax: (03) 8586 7888 briggate@briggate.com.au www.briggatemedical.com...
Need help?
Do you have a question about the Smartdop XT6 and is the answer not in the manual?
Questions and answers