Table of Contents
Advertisement
Quick Links
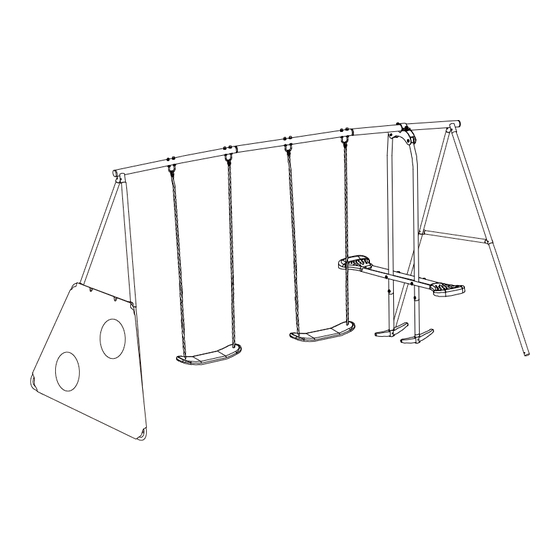
SWING AND GLIDE MULTIPLAY
Assembly & User Instructions -
Important
Limit:
Age:3 - 8 years
Maximum user: 5
Max user weight: 45kg per seat
Max combined weight: 180kg
Important -
Please read these instructions fully before assembly or use.
These instructions contain important information which will help you get the best from your
product and ensure safe and correct assembly, use and maintenance.
If you need help or have damaged or missing parts, call the
Please keep for future reference
Tips: It will take 2 adults
around 30 minutes to
assemble.
Customer Helpline:
(+44) 0330 0904 420
792/0987
Advertisement
Chapters
Table of Contents

Related Manuals for Chad Valley 792/0987


Summary of Contents for Chad Valley 792/0987
- Page 1 SWING AND GLIDE MULTIPLAY Assembly & User Instructions - 792/0987 Please keep for future reference Important Limit: Tips: It will take 2 adults Age:3 - 8 years around 30 minutes to Maximum user: 5 assemble. Max user weight: 45kg per seat...
- Page 2 Contents Warning Parts Assembly Instructions 6-17 Care and Maintenance...
-
Page 3: Warning
Warning Important –Please read these instructions fully before assembly or use. ● DO NOT allow children to climb or play on the equipment WARNING whilst wet (slips or falls may occur). ● DO NOT allow children to climb on or swing from Observing the following statements and warnings reduces structural members (eg legs or top bar and chin bars). - Page 4 Safety Information Important –Please read these instructions fully before assembly or use. ● Hardware: inspect for tightness. Positioning Your Play Set ● Swing hangers: check to insure correct installation. Make sure that the bend of the swing hanger is ● Require at least 2 adults for assembly. Try to place in a positioned tightly against the stop washer and swing flat area of your yard to minimize ground preparation.
-
Page 5: Parts
Parts call the Customer Helpline: (+44) 0330 0904 420 Glider Bracket x 1pcs Right Top Bar x 1pcs VIEW PRODUCT VIEW PRODUCT Target Side Tube x 2pcs Glider Upper Tube x 2pcs VIEW PRODUCT Center Top Bar x 1pcs VIEW PRODUCT VIEW PRODUCT Target Connector Tube x 1pcs Glider Lower Tube x 2pcs... -
Page 6: Parts
Parts Customer Helpline: (+44) 0330 0904 420 Note: The quantities below are the correct amount to complete the assembly. In some cases more VIEW PRODUCT VIEW PRODUCT VIEW PRODUCT VIEW PRODUCT x4 (M8x114mm) x4 (M8x61mm) x4 (M8×54mm) x2 (M8×20mm) VIEW PRODUCT VIEW PRODUCT VIEW PRODUCT VIEW PRODUCT... -
Page 7: Assembly Instructions
Assembly Instructions Step 1 Attach Glider Bracket (10) to Right Top Bar (1) as shown in figure 1. x2pcs x4pcs x2pcs x2pcs Figure 1... - Page 8 Assembly Instructions Step 2 Attach Upper Legs (4) to Left and Right Top Bar (1) and (3) as shown in Figure 2. x4pcs x8pcs x4pcs x4pcs Figure 2...
- Page 9 Assembly Instructions Step 3 Attach Swing Seats (9) to the top bars as shown in Figure 3. x4pcs x16pcs x8pcs x8pcs Figure 3...
- Page 10 Assembly Instructions Step 4 Insert Lower Legs (5) into Upper Legs(4) and secure together with Target Cross Bar (7) on the left side of swing and Cross Bar (6) on the right side as shown in Figure 4. Note: -Plastic cap (8) needs to be placed onto Cross Bar (7) before securing the bolt.
- Page 11 Assembly Instructions Step 5 Insert Glider Top Tubes (11) into Plastic Connector (14) first, then attach it to the bracket on both sides as shown in Figure 5. Tip: Ensure to insert Plastic Tube (15) before connecting the bolt. x2pcs x4pcs x2pcs x2pcs...
- Page 12 Assembly Instructions Step 6 Attach Foot Rest (16) to Glider Lower Tube (12) and connect it with Glider Upper Tube (11) as shown in Figure 6. x2pcs x2pcs x8pcs x4pcs x4pcs Figure 6...
- Page 13 Assembly Instructions Step 7 - Attach Glider Seat Tube (13) to both sides of Glider Upper tubes (11), using the bolt (H), arc washer (K), Spring washer (N) and nut (P) as shown in Figure 7-1. K N P Tip: Need to insert Plastic Connector (18) through tubes (11) and (13) first.
- Page 14 Assembly Instructions Step 8 Connect Target Center Tubes (21) and Side Tubes (22) as shown in Figure 8. Figure 8...
- Page 15 Assembly Instructions Step 9 Lay Target Sheet (23) flat on the ground and wrap the velcro edges around the assembled frame as shown in Figure 9. Figure 9...
- Page 16 Assembly Instructions Step 10 Attach the assembled target to Target Cross Bar (7) as shown in Figure 10. x2pcs x4pcs x2pcs x2pcs Figure 10...
- Page 17 Assembly Instructions Step 11 Attach Anchors (24) to the Lower Legs (5) as shown in Figure 11. Minimum clearance between the footrest/seat and the ground should be 35 cm. IMPORTANT: The product must be anchored into the ground. For optimum safety and performance, we recommend concreting in the corners as shown in the diagram.
-
Page 18: Assembly Instructions
Assembly Instructions SEAT ADJUSTMENT GUIDE THE LENGTH OF THE ROPE IS ADJUSTABLE TO ACCOMODATE THE HEIGHT OF THE CHILD. TO ADJUST, LOOSEN THE KNOT ON THE SEAT CONNECTOR, PULL ROPE THROUGH THE HOLE TO THE APPROPRIATE LENGTH AND RE-TIE THE KNOT AGAIN. -
Page 19: Care And Maintenance
If you need help or have damaged or missing parts,call the Customer Helpline:(+44) 0330 0904 420 Produced for Chad Valley Toys. Argos Ltd. Country of origin: China Address: 489 - 499 Avebury Boulevard, Central Milton Keynes, MK9 2NW. www.argos.co.uk SP-19-SW091-ARGOS-17001...
Need help?
Do you have a question about the 792/0987 and is the answer not in the manual?
Questions and answers