
Related Manuals for MSA AirGo


Summary of Contents for MSA AirGo
- Page 1 Operating Manual AirGo Compressed Air Breathing Apparatus - Modular Basic Apparatus Order No.: 10082058/06 MSAsafety.com...
- Page 2 MSA Europe GmbH Schlüsselstrasse 12 8645 Rapperswil-Jona Switzerland Product of Germany © MSA 2018. All rights reserved...
-
Page 3: Table Of Contents
Installing Quick Connect Adaptor to Cylinder ........ 28 3.2.2.2. Connecting One Compressed Air Cylinder ........29 3.3. Connecting Two Compressed Air Cylinders ..........31 3.3.1. Pressure Reducer with Thread Connection ........31 AirGo... - Page 4 Visual, Function and Tightness Check ............. 54 4.6. Checking the Warning Device ..............54 4.7. Checking the High Pressure Gaskets ............54 4.8. Changing the Battery alphaMITTER / alphaSCOUT / ICU ....... 54 4.9. Overhaul....................55 AirGo...
- Page 5 Compressed Air Breathing Apparatus ............63 9.2. Lung Governed Demand Valve ..............63 9.3. Compressed Air Cylinders ................ 64 9.4. Accessories ....................65 9.5. Work Shop Accessories ................66 AirGo...
-
Page 6: Safety Regulations
Safety Regulations 1.1. Correct Use The MSA AirGo - referred to hereafter as compressed air breathing apparatus - is a self-contained breathing apparatus operating independent of the ambient air. The compressed air breathing apparatus is based on a modular structure which allows the creation and ordering of a unit matched to the specific requirements. -
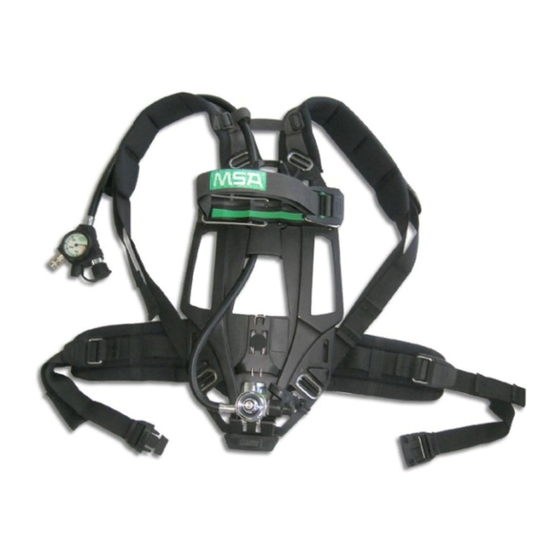
Page 7: Description
Description Description Fig. 1 Compressed air breathing apparatus AirGo (here model AirGo pro) Manifold Handle Cylinder separator Stop bracket (U-clip) Cylinder retaining strap Hip belt plate (Option) Cylinder support Quick-Fill coupling (Option) Cylinder buckle Pressure reducer Shoulder strap Pneumatic system (here SingleLine) - Page 8 Back plate options - bumper with valve-protection ( Section 2.2) - cylinder retaining straps (long or short) LG, SH - swivelling hip plate (standard for harness options MaX and eXX, optional for pro) - retainer - rescue grip and retainer AirGo...
- Page 9 - with integrated control unit ICU/ICS - with coupling system alphaCLICK 2 - with alphaMITTER (short distance transmitter), only with CM as classic with fixed lung governed demand valve Fix pneumatics (AE, AS, N, optional gauge cap) without coupling ( Section 2.3.6) AirGo...
-
Page 10: Harness
The frangible mounting with double buttons ensures a quick pulling out of an additional medium pressure line for supplying a second person with breathing air. This premium harness has additional ribbons to attach a mask/helmet combination. AirGo... - Page 11 To build the rescue seat (EN 1498, class B), an additional rappelling carabiner (according to EN 362) is required in the front loop of the belt. For this purpose MSA recommends the MSA steel Tri-Lock carabiner, tested and approved for use with an SCBA. It is an optional accessory and not included.
-
Page 12: Back Plate
Separator (D) Metal bracket to divide two cylinders to facilitate mounting of two cylinders and give guidance to cylinder strap. Transponder The back plate is equipped with a 125 kHz transponder (RFID chip) next to the label for easy identification. AirGo... -
Page 13: Pneumatic System
On the pressure reducer, there is a safety valve and the single line for connecting the manifold. The pressure reducer reduces the cylinder pressure to approx. 7 bar and the safety valve activates on non-permitted pressure rise to prevent damage insuring the continued supply of breathable air. AirGo... -
Page 14: Singleline Pneumatics
(signal whistle). It triggers a continuous warning signal when the cylinder pressure drops below 55±5 bar. The second connection connects a second lung governed demand valve (e.g. rescue set). 2.3.4. SingleLine SCOUT See additional manual SingleLine SCOUT. AirGo... -
Page 15: Option - Q - With Quick-Fill Coupling
On compressed air breathing apparatus with Quick-Fill couplings, the use of 200 bar compressed air cylinders is not possible. For further information please observe the separate Operation Manual for the Quick-Fill System (Part No. D4075049). AirGo... -
Page 16: Option - 3C/3N - With Additional Connections For Medium Pressure
Hence, the service time is considerably reduced. Always keep this in mind when using your apparatus. Option 3N is prepared for the connection of the following equipment: Compressed Breathing Apparatus without automatic switch valve and for use in a protective suite including decontamination process. AirGo... -
Page 17: Option - C3 - With Coupling System Alphaclick 2
2 has no built-in flow restrictor. Moreover, alphaCLICK 2 has a flat face design which keeps the components clean and operative. alphaCLICK 2 fits all standard breathable air valve threads [EN 144-2]. alphaCLICK 2 is only available for 300 bar: AirGo... - Page 18 Indicator ring with arrow alphaCLICK 2 cylinder adaptor 300 bar Fig. 9 alphaCLICK 2 cylinder adaptor 300 bar alphaCLICK 2 cylinder adaptor 300 bar The cylinder adaptor has to be screwed into a cylinder valve with a specific torque of 20-30 Nm. AirGo...
-
Page 19: Option - M - With Alphamitter (Short Distance Transmitter)
The power supply for the alphaMITTER is provided by 3 Alkaline batteries. Attention! The power supply should only be provided by certain types of battery for reasons of explosion prevention. For detailed information on the alphaMITTER Operating Manual for "alpha personal network". AirGo... -
Page 20: Classic Pneumatics
The pressure gauge indicates the momentary pressure in the connected and opened compressed air cylinders. Option – CM The option CM of the classic pneumatics has the same basic characteristics as the CL option, but can be operated with an alphaMITTER. AirGo... -
Page 21: Option - S - With Signal Line
Description 2.3.5.1. Option – S – with Signal Line Fig. 12 Option AirGo –S (here with additional medium pressure coupling) Pressure reducer Signal line Warning device (signal whistle) This option is equipped with a signal line. The warning whistle is on a separate signal line near the ear of the user where it can be heard well and easily identified as his own warning signal. -
Page 22: Option - Z - With Second Medium Pressure Line
Description 2.3.5.2. Option – Z – with Second Medium Pressure Line Fig. 13 Option AirGo -Z Pressure reducer Second medium pressure line High pressure line Coupling for second connection Medium pressure line There is a second medium pressure connection with safety coupling on the hip belt, which is closed off with a plug when not being used. -
Page 23: Option - Y - With Second Medium Pressure Line
Description 2.3.5.3. Option – Y – with Second Medium Pressure Line Fig. 14 Option AirGo -Y Pressure reducer Coupling for second connection Medium pressure line Second medium pressure line High pressure line There is a second medium pressure connection with safety coupling, which is closed off with a plug when not being used. -
Page 24: Option - Icu/Ics - Integrated Control Unit (With Or Without Key)
2.3.5.5. Option – C3 – with Coupling System alphaCLICK 2 For further information concerning the alphaCLICK 2 please refer to Section 2.3.4.3. 2.3.5.6. Option – M – with alphaMITTER (short distance transmitter) For further information concerning the alphaMITTER please refer to Section 2.3.4.4. AirGo... -
Page 25: Fix Pneumatics
It is not for use with PS full face masks. The AutoMaXX-AS lung governed demand valve is for use with positive pressure. It is fitted with a plug-in connector and suitable for full face masks 3S-PS-MaXX, Ultra Elite-PS-MaXX, 3S-H-PS-MaXX-F1, Ultra Elite-H-PS-MaXX-F1 and G1 PS-MaXX. AirGo... -
Page 26: Using The Compressed Air Breathing Apparatus
Preparing the Apparatus for Use with One Compressed Air Cylinder (1) Hinge down the cylinder separator that is in the middle of the cylinder support into a horizontal position until it catches. (2) If necessary, disconnect T-piece from high pressure socket of pressure reducer. AirGo... -
Page 27: Connecting One Compressed Air Cylinder
(5) Push compressed air cylinder through the cylinder strap (2) with the cylinder valve toward the pressure reducer so that it lies on the central support (3). (6) Thread cylinder valve onto pressure reducer, if necessary, bring the compressed air breathing apparatus with valve up into a vertical position. AirGo... -
Page 28: Pressure Reducer With Alphaclick 2
The threaded connection of the cylinder valve must be undamaged and free from dirt and debris. If the cylinder valve is damaged, remove it from service and return it to a MSA trained or certified repair technician. AirGo... -
Page 29: Connecting One Compressed Air Cylinder
(3) Bring cylinder separator (1) into a horizontal position opposite the cylinder buckle (4) until it catches. When fitting the compressed air cylinder on the coupling of the pressure reducer, it may tip down. In this case, support the pressure reducer with your hand. AirGo... - Page 30 If the strap tension is too low, re-adjust the strap length at the cylinder buckle ( Fig. 19). (12) Fasten end of the cylinder retaining strap onto Velcro strip. (13) Briefly open cylinder valve and check for escaping air, retighten if necessary. AirGo...
-
Page 31: Connecting Two Compressed Air Cylinders
(8) Loosely thread the second cylinder valve onto the T-piece. With right-angled T-piece, align the compressed air cylinders by hinging the pressure reducer and pulling the cylinders together (see Operating Manual for T-pieces). (9) Tighten all three high pressure connection handwheels. AirGo... -
Page 32: Pressure Reducer With Alphaclick 2
Attention! Never push the coupling system together using excessive force. (7) Close the coupling by pushing together using a "small amount" of force and checking that the arrow of the indicator ring is vertically aligned with the back plate. AirGo... -
Page 33: Donning The Compressed Air Breathing Apparatus
The pressure must not drop more than 10 bar in 60 seconds. (4) Carefully activate flushing mode of lung governed demand valve, closing exit port as much as possible. (5) Observe the pressure gauge. The warning signal must sound at 55±5 bar. AirGo... -
Page 34: Donning The Full Face Mask
Warning! The warning signal sounds when the air supply in the compressed air cylinders is reduced. In such cases, immediately leave the area, there is danger of air deficiency. AirGo... -
Page 35: Use Of Additional Connections For Medium Pressure
Warning! During duty, damping down the warning signal tone is not permitted. Remove the protective cap from the warning device again and push it onto the second connection after the SCBA Basic Apparatus has been removed. AirGo... -
Page 36: Filling With Quick-Fill
Danger! Do not throw off compressed air breathing apparatus. This could damage the valve and any remaining compressed air could escape suddenly. This could cause fatal injury to you or to any bystanders. (6) Remove compressed air breathing apparatus. AirGo... -
Page 37: Removing The Compressed Air Cylinders
(4) For compressed air cylinders with alphaCLICK 2 turn the handwheel on the coupling side (arrow 1) in a clockwise direction first ( Fig. 24) and then, when closed up to the stop, push downwards in the direction of the pressure reducer (arrow 2). AirGo... - Page 38 Do not remove the compressed air cylinder(s) from the cylinder strap or transport the compressed air cylinder(s) by the handwheel. This could accidentally open the cylinder valve. (5) Lift compressed air cylinder(s) at the valve and pull out of cylinder strap. AirGo...
-
Page 39: Maintenance And Care
Always use original parts from MSA. Repairs and maintenance must be carried out only by authorised service centres or by MSA. Changes to devices or components are not permitted and could result in loss of approved status. -
Page 40: Maintenance Intervals
3) Lubricate alphaCLICK 2 coupling every 500 coupling cycles at least (see maintenance manual). 4) Rubber components are subject to ageing with varying rates according to local conditions and must be checked and replaced at regular intervals. AirGo... -
Page 41: Cleaning
(“pull the dot”) that is designed to withstand extreme pressure on three sides without unlocking. When pulled on the fourth side where there is an indentation on the “pull the dot” button (back of tunnel), the fastener will release instantly. AirGo... - Page 42 Fig. 26 Pressure reducer with bumper Fig. 27 Pressure reducer with bumper and valve-protection U-Clip U-Clip Catch spring Catch spring Bumper Bumper with valve protection Axis Axis U-Clip and hoses are not to be removed after removing the pressure reducer. AirGo...
-
Page 43: Removing The Swivelling Plate
(1) Remove stop bracket (U-clip) from the back plate. (2) Remove the hip plate from the back plate. (3) Unbutton the hip belts from the swivelling plate ( Note in Section 4.3.3). (4) Assemble the hip belt and swivelling plate in the reverse order. AirGo... -
Page 44: Cleaning And Disinfection Of Automaxx On Fix Pneumatics
Push in safety clamp with a screwdriver, simultaneously push both operating buttons and pull off handwheel. With one hand push and hold down both operating buttons, with the other hand push together both snap-on hooks and push off the protective cap. AirGo... - Page 45 Push medium pressure line into housing till stop Push U-clip from the diaphragm side ( arrow in Fig. 31) into holes of housing till stops. The medium pressure line is secured. Fig. 31 Assembly medium pressure line AirGo...
- Page 46 Slide on handwheel until stopper. Attention! Observe the right seat of positive pressure spring in the guide of the diaphragm. Fig. 32 Handwheel assembly For further information please observe the separate Operation Manual for the AutoMaXX System (Part No. 10083261). AirGo...
-
Page 47: Changing The Straps And Belt
For removing the straps and the belt you must pull up the buckles slightly, tilt them and push them out of the slots in the back plate. 4.4.1. Changing the Shoulder Straps Fig. 33 AirGo pro harness Fig. 34 AirGo compact harness Line retainer... -
Page 48: Changing The Protection Tunnel
(2) Remove the protection tunnels from the shoulder strap. (3) Slide the protection tunnel under the shoulder strap and under the line retainer. (4) Place the line on the shoulder strap. (5) Close the “pull the dot” button and the double button. AirGo... -
Page 49: Changing The Holder For Mask/Helmet Combination
Holder for mask/helmet Combination left right (1) Loosen the buckle of the holder for mask/helmet combination. (2) Pull out the holder for mask/helmet combination. (3) Assemble in reverse order. 4.4.4. Removing the Rescue Grip Fig. 39 Rescue grip Rescue grip Back plate AirGo... -
Page 50: Changing The Hip Belt
(1) Thread the metal buckles and the belt as shown in Fig. 40 through the outer loops in the belt padding. (2) Thread the swivelling plate into the two inner loops of the belt padding. (3) Mount the metal buckles as shown at the swivelling plate. AirGo... -
Page 51: Option Pro Without Swivelling Plate
(2) Remove the hip belt from the back plate threading the back stops through the mounting slots. When assembling ensure that the pressure lines are located between the hip belt and the back plate. Ensure that the belt is fixed correctly by the back stops. (3) Assemble in reverse order. AirGo... -
Page 52: Changing The Cylinder Strap
(on the right hand side of the equipment carrier), then through the left hand slot in the back plate and then through the cylinder bracket - align the cylinder bracket vertically. (2) Push the Velcro strap onto the cylinder strap with the fluffy side facing outwards AirGo... -
Page 53: Short Cylinder Strap
- align the cylinder bracket vertically. (2) Push the Velcro strap onto the cylinder strap with the fluffy side facing outwards. 4.4.6.3. alphaBELT and alphaFP Information about changing can be found in the alphaBELT und alphaFP operating manuals. AirGo... -
Page 54: Visual, Function And Tightness Check
For detailed information of changing the batteries refer to the alpha personal network or ICU Operating Manual. Attention! Danger of injury! There is a danger of explosion since the batteries can cause sparks when being changed! Never change batteries in hazardous areas. AirGo... -
Page 55: Overhaul
They should never be disposed of in household waste. 4.9. Overhaul The overhaul of the pressure reducer may only be performed by MSA or an authorised service centre. Attention! Pressure reducers are completed with a lead seal. Where the lead seal is missing or damaged, it cannot be guaranteed that they are ready for use or that they correspond to the approval status. -
Page 56: Compressed Air Cylinders With Alphaclick 2
(1) Check that the cylinder valve is closed. (2) Thread the alphaCLICK 2 cylinder adaptor with a specific torque of 20-30 Nm into the cylinder valve. AirGo... -
Page 57: Filling Of Compressed Air Cylinders With Alphaclick 2
This can cause damage to persons and objects. (1) Release pressure from the filling panel. (2) Remove the blind plug from the alphaCLICK 2 coupling on the filling panel. (3) Attach the compressed air cylinder to the alphaCLICK 2 coupling and open the cylinder valve. AirGo... - Page 58 The cylinder adaptor releases from the alphaCLICK 2 filling coupling. (8) Remove compressed air cylinder from the alphaCLICK 2 filling coupling. (9) Secure the alphaCLICK 2 filling coupling with blind plug. AirGo...
-
Page 59: Accessories
6.2. Lung Governed Demand Valves / Full Face Masks The basic apparatus of the AirGo series are provided for use with various MSA lung governed demand valves and full masks. A list of compatible devices is given under Section 9.2. -
Page 60: Technical Specifications And Certifications
Body Number: 0158. ATEX BVS 05 ATEXH 027 X I M1 2014/34/EU ATEX II 1 G IIC T6 -30°C ≤ Ta ≤+60°C II 1 D 2014/68/EU The Declaration of Conformity can be found under the following link: https://MSAsafety.com/DoC AirGo... - Page 61 EN 1498 – Class A and C rescue loop alphaBELT Pro, Basic and Lanyard Usable up to a maximum load of 140 kg alphaFP EN 361 (Fall arrest) EN 358 (Work Positioning) EN 813 (Sit Harness) AirGo...
-
Page 62: Notes For Ordering
MSA. Example of an ATO Ordering Code: AirGo - MAX - SW - B - LG - R - D - CL - S - Z - * - C3 - * - ICS Electronic options... -
Page 63: Ordering Information
Ordering Information Ordering Information 9.1. Compressed Air Breathing Apparatus Description Part No. Basic Apparatus AirGo pro 10086571 (Preset: configuration AirGo PRO-*-B-LG-R-D-SL-*-*-*-*-*-*) Basic Apparatus AirGo compact 10086572 (Preset: configuration AirGoFix COM-*-*-AS-*) 9.2. Lung Governed Demand Valve Description Part No. Normal Pressure... -
Page 64: Compressed Air Cylinders
6,9 l/300 bar, filled 10055167 6,9 l/300 bar, empty 10055168 6,9 l/300 bar, filled, with ratchet valve 10055169 6,9 l/300 bar, empty, with ratchet valve 10055170 6,9 l/300 bar, filled, with flow restrictor 10072889 6,9 l/300 bar, empty, with flow restrictor 10072888 AirGo... -
Page 65: Accessories
D4075878 Quick-Fill line, 1 metre D4075929 Quick-Fill cylinder adaptor D4075971 Rescue kit in bag D4075720 Rescue kit in carry case D4075723 Rescue grip AirGo/AirMaXX 10152624 Upgrade-kit valve-protection AirGo 10145942 Chest strap D4075822 Respi-Hood, rescue hood 10045764 Standard medium pressure line... -
Page 66: Work Shop Accessories
2 filling couplings for filling panels 300 bar 10191332 (set including coupling 300 bar, blind plug, bushings for M 16 x 1.5 and G1/4 threads and seals) Filling panels with alphaCLICK 2 on request Test case Multitest ND 10073519 AirGo... - Page 67 Notes Notes AirGo...
- Page 68 For local MSA contacts, please visit us at MSAsafety.com Because every life has a purpose...
Need help?
Do you have a question about the AirGo and is the answer not in the manual?
Questions and answers
What is the life expectancy of a MSA Air go Pro, i understand it is 10 years, could you explain why.