Table of Contents
Advertisement
Quick Links
Advertisement
Table of Contents
Troubleshooting

Subscribe to Our Youtube Channel
Related Manuals for Landice M1


Summary of Contents for Landice M1
- Page 1 M1 Folding Treadmill Owner’s Manual Part Number: 4002...
-
Page 2: Contents M1 Folding Treadmill 1-Year Limited Parts Warranty
M1 Folding Treadmill 1-Year Limited Parts Warranty M1 Folding Treadmill 1-Year Limited Parts Warranty Landice Inc. (“Landice”) warrants to the original purchaser of the M1 Folding Treadmill (the “Treadmill”) that its parts are free from material defects when used for the purpose intended under normal conditions, provided it receives proper care and maintenance as set forth herein. - Page 3 Treadmill even if Landice has been advised of the possibility of such damages. This exclusion and limitation shall apply even if any remedy fails of its essential purpose.
-
Page 4: Important Safety Instructions
• Never operate treadmill if it has a damaged cord or plug, if it is not working properly, or if it has been damaged. Call Landice or certified service provider immediately for examination and repair. • Keep the power cord away from heated surfaces. Be sure the cord has plenty of slack and is not pinched under the treadmill. - Page 5 Important Safety Instructions SAVE THESE INSTRUCTIONS. Failure to observe the following warning WARNING statements can result in serious injury! • Do not use this product without first consulting your doctor if you suffer from any illness, condition, or disability that affects your ability to run, walk or exercise.
-
Page 6: Grounding Instructions
Do not modify the plug provided with the treadmill–if it will not fit the outlet, have a proper outlet installed by a qualified electrician. Landice is not responsible for injuries or damages as a result of cord or plug modification. -
Page 7: Before You Start The Treadmill: Safety
Grounding Instructions Before you Start the Treadmill: Safety The treadmill will not operate unless the red WARNING Emergency Stop switch is in the up position. During operation, pressing the switch down stops the treadmill. Emergency Stop Switch: Operating Position (up) Stopped Position (down) In an emergency, press the emergency stop switch to quickly stop the treadmill. -
Page 8: Table Of Contents
Contents Contents M1 Folding Treadmill 1-Year Limited Parts Warranty ......2 Important Safety Instructions..............4 Grounding Instructions................6 Before you Start the Treadmill: Safety ..........7 1. Introduction .................... 9 1.1. Before you Begin ................9 1.2. Treadmill Features and Controls ..........10 1.3. -
Page 9: Introduction
1. Introduction Your Landice treadmill is a high-quality fitness tool that will provide many years of fitness benefits. Unpleasant weather is no longer an obstacle to getting your exercise. Cold, windy, wet days will never discourage you again, nor will heat and humidity. -
Page 10: Treadmill Features And Controls
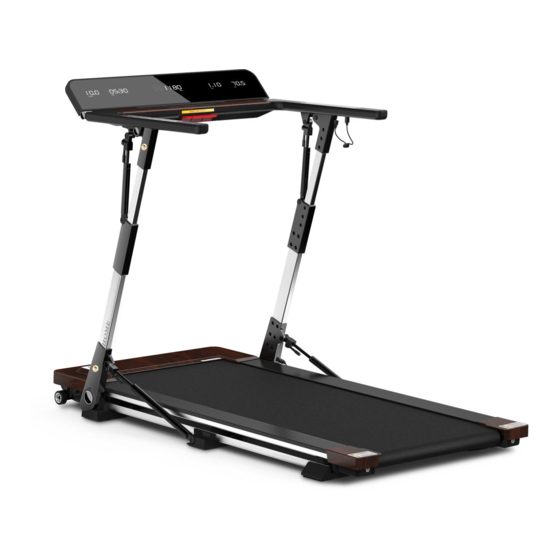
Introduction 1.2. Treadmill Features and Controls Table 1-1 Treadmill Features and Controls Item Description G_1, G_2 Handrails Audio Playback Audio input: Connect a phone through an connectors audio cable and use phone to control the playback. Audio output: Connect headphone cable if desired. -
Page 11: Treadmill Specifications
Introduction Table 1-1 Treadmill Features and Controls (Continued) Item Description Treadbelt/ The treadbelt/running surface has a four-point Running Surface suspension system that helps protect the user's knees. G_7, G_8 Side Straddles The strips on either side of the treadbelt provide a place for the user to safely stand during treadmill start-up or in an emergency. - Page 12 Introduction...
-
Page 13: Installation And Setup
2. Installation and Setup 2.1. Unpacking To avoid injury, use caution when moving WARNING and lifting the treadmill during unpacking and assembly. Place the treadmill carton on a flat level WARNING surface. Use care when handling and transporting the carton. Never open box when it is on its side. - Page 14 Installation and Setup Table 2-1 Carton Contents (Continued) Item Description Cardboard tray Treadmill Accessories: Owner's manual, Allen wrench, lubricant, power cord, audio cable 1. Ensure the carton top cover is upward. 2. Carefully cut the straps around the carton. Be careful! Straps are under tension. CAUTION CAUTION 3.
- Page 15 Installation and Setup 4. Using two people, remove the treadmill from the bottom cardboard tray. 5. Place the treadmill on a flat, clean, dry surface. Do not place it on a soft mat or thick carpeting. Treadmill is for INDOOR USE ONLY. Remove the molded foam and plastic sheeting.
-
Page 16: Unfolding The Treadmill
Installation and Setup 7. Put the molded foam and plastic sheeting back into the carton, and store packaging materials in a dry location. 2.2. Unfolding the Treadmill Follow the steps below to unfold the treadmill before use. The treadmill is shipped folded. It must be fully unfolded and all mechanisms locked into place before using. - Page 17 Installation and Setup See M1 video on our website Note: https://landice-folding-treadmill.com/pages/landice-m1- folding-treadmill-video 1. Rotate levers B_1 and B_2 at the bottom of left and right column outward as far as possible.
- Page 18 Installation and Setup 2. Grasp the ends of left and right handrails B_5 and B_6 and lift the handrails upward to unfold the treadmill uprights. 3. Return levers B_1/B_2 to the down position to lock the uprights in place after unfolding the treadmill.
- Page 19 Installation and Setup 4. Rotate levers B_3 and B_4 at the top of left and right columns outward to the limit position. 5. Grasp the ends of left and right handrails B_5 and B_6 and tilt the handrails downward until they are level. 6.
- Page 20 Installation and Setup 7. Grasp both sides of the display console B_7 and tilt the console up. Adjust to the desired angle (0 to 90 degrees). 8. Plug one end of supplied power cord into the power socket E_1 located on the front of the treadmill at the bottom. 9.
-
Page 21: Treadmill Operation
3. Treadmill Operation 3.1. Turning Power On/Off Do not use a voltage adapter or an WARNING extension cord with the treadmill. Never touch the power cord or power WARNING switch with wet hands. The treadmill must be used with the specified voltage; the power outlet must be grounded. -
Page 22: Power Off
Treadmill Operation 3.1.2. Power Off 1. Set power switch E_2 on the front bottom of the treadmill to the off position (O). 2. Unplug the power cord. If treadmill current becomes too high, the overload Note: protector E_3 automatically disconnects power to protect the controller and the motor. - Page 23 Treadmill Operation Table 3-2 Console Controls Item Description Volume- Button Press to reduce audio volume by 1 bar Press and hold to continually decrease volume Play/Pause Button Press to pause audio when it is playing. Press again to play audio when it is paused Volume+ Button Press to increase audio volume by 1 bar Press and hold to continually increase volume...
-
Page 24: Display Information
Treadmill Operation Table 3-2 Console Controls (Continued) Item Description Next Song Button: press to play the next song on the music list. START Button: Press to start the treadmill. The screen starts to display after 3 seconds. Stop Button: When the treadmill is in motion, press STOP at any time to stop the treadbelt. -
Page 25: Exercising On The Treadmill
Treadmill Operation 3.4. Exercising on the Treadmill Please read and follow these instructions carefully before using the treadmill. • The power can only be turned on after the treadmill is fully unfolded. Plug the power cord into the socket and turn on the power switch in front of the machine. -
Page 26: Playing Music
Treadmill Operation 3.5. Playing Music The treadmill accepts input from the user’s phone or music player. Connect phone through an audio cable to the treadmill’s audio input jack and use the phone to control the volume and playback. -
Page 27: Maintenance And Troubleshooting
Under no circumstances should the motor cover be removed except by a Landice factory-authorized technician. Always unplug the treadmill from the electrical WARNING outlet before cleaning or lubricating the treadmill. -
Page 28: Treadbelt Adjustment
Maintenance and Troubleshooting 4.2. Treadbelt Adjustment 4.2.1. Adjusting the Tension The treadbelt tension is set at the factory. The belt may stretch or be off-center after use. Stretching is normal during the break-in period. Grasp the handrails with both hands. With your WARNING left foot on the ground, try to stop the treadbelt with your right foot. -
Page 29: Lubricating The Treadbelt
Note: The buzzer beeps 5 times when the OIL prompt pops up. Use the silicone lubricant supplied with the treadmill. A Material Data Safety Sheet for the lubricant is available, please contact Landice. To apply lubricant: 1. Unplug the treadmill. -
Page 30: Storing The Treadmill
Maintenance and Troubleshooting 4. Plug the treadmill in. 5. Turn the treadmill on and operate at 1mph for 5-10 minutes. This will allow the lubricant to spread evenly across the treadbelt. 6. If some lubricant works its way onto the treadbelt, remove it using diluted dish detergent applied on a lint-free towel. - Page 31 Maintenance and Troubleshooting Figure 4-1. Folding the Treadmill 1. Hold the console C_1 with both hands and push it downward until it aligns with the handrails.
- Page 32 Maintenance and Troubleshooting 2. Unlock the handrails by rotating levers C_2 and C_3 at the top of left and right columns outward until they stop. 3. Fold the handrail assembly C_4 and C_5 down to the columns. Hold handrails until folding is completed. 4.
- Page 33 Maintenance and Troubleshooting 5. Rotate levers C_6/ C_7 at the bottom of left and right column fully outward. 6. Hold the ends of left and right handrails and press the uprights down to the walking board. Hold the handrails until uprights are folded completely down.
-
Page 34: Moving The Folded Treadmill
Maintenance and Troubleshooting 4.5. Moving the Folded Treadmill After folding the treadmill, follow these steps to move and store the treadmill if necessary. The treadmill can be moved easily using its wheels. To avoid injury, ensure the power switch WARNING is OFF and the power cord is unplugged prior to moving the treadmill. -
Page 35: Troubleshooting
Maintenance and Troubleshooting 2. After the treadmill is fully upright, move it to the desired location by rolling it on the two horizontal wheels D_3, located in front of the motor cover. Ensure treadmill is safely stored, will not fall over, obstruct points of exit and is not near heat sources. - Page 36 111 Canfield Avenue, Suite A-1, Randolph, NJ 07869 1-800-LANDICE Tel. 973-927-9010 · Fax 973-927-0630 www.landice.com...
Need help?
Do you have a question about the M1 and is the answer not in the manual?
Questions and answers