Samsung SBB-SSN User Manual
Digital signage player
Hide thumbs
Also See for SBB-SSN:
- Connection manual (11 pages) ,
- Quick setup manual (2 pages) ,
- Quick setup manual (6 pages)
Table of Contents
Advertisement
Quick Links
User Manual
SBB-SSN
The colour and the appearance may differ depending on the product, and the content in the
manual is subject to change without prior notice to improve the performance.
© Samsung Electronics
Samsung Electronics owns the copyright for this manual. Use or reproduction of this manual in parts or entirety without the authorization of Samsung Electronics is prohibited. Trademarks other than Samsung Electronics are
property of their respective owners.
Advertisement
Table of Contents

Related Manuals for Samsung SBB-SSN


Summary of Contents for Samsung SBB-SSN
- Page 1 © Samsung Electronics Samsung Electronics owns the copyright for this manual. Use or reproduction of this manual in parts or entirety without the authorization of Samsung Electronics is prohibited. Trademarks other than Samsung Electronics are property of their respective owners.
-
Page 2: Table Of Contents
Table of contents Before Using the Product Connecting and Using Player feature a Source Device Safety Precautions Player Safety symbols Viewing content Before Connecting Electricity and Safety When content is running Pre-connection Checkpoints Installation Available menu Connecting to an Audio System Operation File Formats Compatible with Player Cleaning... - Page 3 Table of contents OnScreen Display Network System Display Orientation Network Status Accessibility Onscreen Menu Orientation High Contrast Open Network Settings Enlarge Screen Protection Network Type Auto Protection Time Network Settings (Wired) Start Setup Network Settings (Wireless) Message Display Time Use WPS MDC Message Clock Set Download Status Message...
- Page 4 Customers) Not a product defect Terms & Conditions A Product damage caused by customer's fault 72 Reset All Others Licence Troubleshooting Guide Requirements Before Contacting Samsung Customer Service Centre Testing the Product Checking the Resolution and Frequency Check the followings.
-
Page 5: Before Using The Product
Chapter 01 Before Using the Product Safety Precautions The following safety instructions are to ensure your personal safety and prevent property CAUTION damage. Please read the following to ensure the proper use of the product. RISK OF ELECTRIC SHOCK. DO NOT OPEN. Safety symbols CAUTION: TO REDUCE THE RISK OF ELECTRIC SHOCK, DO NOT REMOVE COVER (OR BACK). -
Page 6: Electricity And Safety
Product failure, an electric shock or fire may result from a damaged Only use the power cable provided with your product by Samsung. Do not use the cable. power cable with other products. -
Page 7: Installation
If the product is installed in an unusual location, the surrounding environment may Keep the remote control batteries and the small accessories out of the reach of cause a serious quality problem. Therefore, be sure to contact Samsung Customer children. Ensure children do not swallow any of them. - Page 8 If foreign substances such as water enter the product, be sure to disconnect the Insert each battery so that its polarity (+, –) is correct. power cord. Then contact Samsung Customer Service Centre. If the polarity is not correct, the battery may rupture or the internal fluid may leak, •...
-
Page 9: Cleaning
Cleaning Warning Do not spray water or cleaner directly on the product. • The product’s surface may be damaged, or the markings may be erased. • An electric shock or fire may result. Caution When cleaning, be sure to disconnect the power plug and wipe gently with a soft and dry cloth such as superfine fibers or cotton flannels to prevent scratches. -
Page 10: Preparations
Chapter 02 Preparations Checking the Components " Contact the vendor where you purchased the product if any components are missing. " The appearance of the components may differ from the images shown. Warranty card Batteries (AAA x 2) " The RS232C adapter can be used to connect using the D-SUB(9-pin) to Quick Setup Guide Power cord... -
Page 11: Parts
Parts Buttons Description Power off the product. • With the control menu screen displayed, briefly press the power button to Power off Control menu move the cursor to Power off , and then press and hold the power button to turn off the product. -
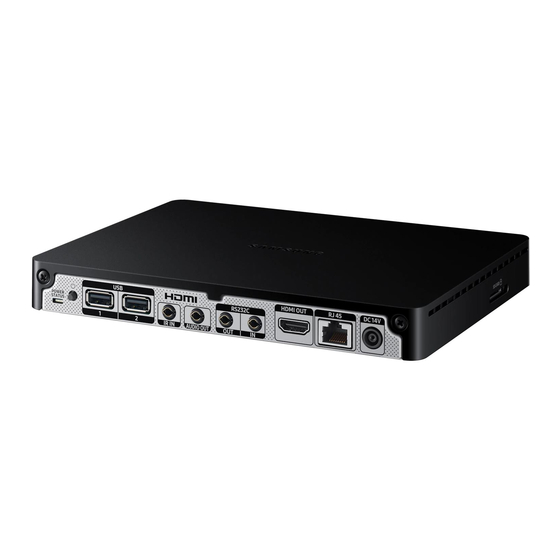
Page 12: Ports
Ports " The colour and shape of parts may differ from what is shown. Specifications are subject to change without notice to improve quality. SD CARD HDMI OUT RJ 45 DC 14V RS232C IR IN AUDIO OUT POWER STATUS Port Description Port Description... -
Page 13: Attaching To Display
Attaching to display " The colour and shape of parts may differ from what is shown. Specifications are subject to change without notice to improve quality. Align the short side of the mount Continue fitting the other side of the Fasten the screws (M4 x L8, S-Type). -
Page 14: Connecting To The Signage Player Box
Connecting to the Signage Player Box Connect the HDMI cable to the HDMI OUT ports on the Signage Player Box and the display. Press the SOURCE button on the remote control to change the input source to HDMI. " To view media in UHD resolution, use the supplied HDMI cable. "... -
Page 15: Remote Control
Remote Control " Using other display devices in the same space as the remote control of this product can cause the other display devices to be inadvertently controlled. " A button without a description in the image below is not supported on the product. Power on the product. - Page 16 Quickly select frequently used functions by Display information about the MagicInfo mode. pressing it while a content is playing. Move to the upper, lower, left or right menu, or adjust an option's setting. Confirm a menu selection. Return to the previous menu. Exit the current menu.
-
Page 17: Connecting And Using A Source Device
Chapter 03 Connecting and Using a Source Device Before Connecting Connecting to an Audio System " Connecting parts may differ in different products. Pre-connection Checkpoints " Make sure to connect the same colour connectors together. (white to white, red to red, etc.) "... -
Page 18: Changing The Input Source
Changing the Input source You can display the screen of a source device connected to the product. Select a source from source list to display the screen of the selected source. " The input source can also be changed by using the SOURCE button on the remote control. "... -
Page 19: Web Browser
If you enter a keyword in the URL/keyword input field, Web Browser will open the Search Set the website to display when the web browser is refreshed. Results page. Choose the search engine you want to use. • Samsung Display Custom • Google / Bing Custom Enter the URL to set as the home page. - Page 20 Privacy & Security Ask websites not to track you. Do Not Track • Use / Do not use Delete History Delete your entire browsing history. Allow all sites to run JavaScript for a better browsing experience. JavaScript • Use / Do not use Delete all browsing data such as cookies, cached images and Delete browsing data data.
-
Page 21: Multiple Display Control
Chapter 04 Multiple Display Control Control multiple display devices connected to a PC simultaneously. Cable Connection • Pin assignment 1 2 3 4 5 5 4 3 2 1 RS232C Cable Interface RS232C (9 pins) TxD (No.2), RxD (No.3), GND (No.5) Bit rate 9600 bps 6 7 8 9... -
Page 22: Lan Cable
LAN Cable • RS232C cable Connector: 9-Pin D-Sub to Stereo Cable • Pin assignment 1 2 3 4 5 6 7 8 -P2- -P1- -P1- -P1- -P2- -P2- STEREO Male type PLUG Pin No Standard Colour Signal (3.5ø) White and orange Orange White and green Blue... - Page 23 Cross LAN cable (PC to PC) • Connector : RJ45 Direct LAN cable (PC to HUB) RJ45 RJ45 Signal Signal RJ45 Signal Signal...
-
Page 24: Connection
Connection • Connection 2 " Ensure you connect each of the adapters to the correct RS232C IN or OUT port on the Monitor 1 Monitor 2 product. • Connection 1 Monitor 1 Monitor 2 Monitor 3 RJ45 RJ45 RJ45 RJ45 RS232C IN RS232C OUT RS232C IN... -
Page 25: Control Codes
Control Codes • All communications take place in hexadecimals. The checksum is calculated by adding up all values except the header. If a checksum adds up to be more than 2 digits as shown below (11+FF+01+01=112), the first digit is removed. Viewing control state (Get control command) E.g. - Page 26 Power control Volume control • Function • Function A product can be powered on and off using a PC. The volume of a product can be adjusted using a PC. • Viewing power state (Get Power ON / OFF Status) •...
- Page 27 Input source control Safety Lock • Function • Function The input source of a product can be changed using a PC. PC can be used to turn the Safety Lock On function on or off on a product. This control is available regardless of whether or not the power is turned on. •...
-
Page 28: Using Mdc
"Finish" to run the MDC programme immediately. For details on how to use the MDC programme, refer to Help after installing the programme. The MDC programme is available on the website. (http://displaysolutions.samsung.com) The MDC Unified shortcut icon will be created on the desktop after installation. -
Page 29: Player Feature
Chapter 05 Player feature Accessible using the button on the remote control. Player Description Select between internal or external memory. → Player → E Play content, templates and schedules configured on the server. Play a range of content such as channels with schedules assigned, templates or files. •... -
Page 30: When Content Is Running
When content is running Available menu Press the TOOLS button on the remote control during content playback to configure settings. Control buttons on the remote control Menu Description You can play, pause, or skip the content on the playlist by pressing buttons on the remote control. -
Page 31: File Formats Compatible With Player
File Formats Compatible with Player Sound output restrictions • More than one sound output cannot be used. • Supported file systems include FAT32 and NTFS. • Playback priority: network BGM → local BGM → video file in the main frame selected by the •... - Page 32 Content Frame rate Bit rate File Extension Container Video Codec Resolution Audio Codec (fps) (Mbps) *.avi 4096x2160: 30 H.264 BP/MP/HP *.mkv 3840x2160: 60 4096x2160 *.asf HEVC (H.265 - Main, Main10) *.wmv Motion JPEG 3840x2160 *.mp4 *.mov LPCM *.3gp ADPCM(IMA, MS) MPEG4 SP/ASP *.vro Window Media Video v9 (VC1)
- Page 33 Video Audio Image • 3D video is not supported. • Audio content with a Bit rate or Frame rate larger than the • Compatible image file format: JPEG, PNG, BMP rate specified in the table above can cause choppy audio •...
- Page 34 Power Point WORD • Compatible document file formats • Compatible document file formats • Compatible document file formats – Extension : ppt, pptx – Extension : pdf – Extension : .doc, .docx – Version : Office 97 ~ Office 2013 –...
-
Page 35: Schedule
Schedule You can check the schedule imported from a selected storage device. Description → Schedule → E Select the saved location of the schedule. Schedule Sunday, January 14 08:45 AM Create/Edit/Delete/View schedule of content playback. Schedule your content on a local channel. Internal Memory Send Delete... -
Page 36: Clone Product
Clone Product Export settings on the product to an external storage device. You can also import settings from an external storage device. This option is useful when assigning the same settings to several products. → Clone Product → E When a duplicate file is not found on the external storage device MENU Connect the external storage device, then run the Clone Product... -
Page 37: Id Settings
ID Settings Assign an ID to a set. Device ID → ID Settings → E Set a unique ID number for each product. (Range: 0~224) " Press u/d to select a number, and press E. " Enter the number you want using the number buttons on the remote control. Device ID Auto Set This feature automatically allots an ID number to a device connected via an RS232C cable. -
Page 38: Network Status
Network Status Check the current network and Internet connection. → Network Status → E Network Status " The displayed image may differ depending on the model. -
Page 39: On/Off Timer
On/Off Timer " You must set Clock Set before you can use this feature. On Timer → On/Off Timer → E On Timer so that your product turns on automatically at a time and on a day of your choice. The power is turned on with the specified volume or input source. -
Page 40: Off Timer
Off Timer Set the off timer (Off Timer) by making a selection from one of the seven options. (Off Timer 1 Off Timer • Setup: Select Off, Once, Everyday, Mon~Fri, Mon~Sat, Sat~Sun or Manual. If you select Manual, you can choose the days you want Off Timer to turn off your product. -
Page 41: Url Launcher
URL Launcher For details on how to use the URL Launcher feature, contact the dealer the product was purchased from. " To use the URL Launcher feature, set Play via URL Launcher in System. (m MENU → System → Play via →... -
Page 42: Url Launcher Settings
URL Launcher Settings " For details on how to use the URL Launcher feature, contact the dealer the product was purchased from. • Install Web App: Enter URL to install the web application. • Install from USB Device: Install the web application from the USB storage device. →... -
Page 43: Onscreen Display
Chapter 06 OnScreen Display Display Orientation Onscreen Menu Orientation Select whether the onscreen menu should be displayed in landscape or portrait orientation. m MENU → OnScreen Display → Display Orientation → E • Landscape: Display the menu in landscape mode. •... -
Page 44: Screen Protection
Screen Protection Auto Protection Time If the screen displays a still image for a certain period of time you define, the product activates the screen saver to prevent the formation of burnt in ghost images on the screen. m MENU → OnScreen Display →... -
Page 45: Language
Language Set the menu language. " A change to the language setting will only be applied to the onscreen menu display. It will not be applied to other functions on your PC. m MENU → OnScreen Display → Language → E OnScreen Display Language English... -
Page 46: Sound Adjustment
Chapter 07 Sound Adjustment Configure the Sound settings for the product. Sound Mode You can select a sound mode to suit your personal preferences. • Standard: Selects the normal sound mode. • Music: Emphasises music over voices. m MENU → Sound →... -
Page 47: Balance
Balance Auto Volume m MENU → Sound → Balance → E m MENU → Sound → Auto Volume → E Adjust speaker volume levels for sound balance optimisation. Automatically adjusts the volume level when you change video sources or content so the level remains the same. -
Page 48: Network
Chapter 08 Network Network Status Open Network Settings m MENU → Network → Network Status → E m MENU → Network → Open Network Settings → E You can check the current network and Internet status. Configure network settings to connect to an available network. Network Type •... -
Page 49: Network Settings (Wired)
Network Settings (Wired) • Depending on how your network is configured, you may be able to attach your product to your LAN by connecting the LAN port on the back of your product directly to a network wall outlet using a LAN cable. See the diagram below. - Page 50 Set the network connection to use Internet services such as perform software upgrades. How to set up manually Network Type Wired from the Open Network Settings page. Automatic Open Network Settings (Wired) The network test screen appears and the verification process starts. Press Cancel. The verification process stops.
-
Page 51: Network Settings (Wireless)
6. If you select the Pure High-throughput (Greenfield) 802.11n mode and the Encryption type is set to WEP, TKIP or TKIP AES (WPS2Mixed) on your AP or wireless router, Samsung products If the router has security, enter the Enter the password for (AP Name). - Page 52 Manual Network Setup (Wireless) How to set up manually Network Type Wireless from the Open Network Settings page. Offices may use static IP addresses. Network function searches for available wireless networks. When done, it displays a list If this is the case, ask the network administrator for the IP address, subnet mask, gateway and of the available networks.
-
Page 53: Use Wps
IPv6 Use WPS How to set up using Use WPS m MENU → Network → IPv6 → E Enable or disable IPv6. If your router has a Use WPS button, follow these steps. • Network Type Wireless from the Open Network Settings page. -
Page 54: Server Network Settings
→ E " For the MagicInfo Server user guide, visit the following website: http://displaysolutions. Select or enter a device name. samsung.com → Support → Resources → MagicInfo Web Manual. This name can be shown on network device over the network. •... -
Page 55: System
Chapter 09 System Accessibility High Contrast Set the background and font to high-contrast colours in Menu. Menu transparencies become opaque when the option is selected. m MENU → System → Accessibility → E • System Enlarge Accessibility Enlarge the size of the Menu area. •... -
Page 56: Start Setup
Start Setup Go through the initial setup steps like you did the first time you used this product. " Enter your 4 digit PIN number. The default PIN number is "0-0-0-0". If you want to change the PIN number, use the Change PIN function. -
Page 57: Time
Time You can configure Clock Set or DST. Configure various time-related settings. Clock Set m MENU → System → Time → E Select Clock Set. Select Date or Time, and then press E. Use the number buttons to enter numbers or press the up and down arrow buttons. Use the left and right arrow Time buttons to move from one entry field to the next. -
Page 58: Power Control
Power Control Network Standby This feature keeps the network power on when the product turns off. m MENU → System → Power Control → E • Power Button Power Control The power button on the remote control P can be set to turn on the power or turn on or off the power. Network Standby •... -
Page 59: Temperature Control
Temperature Control This function detects the internal temperature of the product. You can specify the temperature range that is acceptable. The default temperature is set to 77 °C. m MENU → System → Temperature Control → E The recommended operating temperature for this product is 75 to 80 °C (based on an ambient temperature of 40 °C). -
Page 60: Change Pin
Change PIN Change your 4-digit Personal Identification Number (PIN). Choose any 4 digits for your PIN and enter it in Enter a new PIN.. Reenter the same 4 digits in Enter the PIN again.. The product has memorised your new PIN. m MENU →... -
Page 61: Security
Security Safety Lock On " Enter your 4 digit PIN number. The default PIN number is "0-0-0-0". If you want to change the PIN number, use the Change PIN function. m MENU → System → Security → E " Change the PIN to keep your device secure. Turn Safety Lock On on or off. -
Page 62: Usb Auto Play Lock
MagicInfo Premium application and published to the USB device you are using. The MagicInfo Premium application programme is available on the Power On Button website. (http://displaysolutions.samsung.com) Button Lock " When published to a USB device, your Published Content is saved to Contents and Schedules folders in the root folder of the connected USB device. -
Page 63: General
General Smart Security The security provided to protect your display device and connected storage devices against viruses includes. m MENU → System → General → E Scan General Inspect your display device and connected storage devices to check for viruses. Smart Security Isolated List Frame Rate... -
Page 64: Reset System
Reset System Reset all system settings to default. m MENU → System → Reset System → E System Reset System " The displayed image may differ depending on the model. -
Page 65: Support
Software Update menu lets you upgrade your product software to the latest version. You can view the address of the Samsung website, the call centre phone number, your product's model number, software version, Open Source Licence and other information. " Be careful not to turn off the power until the upgrade is complete. The product will turn off and on automatically after completing the software upgrade. -
Page 66: Troubleshooting Guide
Chapter 11 Troubleshooting Guide Requirements Before Contacting Samsung Customer Service Centre Testing the Product " Before calling Samsung Customer Service Centre, test your product Check if your product is operating normally by using the product test function. as follows. If the problem persists, If the screen remains blank while the power indicator blinks even when the product is correctly connected to a PC, perform product testing. -
Page 67: Check The Followings
Check the cable connections. I see red, green, and blue. This issue may happen when the panel of the product is defective. Contact a Samsung Service Centre to resolve the issue. The screen may freeze when a resolution other than the recommended resolution is used or The display looks unstable and then freezes. - Page 68 Screen issue A scaled SD (4:3) content file can cause black bars on both sides of an HD channel screen. A video with an aspect ratio different from the product can cause a black bar to appear at the The screen cannot be displayed in full screen. top and bottom of the screen.
- Page 69 Remote control issue Make sure that the batteries are correctly in place (+/-). Check if the batteries are flat. The remote control does not work. Check for power failure. Make sure that the power cord is connected. Check for any special lighting or neon signs switched on in the vicinity. Source device issue A beeping sound is heard when my PC is booting.
-
Page 70: Specifications
Temperature: -20 °C – 45 °C (-4 °F – 113 °F) " For detailed device specifications, visit the Samsung Electronics website. Storage Humidity: 5% – 95%, non-condensing * Applicable before the product package is unpacked. -
Page 71: Preset Timing Modes
Preset Timing Modes Horizontal Vertical Pixel Clock Sync Polarity Frequency Frequency Resolution (MHz) (H/V) (kHz) (Hz) " This product can be set to only one resolution for each screen size to obtain the optimum picture quality due to the nature of the panel. Using a resolution other than the specified VESA, 800 x 600 46.875 75.000... -
Page 72: Appendix
External impact or drop. " When the service is requested, in spite of in warranty, we may charge you for a visit from a • Use of supplies or separatly sold product unspecified by Samsung. service technician in the following cases. •... -
Page 73: Licence
YOUR USE OF THIS PRODUCT IN CONNECTION WITH HEVC ENCODED CONTENT IS DEEMED ACCEPTANCE OF THE LIMITED AUTHORITY TO USE AS NOTED ABOVE. For information on the Open Source Licence Notice, contact the Samsung Customer Centre or send email to oss.request@samsung.com.
Need help?
Do you have a question about the SBB-SSN and is the answer not in the manual?
Questions and answers